This document details the steps involved in installing the Fusion Middleware and its components
1.1 Sources/Reference
This SOA Build document was prepared with input from the following sources:
- <URL>
1.2 Software Versions
Contents
- Oracle 11g Database installation. Version – 11.2.0.1
- Oracle Resource Creation Utility.
- Oracle Weblogic 10.3.2
- Oracle SOA Suite 11g 11.1.1.1.2
- Oracle Weblogic 10.3.0
- Oracle Service Bus 10.3.0
1.3 Installation Steps
1.3.1 Pre-requisites:
Performing the pre-installation tasks
1. Check the size of physical RAM
$ grep MemTotal /proc/meminfo
Note: During the installation it will say failed when it checks the available physical RAM is less than 900 MB , no problem even if you have less than 900MB (if it’s for testing purpose), you can continue with the installation.
2. Check the size of SWAP space
$ grep SwapTotal /proc/meminfo
3. Check the free disk space in “/tmp” directory
$ df -k /tmp
4. Check the free space available on the system
$ df –k
5. Checking the Software Requirements The version of Linux is installed
$ uname –a
6. Check the following required packages are installed.
binutils-2.15.92.0.2-18
compat-libstdc++-33.2.3-47.3
elfutils-libelf-0.97-5
elfutils-libelf-devel-0.97-5
glibc-2.3.9.4-2.19
glibc-common-2.3.9.4-2.19
glibc-devel-2.3.9.4-2.19
gcc-3.4.5-2
gcc-c++-3.4.5-2
libaio-devel-0.3.105-2
libaio-0.3.105-2
libgcc-3.4.5
libstdc++-3.4.5-2
libstdc++-devel-3.4.5-2
make-3.80-5
sysstat-5.0.5
unixODBC-2.2.11
unixODBC-devel-2.2.11
7. Configuring Kernel Parameters
Check the current parameters and values in /etc/sysctl.conf
Check the current parameters and values in /etc/sysctl.conf
# cat /etc/sysctl.conf
Note: Take a back up of this file before changing the values and parameters.
# cp –p /etc/sysctl.conf /etc/sysctl.conf.old
8. Check and add the below parameters in /etc/sysctl.conf
fs.file-max = 76800
kernel.shmall = 2097152
kernel.shmmax = 2147483648
kernel.shmmni = 4096
kernel.sem = 250 32000 100 128
net.ipv4.ip_local_port_range = 1024 65000
net.core.rmem_default = 4194304
net.core.rmem_max = 4194304
net.core.wmem_default = 262144
net.core.wmem_max = 262144
kernel.shmall = 2097152
kernel.shmmax = 2147483648
kernel.shmmni = 4096
kernel.sem = 250 32000 100 128
net.ipv4.ip_local_port_range = 1024 65000
net.core.rmem_default = 4194304
net.core.rmem_max = 4194304
net.core.wmem_default = 262144
net.core.wmem_max = 262144
9. To change the current values of the kernel parameters
# /sbin/sysctl -p
10. Make sure that the parameters and values in /etc/system file are set properly
# cat /etc/sysctl.conf
11. Check and set the following lines in the /etc/security/limits.conf file.
Note: Take a back up of this file before changing the values and parameters.
Note: Take a back up of this file before changing the values and parameters.
# cp –p /etc/security/limits.conf /etc/security/limits.conf.old
oracle soft nproc 2047
oracle hard nproc 16384
oracle soft nofile 1024
oracle hard nofile 65536
oracle hard nproc 16384
oracle soft nofile 1024
oracle hard nofile 65536
12. Add or edit the following line in the /etc/pam.d/login file, if it does not already exist
Note: Take a back up of this file before changing the values and parameters.
Note: Take a back up of this file before changing the values and parameters.
# cp –p /etc/pam.d/login /etc/pam.d/login .old
session required /lib/security/pam_limits.so
session required pam_limits.so
session required pam_limits.so
13. Configuring the Oracle User’s Environment
Check and change the contents of .profile or .lgoin files.
Check and change the contents of .profile or .lgoin files.
$ vi .bash_profile
1.3.2 Oracle Database 11g - Software Installation
1) Start OUI from the stage folder and below screen displays:
a. Unselect the check box for I wish to receive security updates via My Oracle Support & Click Next

2) From select Installation options dialog:
a. choose: install Database software only and Click Next.

3) From Node Selection dialog: select Single Instance database installation & click Next.

4) From Select Product language: select default English and click next.

5) From Select Database Edition Dialog Box: select Enterprise Edition click next.

6) From Specify Installation location dialog:
a. Enter values for oracle base: /oracle/oracle_base1
b. Enter values for software location : /oracle/oracle_base1/product/11.2.0.1/SOAD/db & click next.

7) From privileged Operating Systems Group:
a. Choose Database Administrator Group (OSDBA) : soadba
b. Database Operator (OSOPER) group : soadba & click next.

8) From Summary page:
a. Check the Summary list and click finish.

9) From Execute Configuration scripts dialog:
a. Open a terminal window.
b. Login as a root user.
c. Run the scripts.
d. Return to the below window and click ok.


10) Final Screen for Database installation.

1.3.3 Oracle Database 11g - DB Creation Steps
11) Start the DBCA. On the welcome screen click next.

12) On DBCA operations dialog:
a. Select Create a Database and click next.

13) On DBCA Database templates dialog:
a. Select General purpose or transaction processing and click next.


14) On DBCA Database identification dialog:
a. Enter global database name: soad.tdic.auh
b. Enter SID value: soad

15) on DBCA Management options dialog:
a. Unselect the Configure Enterprise manager & click next.

16) On DBCA Database credential dialog:
a. Choose use the same administrative password for All Accounts
b. Enter the password : S0ad3vdb$1 & click next.


17) on DBCA Database File Location:
a. Choose Storage type : File System
b. Storage location : /oradata/SOAD & Click Next.


18) on DBCA recovery Configuration dialog:
Select Specify Flash recovery area. & flash recovery area size: 3882 & click next


19) on DBCA Database content
Unselect sample schema and click next.

20) On DBCA Initialization parameter dialog:
a. On memory tab choose typical memory size SGA and PGA 1508 MB and choose Automatic memory management.


b. select tab character sets. Select use Unicode (AL32UTF8) & click next.


21) On DBCA Database storage: Create redo log groups
i. File name: redo01.log and directory /oradata/SOAD
ii. File name: redo02.log and directory /oradata/SOAD
iii. File name: redo03.log and directory /oradata/SOAD
iv. File name: redo04.log and directory /oradata/SOAD
v. File name: redo05.log and directory /oradata/SOAD.


23) Confirmation page before installation starts:

24) Database configuration Assistant:


25) Database creation complete page:

1.3.4 Oracle Resource Creation Utility - SOA Repository Creation Steps
1) Start RCU.
a. Go to /stage/SOA/rcuhome/bin
b. Run the rcu à ./rcu


c. Note: first time wait for installer to popup. Click Next button.

d. Select Create Radio button and Click on next button.

e. Enter Database Connection Details as below and click next button.
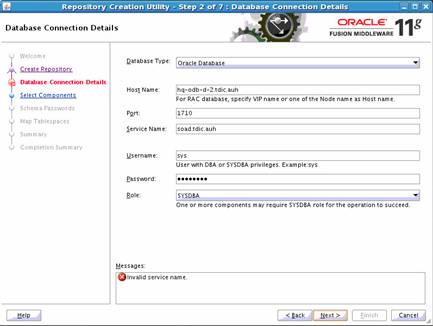
f. the below popup checks for the prerequisites.


g. Once Prerequisites completed, then click ok button.

h. Select the components which are going to use in the project.


i. Select the SOA and BPM infrastructure.

j. Specify Schema Passwords : S0ad3vdb$1 & click next.


k. Accept the defaults & click next.


l. Click ok to create the tablesapes.


m. Summary page check the values and click create.


n. Completion Summary check the values and click ok.

1.3.5 Oracle Weblogic 10.3.2 Installation Steps
1) Start Weblogic installation binary pack.
a. ./oepe111130_wls_linux32.bin


2) Oracle Installer starts installer for Oracle Weblogic 10.3.2.0
Click next.


3) on Choose Middleware Home Directory:
a. Choose Create a new Middleware Home radio button.
b. Enter Middleware Home Directory: /oracle/MW_HOME/product/wlserver_10.3 & click next.


4) Confirm the bypass initiation.


5) Registry for Security Updates screen unselects any option & click next.


6) On Choose install type select the Custom and click Next.


7) Choose products and components screen accept the defaults & click next.


8) On Select JDK Selection page choose both the bundles of jdk & click next.


9) Choose Product Installation Directories enter the below values:
i. Weblogic server: /oracle/MW_HOME/product/wlserver_10.3/wlserver_10.3
ii. Oracle Enterprise Pack for Eclipse: /oracle/MW_HOME/product/wlserver_10.3/oepe_11gR1PS1

10) On Installation Summary.
i. Check the values & click next.

11) Oracle Installer runs the installation with the below screen.

12) Once the Installation Completes check the below screen & click next.

1.3.6 Oracle SOA Suite 11g Installation Steps
1) Start. /runInstaller with JRE Location for the SOA Suite.


2) On Welcome Page read the Complete installation process & click next.


3) The below screen check the Prerequisite and displays the results automatically once the results display check & click next.


4) On Specify the Installation Location:


4) On Specify the Installation Location:
a. Enter the Oracle Middleware Home: /oracle/MW_HOME/product/wlserver_10.3
b. Oracle Home Directory:SOA_11.1.1.2 & click next.


5) On Installation Summary page check the details & click Install.

6) The Installation Progress display as below once complete click next.


7) Check the installation details from the below screen and click Finish.

1.3.7 Oracle SOA Suite 11g Domain Configuration Steps.
1) Go to /oracle/MW_HOME/product/wlserver_10.3/wlserver_10.3/common/bin
2) ./config.sh

3) Displays the Fusion Middleware Configuration wizard:
a. Select the Create a new Weblogic domain & click next.

4) on Select Domain Source screen:
a. Select the Oracle SOA Suite – 11.1.1.0 (SOA_11.1.1.2).
b. Select Oracle Enterprise Manager – 11.1.1.0 (Oracle_common).
c. Oracle WSM Policy Manager – 11.1.1.0 (Oracle_Common).
d. Oracle JRF Webservices Asynchronous Services – 11.1.1.0 (Oracle_Common).
e. Oracle JRF – 11.1.1.0 (Oracle_Common).
f. Weblogic Advances Web Services Extension – 10.3.2.0 (wlserver_10.3) & Click Next.

5) On Specify Domain Name and Location:
Enter Values as below:
a) Domain name: soa_domain
b) Domain location: /oracle/MW_HOME/product/wlserver_10.3/user_projects/domain
c) Application location: /oracle/MW_HOME/product/wlserver_10.3/user_projects/applications & click next.

6) On Configure Administrator user name and password screen:
Enter the values as
a) User name: Weblogic
b) User password: weblogic123
c) Confirm user password: weblogic123 & click Next.


7) On Configure Server Start Mode and JDK
a. Select the Development Mode for Weblogic Domain Startup Mode
b. Select JRockit SDK 1.6.0_14 @ /oracle/MW_HOME/product/wlserver_10.3 & click next.

8) On Configure JDBC Component Schema screen:
a. Enter the values as below
a) Choose all the component schema
b) Enter Schema password :
c) DBMS / Service: soad.tdic.auh
d) Host name: hq-odb-d-2.tdic.auh
e) Port: 1710 & click next.

9) On Test Component schema screen
a. Automatically the installer check the schema connections and displays the results when all the results are successful then click next.


10) On Select Optional Configuration screen.
a. Select the Administration Server and click next.

11) On Configure the Administration Server Screen:
a. Accept the Default values and Click next.

12) On Configuration Summary Page;
a. Check the details for the installed SOA Domain Configuration and click create.


13) Creating Domain screen monitor the progress once done click on done button.


1.3.8 Oracle Weblogic OSB 10.3 installation Steps.
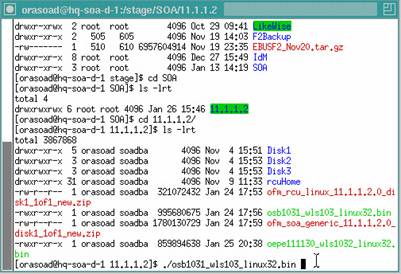
1) Start the OSB installation by starting the ./osb1031_wls103_linix32.bin from the stage area.
On the 100% of extraction complete then the installer starts the display.

2) Oracle Installer Displays the Welcome page, And click next.

2) On choose BEA Home Directory
a. Select Create a new BEA Home
b. BEA Home Directory value: /oracle/osb103/product/osb_home & click next.

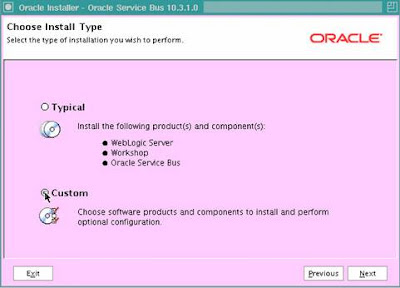
3) On Choose Install Type
a. Choose Custom and click next.

4) On Choose Products and Components Screen:
a. Accept the defaults and click next.

5) On JDK Selection Screen:
a. Select both the Bundled JDK and click Next.


6) On Install Eclipse Location Options
a. Click install Eclipse and click next.


7) Choose Product Installation Directories:
a. Weblogic Server:/oracle/osb103/product/osb_home/wlserver_10.3
b. Workshop:/oracle/osb103/product/osb_home/workshop_10.3
c. Oracle Service Bus:/oracle/osb103/product/osb_home/osb_10.3 & click next.


8) On Installation Summary Screen:
a. Check the installation Description and Click next.


9) On Installation complete screen check for the successful install message & click done.


1) Start the config.sh under /oracle/osb103/product/osb_home/wlserver_10.3/common/bin/


2) Select Create a new Weblogic domain from the Welcome screen.
3) From Select Domain Source screen Choose Oracle Service Bus option and Click next.

4) From Configure Administrator Username and password screen:
a. User name: Weblogic
b. User password: weblogic123
c. Confirm user password: weblogic123 & click Next.


5) From Configure Server Start mode and JDK
a. Weblogic domain start mode as development.
b. JDK bundle as Jrockit_1.6.0_05@/oracle/osb103/product/osb_home/wlserver

6) From Customize Environment and Services Settings
Select yes from settings defined for the domain.


7) Select Configure RDBMS Security Store Database
a. Accept the default and click next.

8) From Configure the Administration Server screen:
a. Change the Listen Port: 7021 and accept the rest & click next.


9) From Configure Managed Servers screen:
a. Accept the defaults and click next.

10) From Configure Machines screen:
a. Accept the default values and click next.


11) From Configure JDBC Data Sources:
a. Accept the defaults and click next.

12) From Run Database Scripts;
a. Accept the default values and click next.


13) From Configure JMS File Stores;
a. Accept the default and click next.

14) From Review Weblogic Domain screen:
a. Review the values, details and click next.


15) From Create Weblogic Domain screen:
a. Enter Domain anme: osb_domain
b. Domain location: /oracle/osb103/product/osb_home/user_projects/domains


16) Once Creating domain screen completes the installation click done.

OHS11g
Changing/ Starting OSH 11g on port 80 at Unix
This post covers steps to start OHS (Oracle HTTP Server) 11g on port 80 on Unix (To start any process on port < 1024 that process should run as ROOT).
Steps in this post assumes that you have standalone HTTP Server (No WebCache or WebLogic Server configured with this HTTP Server - If you have WebCache or WebLogic Server then change Origin Server setting in WebCache or some additional settings your applications)
On UNIX systems, if you change the Oracle HTTP Server Listen port number to a value less than 1024, you must enable Oracle HTTP Server to run as root, as follows:
1. Allow root to start HTTP Server
1.1Login as root
1.2 Run following command as root
cd ORACLE_HOME/ohs/bin
chown root .apachectl (Note* dot infront of apachectl which in Unix means this is hidden file)
chmod 6750 .apachectl
.

.
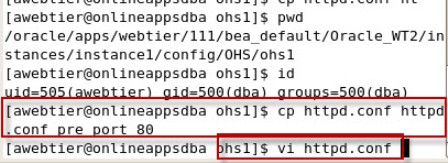
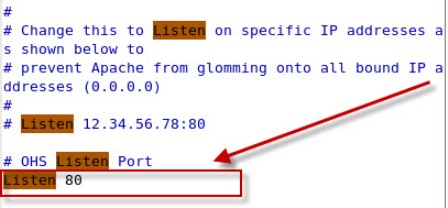
2. Change httpd.conf(using user owning OHS - awebtier in my case)
2.1Login as owning OHS 11g
2.2 cd $INSTANCE_HOME/config/OHS/ohs1 (INSTANCE_HOME for OHS by default is $MW_HOME/Oracle_WT1/instances/instance1)
2.3cp httpd.conf httpd.conf_pre_port_80
2.4 Change value against Listen to 80 (by default LISTEN value for OHS is 7777 or 7778 for OHS with webcache)
.
.
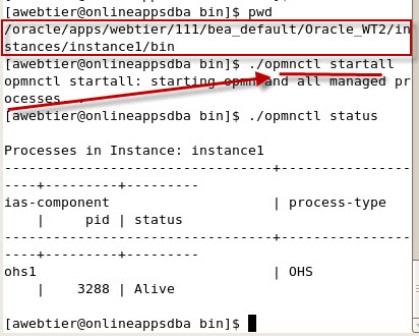
3.Start OHS using OPMN (using user owning OHS - awebtier in my case)
3.1cd $INSTANCE_HOME/bin (or $MW_HOME/Oracle_WT1/instances/instance1/bin)
3.2./opmnctl startall (stopall and startall if opmn is already running)
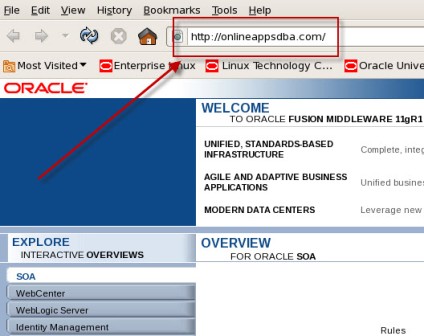
4. Test OHS via URL
4.1 Check if port 80 is listening on that machine “netstat -an | grep 80″
4.2 Type URL http://servername:80 (If you don’t specify port with http by default it takes port 80)
.

.
Changing/ Starting OSH 11g on port 80 at Unix
This post covers steps to start OHS (Oracle HTTP Server) 11g on port 80 on Unix (To start any process on port < 1024 that process should run as ROOT).
Steps in this post assumes that you have standalone HTTP Server (No WebCache or WebLogic Server configured with this HTTP Server - If you have WebCache or WebLogic Server then change Origin Server setting in WebCache or some additional settings your applications)
On UNIX systems, if you change the Oracle HTTP Server Listen port number to a value less than 1024, you must enable Oracle HTTP Server to run as root, as follows:
1. Allow root to start HTTP Server
1.1Login as root
1.2 Run following command as root
cd ORACLE_HOME/ohs/bin
chown root .apachectl (Note* dot infront of apachectl which in Unix means this is hidden file)
chmod 6750 .apachectl
.
.
2. Change httpd.conf(using user owning OHS - awebtier in my case)
2.1Login as owning OHS 11g
2.2 cd $INSTANCE_HOME/config/OHS/ohs1 (INSTANCE_HOME for OHS by default is $MW_HOME/Oracle_WT1/instances/instance1)
2.3cp httpd.conf httpd.conf_pre_port_80
2.4 Change value against Listen to 80 (by default LISTEN value for OHS is 7777 or 7778 for OHS with webcache)
.
.
3.Start OHS using OPMN (using user owning OHS - awebtier in my case)
3.1cd $INSTANCE_HOME/bin (or $MW_HOME/Oracle_WT1/instances/instance1/bin)
3.2./opmnctl startall (stopall and startall if opmn is already running)
4. Test OHS via URL
4.1 Check if port 80 is listening on that machine “netstat -an | grep 80″
4.2 Type URL http://servername:80 (If you don’t specify port with http by default it takes port 80)
.
.


No comments:
Post a Comment