OIM, OAM, LDAP, OID, DIP, OVD, OIF, SSO Installation & Configuration
.
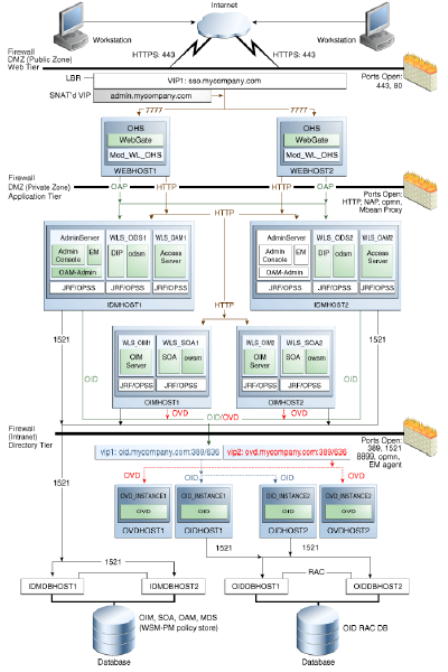
If you are planning to deploy Oracle Access Manager (OAM) 11g and Oracle Identity Manager (OIM) 11g in High Availability (Active - Active Cluster) then you can follow Oracle’s Enterprise Deployment Guide for Identity Management here and High Availability Guide for Oracle Fusion Middleware here
Oracle Identity and Access Management can logically be divided into three main categories
- Directory Service (OID, Virtual Directory, DIP)
- Access Management (Access Manager, Identity Federation, AS SSO, OeSSO)
- Identity Management (Identity Manager & DAS)
1) Directory Services - overview including OID, I have already covered in past at OID overview.
2) Access Management:
A) Access Manager - Controlling User Access to Enterprise resources. It also provides web based Identity Administration & access control to applications & resources. Provides User, password and group management. User access policies can be defined and enforced with high granularity.
B) Identity Federation - Allows companies to operate independently and enable cross domain user provisioning.
C) Single Sign-on - It provides built in integration with customer’s IM
and addressing key challenges (for cross domain access) like automatic mapping, identity mapping access control navigation.
D) eSSO - Enterprise SSO is upcoming product which provide true SSO for all application and resource in an enterprise, without modifying existing
applications.
3) Identity Management:
A) Identity Manager - Allows automated user identity provisioning and deprovisioning. Key features of Identity Manager are password management, workflow & policy management, Identity reconciliation, reporting and Auditing. Identity manager also supports attestation (confirming access rights by user or system manager periodically). This is requirement from SoX compliance.
B) DAS - Delegating Administrative Services provides trusted proxy based
administration at User or Administrator level.
What is available to download & Install ?
There are two packages available which you can download & install based on requirement
- Oracle Identity Management and Access Management Suite (OID, Virtual Directory, Access Manager, Federation and Identity Manager)
- Oracle Application Server Infrastructure Component (OID, DIP, SSO, DAS)
More on Oracle Access Manager (Formerly Oblix) including Webgate, Webpass, Access & Identity System and Policy Manager
This post covers overview & installation of Oracle Identity Management 11g, for 11g SOA Suite installation on Linux/Unix click here
Before I jump to isntallation of Oracle FMW 11g Identity Management, I am going to cover some basics
.
Oracle Identity Management overview in Fusion Middleware 11g R1
1. Oracle Identity Management consist of various products, here is list of Identity Management Product which are part of Fusion Middleware 11g Identity Management component
- OID - Oracle Internet Directory
- DIP - Directory Integration Platform
- OVD - Oracle Virtual Directory
- OIF - Oracle Identity Federation
other Oracle Identity Management products which are NOT part of Oracle Fusion Middleware 11g R1 are
- Oracle AS Single Sign-On
- Oracle Enterprise Single Sign-On - access management system
- Oracle Access Manager - access and identity management system
- Oracle Delegated Administrative Services (DAS)
- Oracle Identity Manager - Identity Provisioning software
- Oracle Role Manager - managing roles and entitlements
- Oracle Adaptive Access Manager - real-time fraud detection and multi-factor authentication
- Oracle Web Services Manager (OWSM)
- Oracle Entitlement Server - fine-grained entitlements management solution
3. You can select “Install Software Do not Configure” or “Install and Configure” option for Oracle FMW 11g Identity Management. (You can configure software later using $ORACLE_HOME/bin/config.sh )
.

.
4. Database for Oracle FMW Identity Management 11gshould be at-least 10.2.0.4 or higher for 10g , 11.1.0.6 or higher for 11g
.

.
5. Oracle Directory Services Manager (ODSM) - is Graphical Administrative Interface to manage Oracle Internet
6. There is NO 11gR1 version of Oracle AS Single Sign-On or Delegated Administrative Services (DAS) components. 11g OID is certified with 10g SSO/DAS hence you can upgrade existing 10g OID to 11g OID and continue using existing 10g SSO/DAS from 10g. For OID upgrade guide from 10g to 11g click here
.
Oracle Indentity Management 11g Installation Order
A. Prereq Steps
1. Ensure that all prereqs. are met (swap space, disk space, temp space, monitor/X server, kernel parameter, o.s. user/group creation)
For Linux add these entry in /etc/security/limits.conf (to set hard and soft file limit)
<os_user> hard nofile 4096
<os_user> soft nofile 4096
(replace os_user with o.s. user installing FMW 11g Identity Management)
B. Install Database
2. Install Oracle Database (10.2.0.4 or higher for 10g , 11.1.0.6 or higher for 11g)
2.1 set database processes atleast 500
SQL> alter system set processes=500 scope=both; (scope=both because I am using SPFile)
.
.
C. Install WebLogic Server
3. Install WebLogic Server ( OID can be installed with or without Weblogic). For other components like OVD/OIF weblogic is mandatory)
- Use Weblogic 11g (10.3.1) installer from here
This step will create Fusion Middleware Home (MW_HOME) & WebLogic Server Home (WLS_HOME), for more information on various HOMEs in Oracle Fusion Middleware 11g click here
.
.
D. Install Identity Management
4. Install Identity Management components - Download software from here and start installation by running runInstaller
4.1 Select Install and Configure
.
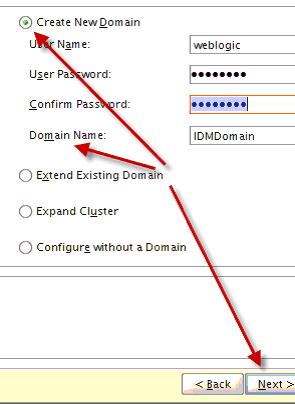
4.1 Create a new domain (If you already have domain and wish to use that domain for 11g IdM then select existing domain)
.
.
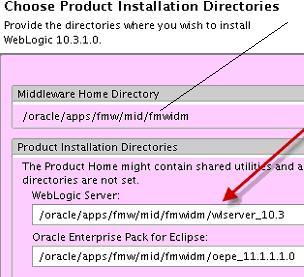
4.3 Select Installation Directory.
.
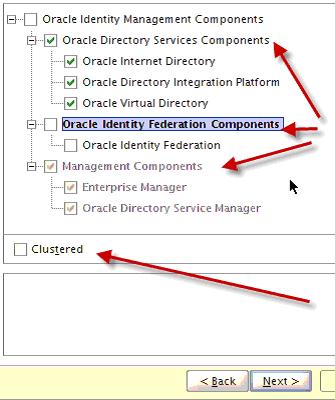
4.4 Select Identity Management Components (Directory Services and Identity Federation)
.
.
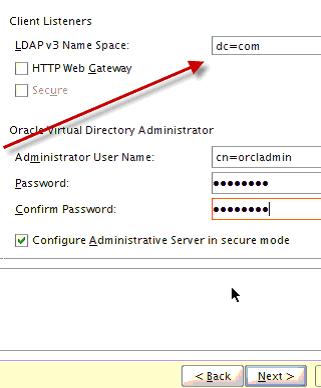
4.5 Select domain name/REALM for OID (Oracle Internet Directory)
.
.
4.6 Select Create Schema -
You can create schema in advance as well (by running RCU more information here)
.

.
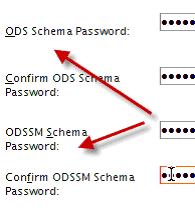
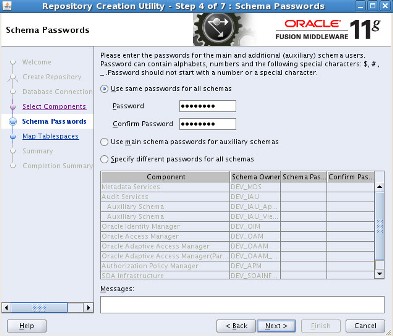
4.7 Select Schema Password
.
.
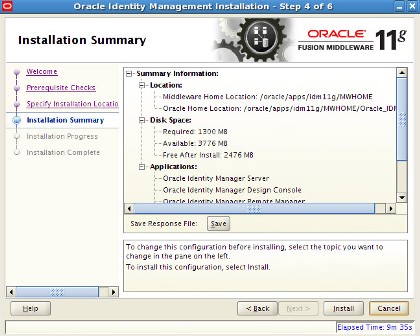
4.8 Check Installation Summary
.
.
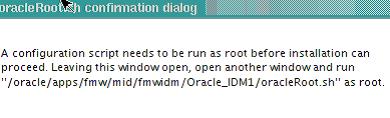
4.9 run oracleRoot.sh from root user (This is similar to root.shin database, oracleRoot.sh will call root.sh)
.
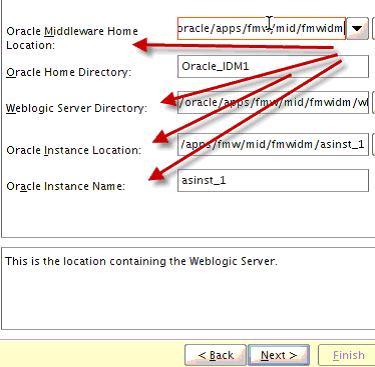
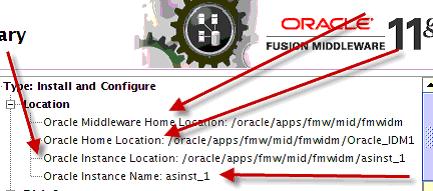
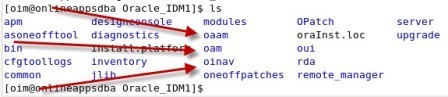
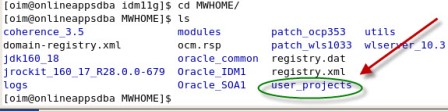
4.10 After installation, you will see Directory Structure like below under 11g Fusion Middleware Oracle Home

.
where
- asint1_1 is ORACLE_INSTANCE- contains runtime (configuration, log..) files for one or more System Components inthis case Oracle Identity Management
- Oracle_IDM1 is ORACLE_HOMEfor Oracle Identity Management - contains binaries (software) related to specific oracle middleware product in this case Oracle Identity Management
- wlserver_10.3 is WLS_HOME- contains binaries (software) for Oracle WebLogic Server
- user_projects - contains domain specific configuration/log files
For Identity Management 11g installation guide from Oracle visit
- Oracle Identity Management (OID, OVD, DIP, OIF) 11g Quick Installation Guide
- Oracle Identity Management 11g Installation Guide here
=====================================================================
Oracle Identity Management is Fusion Middleware Component which covers following Identity & Access Management software including Directory Server.
1. Oracle Access Manager (OAM) : Identity and Access Management product acquired from Oblix (Oblix COREid Access & Identity) more here here
2. Oracle Identity Manager (OIM) : User Provisioning product acquired from Thor more here
3. Oracle Role Manager (ORM) : Enterprise role management product acquired from Bridgestream more here
4. Oracle Web Services Manager (OWSM) : product to protect Web Services acquired from Oblix(Oblix COREsv) more here
5. Oracle Identity Federation (OIF): Broswer based cross domain SSO solution , combination of product acquired from Oblix(SHAREid) and Phaos
6. Oracle Enterprise Single Sign-On (eSSO) : Unified authentication and Single Sign-On to thin- and thick-client applications with no modification to existing applications. More here
7. Oracle Entitlements Server (OES) : fine-grained authorization software acquired from BEA(Aqualogic Entitlement Server). More here
8. Oracle Adaptive Access Manager (OAAM): real-time fraud prevention and multi-factor authentication acquired from Bharosa . More here here and here
9. Oracle Platform Security Services (OPSS): Security Framework for Java applications and part of Oracle Fusion Middleware 11g. OPSS is self-contained, portable framework that runs on Oracle WebLogic Server.
10. Identity Governance Framework (IGF) : software to control how identity-related information is used, stored and propagated between applications.
11. Oracle Information Rights Management (IRM) : secures and tracks sensitive digital information everywhere it is stored and used, More here
12. Oracle Identity Analytics (OIA) : Identity Intelligence product acquired from Sun (Sun Role Manager) more here
13. Oracle Single Sign-On (OSSO) : In-house developed web single sign-on product, required by Oracle 10g/11g Portal. Oracle Access Manager’s (OAM) single sign-on solution is recommended web single sign-on product.
Directory Services
.14. Oracle Internet Directory (OID) : LDAP compliant directory server more here and here
15. Oracle Virtual Directory (OVD): provides a single standard interface to access identity data from multiple directory servers like OID, iPlanet, Active Directory or Databases (Relational databases)
.
.
Access Management Software
1. Oracle Access Manager (OAM)
2. Oracle Entitlement Server (OES)
3. Oracle Adaptive Access Manager (OAAM)
4. Oracle Information Rights Management (IRM)
5. Oracle identity Federation (OIF)
6. Oracle Single Sign-On (OSSO)
.
Identity & Access Management Software1. Oracle Access Manager (OAM)
2. Oracle Entitlement Server (OES)
3. Oracle Identity Manager (OIM)
4. Oracle Internet Directory (OID)
5. Oracle Virtual Directory (OVD)
.
Acronyms related to Identity Management components
OIM - Oracle Identity Manager
ORM - Oracle Role Manager
OAM - Oracle Access Manager
OWSM - Oracle Web Services Manager
OIF - Oracle Identity Federation
eSSO - enterprise Single Sign-On
OES - Oracle Entitlement Server
OAAM - Oracle Adaptive Access Manager
ODS - Oracle Directory Services
OPSS - Oracle Platform Security Services
IGF - Identity Governance Framework
IRM - Information Rights Management
GRC - Governance Rick and Compliance platform
OID - Oracle Internet Directory
OVD - Oracle Virtual Directory
XACML - Extensible Access Control Markup Language
AAPML - Attribute Authority Policy Markup Language
SOAP - Simple Object Access Protocol
WSDL - Web Services Description Language
CARML - Client Attribute Markup Language
CSF - Credential Store Framework
OSDT - Oracle Security Developer Tools
JPS - Java Platform Security
SSPI - Security Services Provider Interface
JAZN - Java AuthoriZatioN
RBAC - Role Based Access Control
JACC - Java Authorization Contract for Containers
JAAS - Java Authentication and Authorization Service
OPSS - Oracle Platform Security Services
EUS - Enterprise User Security
DIP - Directory Integration Platform
LDAP - Lightweight Directory Access Protocol
SAML - Security Assertion Markup Language
ASA - Adaptive Strong Authentication
ARM - Adaptive Risk Management
SPML - Service Provisioning Markup Language
PSO - Provisioning Services Object
=================================================================
High Level Steps for OIM & OAM 11g installation
1)Install Oracle WebLogic Server 10.3.3 (aka Oracle WebLogic 11g R1 PS2)
2) Install Oracle Database (11.1.0.7+ or 11.2.X+)
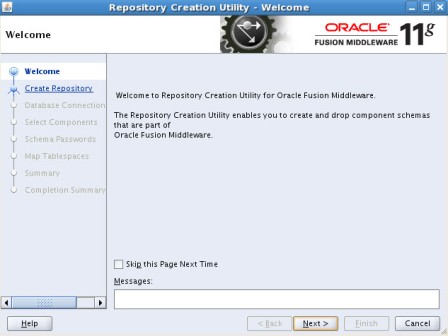
3)Run RCU (Repository Creation Utility) and load schemas
a) For OIM: Select Identity Management - Oracle Identity Manager, SOA Infrastructure schema, the User Messaging Service schema, and the Metadata Services .
b) For OAM : Identity Management - Oracle Access Manager, AS Common Schema - Audit Services.
- For more information on RCU click here
- More information on loading schema for OAM/OIM here
Note* For SOA 11.1.1.3.0 is patchset only where as 11.1.1.2.0 is base software.
Note* If you want just OAM (Oracle Access Manager) : SOA 11g is not required.
5) Install Oracle Identity Management 11g R1 (This step will create ORACLE_HOME for Identity Management- OIM & OAM)
- For more information on MW_HOME, ORACLE_HOME & DOMAIN_HOME click here
This step will create weblogic domain and deploy applications related to OIM , OAM & OIN.
- For more information on WebLogic Domain, Admin & Managed Server click here
==================================================================
step by step installation of Oracle Identity Management 11g R1 PS2 (11.1.1.3) for OIM, OAM, OAAM, OAPM & OIN. For steps on installing Oracle Identity Management 11g R1 (11.1.1.1) for OID, ODIP, OVD & OIF click here
.
OIM : Oracle Identity Manager
OAM : Oracle Access Manager
OAAM : Oracle Adaptive Access Manager
OAPM : Oracle Authorization Policy Manager
OIN : Oracle Identity Navigator
.
High Level Steps :
1. Download Software- Database, RCU, WebLogic, SOA, Identity & Access Management
2. Install Database 11g or 10g - not covered in this install series
3. Load Schema using RCU 11.1.1.3.2 +
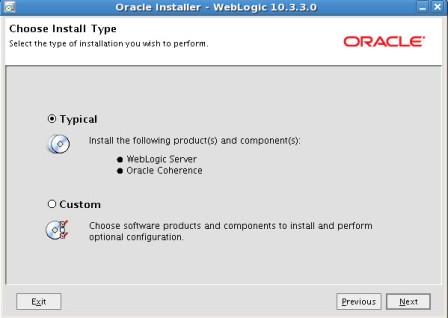
4. Install WebLogic 10.3.3
5. Install Oracle SOA 11.1.1.2.0 - Required only for OIM
6. Upgrade Oracle SOA to 11.1.1.3.0 - Required only for OIM
7. Install Oracle IDAM 11g R1 PS2 (11.1.1.3)
8. Create WebLogic domain using config.sh
9. Configure application OIM, OAM , OAAM, OAPM & OIM
.
1. Download Software
a) Download Database : Download Oracle Database from here
b) Download RCU (11.1.1.3.2) : Download RCU from here ensure to download version 11.1.1.3.2 or higher (OAM, OIM, OAAM & OAPM schemas are in this version of RCU)
c) Download WebLogic (10.3.3): Download WebLogic 10.3.3 from here (For 64 bit weblogic on 64 bit machines download jar file)
d) Download SOA suite - Download SOA 11.1.1.2 & 11.1.1.3 from here (SOA 11.1.1.3 is patchset only hence you would need both 11.1.1.2 & 11.1.1.3)
e) Download Identity & Access Management (IDAM) : Download IDAM 11.1.1.3 from here (Ensure that you download “Oracle Identity and Access Management” & NOT “Identity Management“)
.
Oracle IDAM 11g R1 PS2 (11.1.1.3.0) Part I - Load Schema using RCU
RCU - Repository Creation Utility is java based tool (available only for Windows and Linux) to create schema in Database. For basics on RCU (Repository Creation Utility) click here
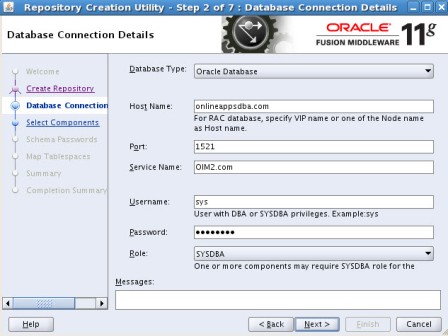
–Unzip RCU software and load schema as shown in below screenshots ensure that
- You use sysaccount or any user with sysdba privileges to database
- RCU version is minimum 11.1.1.3.2
- When you select OIM schema, RCU will automatically select SOA related schemas


.
Step by Step Installation of Oracle Identity Management 11g R1 PS2 (11.1.1.3.0) for OIM, OAM, OAAM, OAPM & OIN . Part I of this series here covers software location and steps to load schema in database.
After loading OIM/OAM/OAAM/OAPM schemas in database using RCU (covered in part I of this series here), next task is to install WebLogic Server version 10.3.3 (10.3.3 WebLogic is minimum release you must install for Oracle IdM 11g R1 PS2)
- Ensure that WebLogic Server is atleast 10.3.3 (If you already have 10.3.2 WebLogic then you could upgrade it to 10.3.3 and use for IdM 11g R1 PS2)
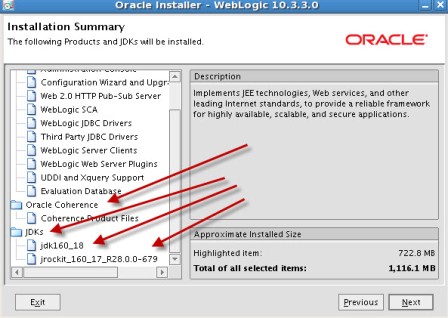
- Make sure that you download WebLogic Installer with Coherence (OAM makes heavy use of Coherence for user session data - In OAM 11g user sessions are state-ful with option to store user session in memory-cache or database. More on user session data in OAM11g coming soon …). For Oracle Coherence documentation click here
- If you are installing WebLogic/IdM on 64 bit Machine and wish to use 64 bit JDK/JVM then first install 64 bit JDK and then user WebLogic jar file to install WebLogic using “64bitJDK/bin/java -d64 -jar weblogic_1033_software.jar“ . More information here
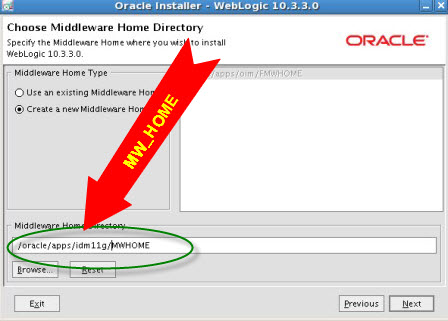
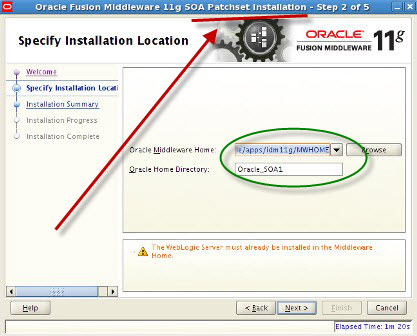
- Directory in which you are going to install WebLogic (in my case /oracle/apps/idm11g/MWHOME) is called as MW_HOME (Middleware Home). For more information on MW_HOME, ORACLE_HOME, DOMAIN_HOME or INSTANCE_HOME click here
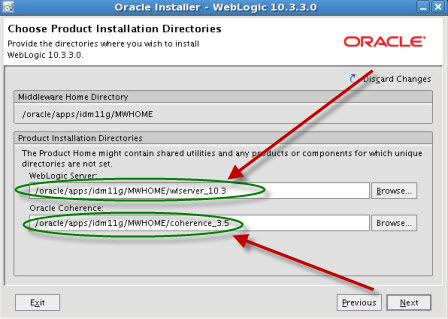
- Under MW_HOME you will see two directories wlserver_10.3 & coherence_3.5 known as WL_HOME & COHERENCE_HOME resp.
.


.
step by step installation of Oracle Identity Management (OAM, OIM, OAAM, OAPM & OIN) which covers SOA suite 11.1.1.2.0 installation and upgrade to SOA 11.1.1.3.0 .
For Part I Download Software and create Schema click here
For Part II Install WebLogic Server 10.3.3 click here
.
Various Homes used in this Post
- MW_HOME (Middleware Home) : /oracle/apps/idm11g/MWHOME (created during WebLogic Installation in part II of series)
- WL_HOME(WebLogic Home) : /oracle/apps/idm11g/MWHOME/wlserver_10.3 (created during WebLogic Installation in part II of series)
- Coherence Home: /oracle/apps/idm11g/MWHOME/wlserver_10.3 (created during WebLogic Installation in part II of series)
- SOA ORACLE_HOME : /oracle/apps/idm11g/MWHOME/Oracle_SOA1 (created during SOA Installation in part III of series)
- SOA suite is required only for OIM (Oracle Identity Manager) for workflows so if you DO NOT want OIM (installing just OAM, OAAM, OAPM or OIN) then it is safe to ignore this post (SOA is NOT required for OAM, OAAM, OAPM or OIN)
- SOA 11.1.1.3 is patch-set only where as SOA 11.1.1.2 is base release hence you should first install SOA 11.1.1.2 and then upgrade it to SOA 11.1.1.3
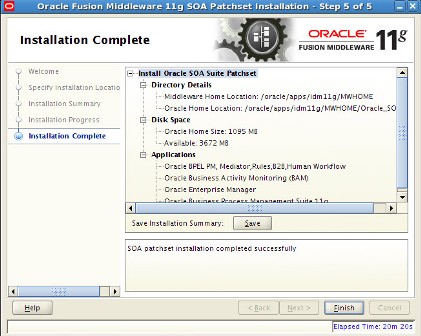
- SOA patch-set installation (from 11.1.1.2 to 11.1.1.3) includes updating binaries/software (using runInstaller as shown in this post) and upgrading SOA Schemas using PSA (Patch Set Assistant - more information on PSA here ). We are not going upgrade our SOA schema to 11.1.1.3 because We created SOA schema using 11.1.1.3.X RCU in Part I of this series here
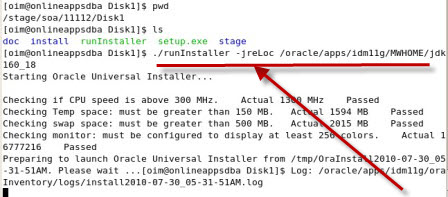
- SOA 11.1.1.2 is installed using runInstaller(on Linux/Unix) and would need JRE (Java Runtime Environment) Location which you can enter using option -jreLoc as shown in picture 1 below
- SOA patch-set 11.1.1.3 is also installed using runInstaller(from 11.1.1.3 SOA patch-set) and would need JRE Location.
- For JRE location on 32 bit machines use JDK or JRockit (under MW_HOME)
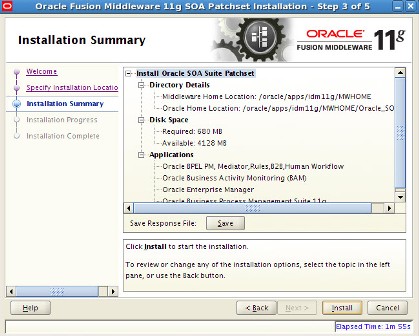
- Install SOA suite 11.1.1.3 patch-set under same ORACLE_HOME directory (Oracle_SOA1) and same Middleware Home in which you installed SOA 11.1.1.2 software.
- For any installation issues check logs at oraInventory/logs where location of oraInventory directory mentioned in oraInst.loc . For location of oraInst.loc click here, more information on oraInventory in Oracle here
Screenshot of Oracle SOA 11.1.1.2 Installation


.
.
Screenshot of Oracle SOA 11.1.1.3 Patchset Installation
.


.
step by step installation of Oracle Identity Management (OAM, OIM, OAAM, OAPM & OIN) which covers Identity and Access Management 11.1.1.3.0 .
- For Part I Download Software and create Schema click here
- For Part II Install WebLogic Server 10.3.3 click here
- For Part III Install SOA Server and Upgrade to 11.1.1.3 click here
.
Key points for OIM 11.1.1.3 installation
- IDAM 11.1.1.3 is installed using runInstaller (on Linux/Unix) from IDAM software and would need JRE (Java Runtime Environment) Location which you can enter using option -jreLoc as shown in picture 1 below
- For JRE location on 32 bit machines use JDK or JRockit(under MW_HOME) and for 64 bit Machine use pre-install 64 bit JDK location (Sun or JRockit)
- For any installation issues check logs at oraInventory/logs where location of oraInventory directory mentioned in oraInst.loc. For location of oraInst.loc click here, more information on oraInventory in Oracle here

.
- When prompted for Middleware Home, Enter directory which you created during WebLogic Installation in Part II of this series here

.
After IDAM installation you should see three ORACLE_HOMEs under MW_HOME
- oracle_common - This Oracle_Home contains Java Required Files ()
- Oracle_SOA1 - This Oracle_Home contains SOA related Files
- Oracle_IDM1- This Oracle_Home contains IDAM (oam, oim, oaam, oapm & oin) related Files

.
- Under IDAM Oracle_Home you will see binaries/software for IDAM components like OAAM, OIN
.
step by step installation of Oracle Identity Management (OAM, OIM, OAAM, OAPM & OIN) which covers creating domain for Identity and Access Management 11.1.1.3.0 .
- For Part I Download Software and create Schema click here
- For Part II Install WebLogic Server 10.3.3 click here
- For Part III Install SOA Server and Upgrade to 11.1.1.3 click here
- For Part IV Install IDAM 11.1.1.3 click here
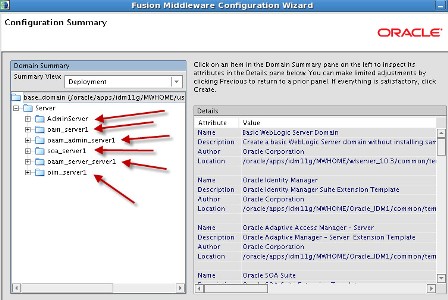
a) Admin Server listening on port 7001
b) oim_server1 listening on port 14000
c) oam_server1 listening on port 14100
d) oaam_admin_server1 listening on port 14200
e) oaam_server_server1 listening on port 14300
f) soa_server1 listening on port 8001
More on Domain in WebLogic Server here
.
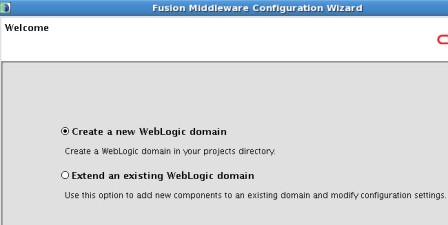
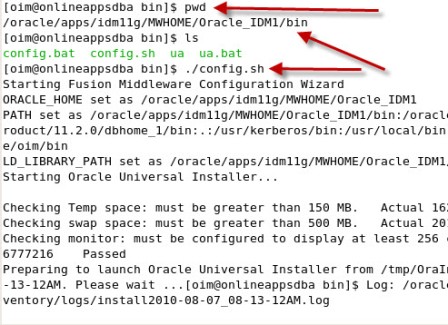
Start configuring domain by running config.sh under $ORACLE_HOME/common/bin (where ORACLE_HOME is for Identity Management in which you installed OIM, OAM, OAAM, OIN, OAPM in Part IV of this Series) :
Note* : config.sh under $ORACLE_HOME/bin is to configure OIM server and not to create Domain

.
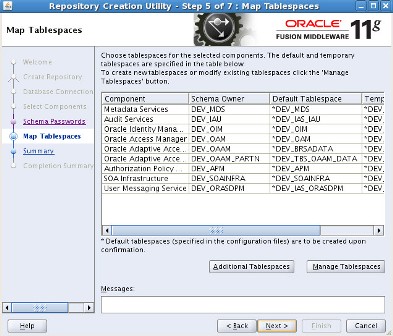
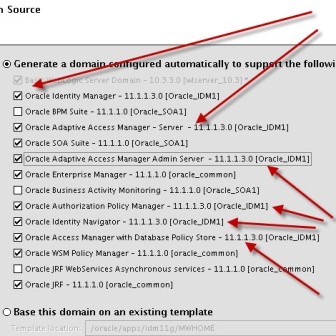
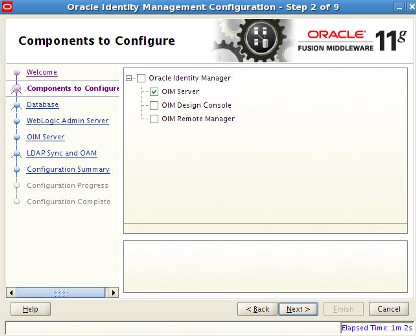
Select components which you wish to install (Some components are dependent on other components like OIM uses SOA for Workflow)
.
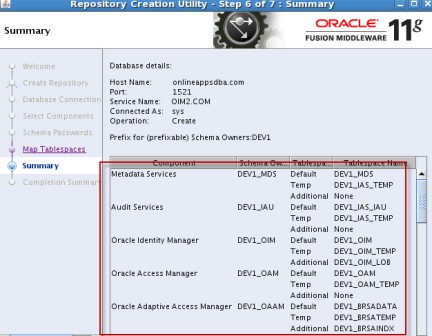
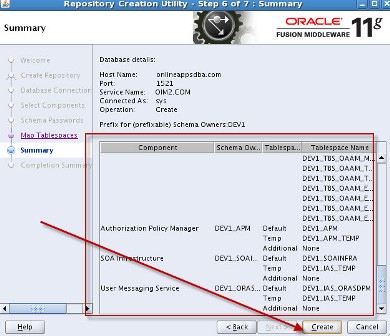
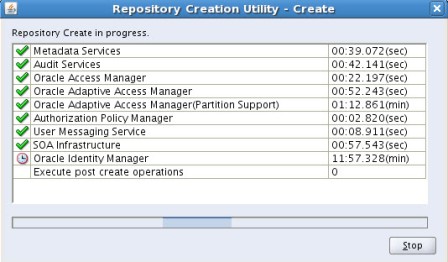
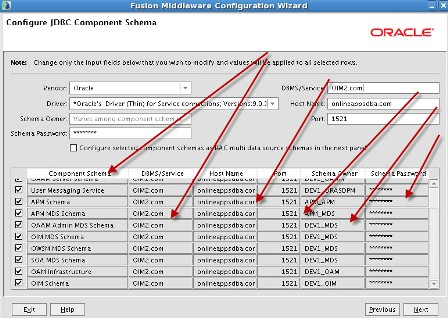
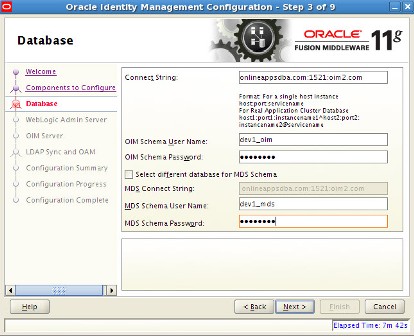
Enter database schema details here (schemas which you created in Part I Load Schema)
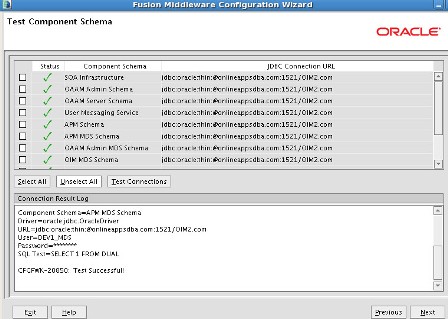
.
- Below screen is to customize severs (configure cluster, settings…) during install time. (It is possible to change all these steps later too.)
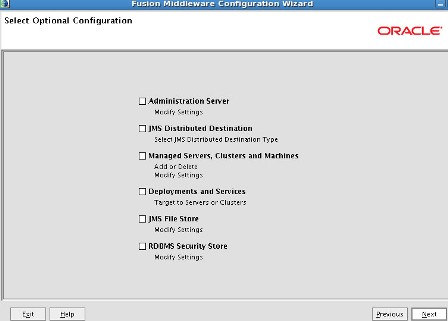

.
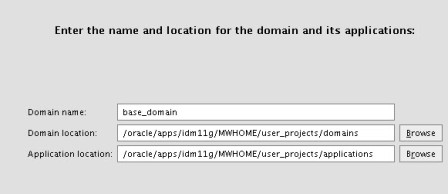
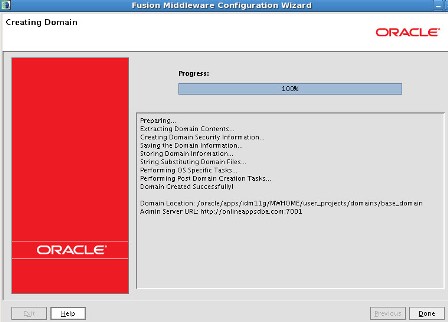
- After creating domain you should see directory user_projects(default location is under MW_HOME). WebLogic related configuration, log, start-stop, application and all run time files are under this directory
.
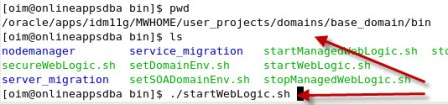
- Start Admin Server from $DOMAIN_HOME/bin/startWebLogic.sh (Default DOMAIN_HOME location is $MW_HOME/user_projects/domains/base_domain)

.
wait till you see listening on [IP]:7001 on console

.
- Login to console using http://serverName:7001/console (user weblogic/[password]) where username/password is one you entered during domain creation

.
- click on Servers in console to see list of servers running
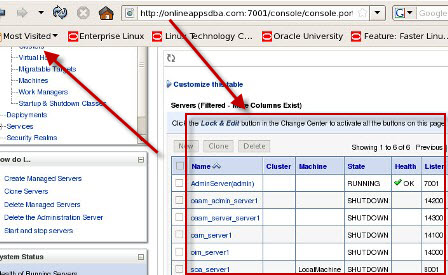
.
step by step installation of Oracle Identity Management (OAM, OIM, OAAM, OAPM & OIN) which covers configuring Oracle Identity Manager 11.1.1.3.0 .
Oracle Identity Manager (OIM) is User Provisioning and User Management component of Oracle Identity Management 11g.
- For Part I Download Software and create Schema click here
- For Part II Install WebLogic Server 10.3.3 click here
- For Part III Install SOA Server and Upgrade to 11.1.1.3 click here
- For Part IV Install IDAM 11.1.1.3 click he
- For Part V Create Domain for OIM, OAM, OAAM, OAPM & OIN here
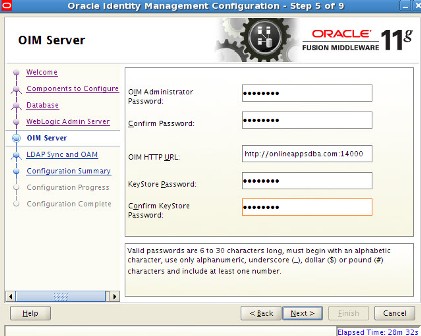
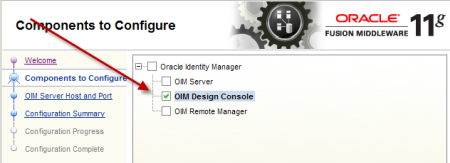
- Select OIM Server (OIM Design Console is design time tool used by developers and available only on Windows).
- Enter OIM/MDS schema details which We created in Part I of this series here
- Enter WebLogic Admin Server URL (Admin Server should be running at this stage). Default Port for WebLogic Admin Server URL is 7001
- T3 is Oracle’s proprietary protocol used by WebLogic to transport data between WebLogic Server and other Java Programs
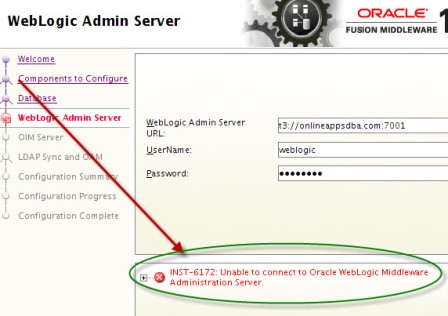
- If WebLogic Admin Server is not running then start Admin Server
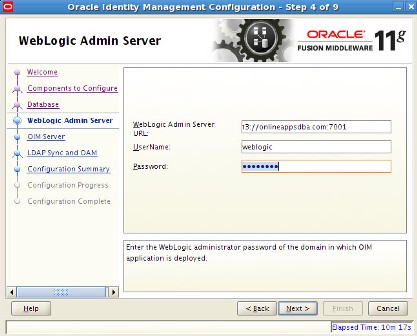
- Enter OIM Administrator Password (xelsysadm is OIM Administrator user)
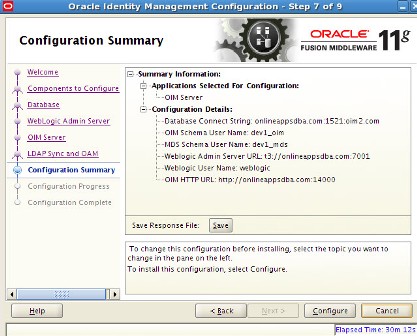
- Enter OIM HTTP URL (Default OIM Managed Server Port number is 14000)
- You can configure standalone OHS (Oracle HTTP Server) in-front of WebLogic Server using steps mentioned here
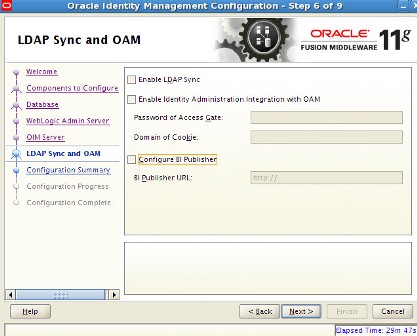
- For time being don’t select anything here (We will enable OIM for LDAP Sync and integrate with OAM later)
- Integration of OIM with OAM provides Single Sign-On (SSO) and Access Management features provided by Oracle Access Manager(OAM)
- Restart WebLogic Admin Server (stopWebLogic.sh & startWeblogic.sh)
- Start OIM Managed Server using startManagedWebLogic.sh where oim_server1 is name of OIM Managed Server
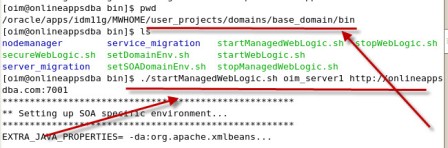
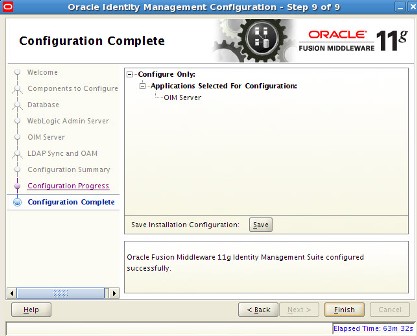
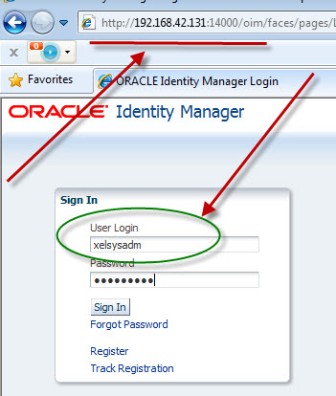
- Access OIM Admin Server using http://servername:OIM_Port/oim (default OIM Managed Server Port is 14000)
- OIM Admin User-name is xelsysadm and password you entered during OIM configuration screen above
.
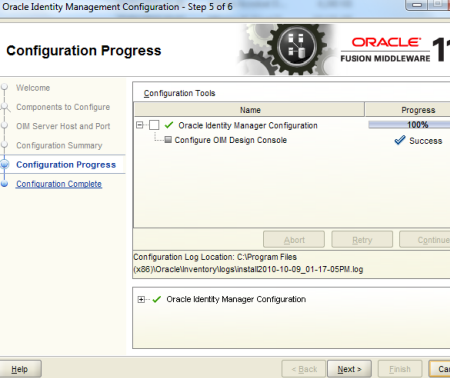
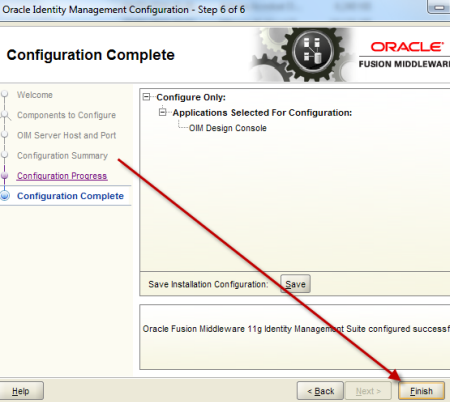
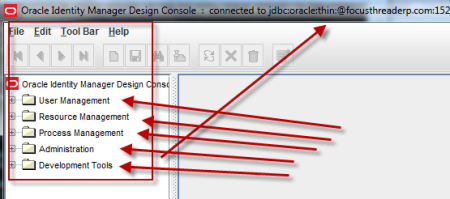
step by step installation of Oracle Identity Management (OAM, OIM, OAAM, OAPM & OIN) which covers configuring OIM Design Console 11.1.1.3.0 .
OIM Design Console : is thick client used by developers and system administrators (OIM Design Console is supported only on Windows Machine) and used to configure system settings.
- For Part I Download Software and create Schema click here
- For Part II Install WebLogic Server 10.3.3 click here
- For Part III Install SOA Server and Upgrade to 11.1.1.3 click here
- For Part IV Install IDAM 11.1.1.3 click he
- For Part V Create Domain for OIM, OAM, OAAM, OAPM & OIN here
- For Part VI Configure Identity Manager click here
Things good to know about OIM Design Consle
- OIM Design Console is supported on Windows Only
- You can install OIM server on one machine and OIM design console on different machine
- If you are installing/configuring just OIM Design Console then SOA or WebLogic server is NOT require on machine on which you are installing OIM Design Console (all you need is JRE and Identity and Access Management software)
- If you install Oracle IDAM 11.1.1.3 without weblogic server, you will get warning like below (click Yes when prompted)

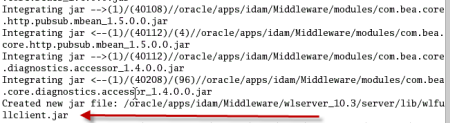
- You must create wlfullclient.jar on OIM server and copy it to $ORACLE_HOME\designconsole\ext directory on OIM Design Console machine
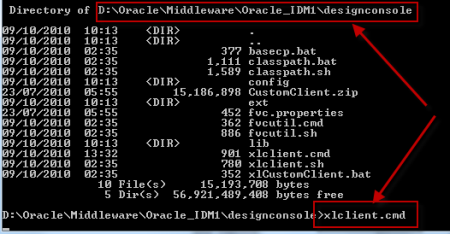
- Script to start OIM Design Console is xlclient.cmd in $ORACLE_HOME\designconsole
- User name to login to OIM design console is xelsysadm and password is one you entered during OIM Server confguration (This password could be different from WebLogic user password) .
1. Make sure you have JRE (1.6 or higher) installed on machine on which you are planning to install/configure OIM design console (If you don’t have JRE 1.6 you can download standalone JRE from Sun/Oracle website orinstall WebLogic and use JRE shipped with WebLogic)
2.Install Oracle Identity and Access Management 11.1.1.3 Software (This will create filesystem for IDAM and ORACLE_HOME)
3.Start $ORACLE_HOME/bin/config.bat , select OIM design Console
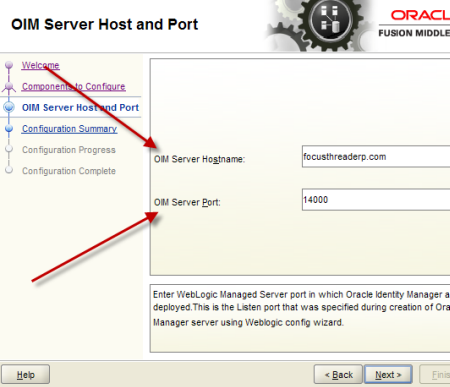
4.Enter OIM server hostname and port (default OIM server portis 14000. OIM server and WebLogic Admin Server should be running at this stage)
5. Create wlfullclient.jar on OIM server (Do this on OIM Server and NOT on OIM design console)
- cd $MW_HOME\wlserver_10.3\server\lib
- java -jar $MW_HOME/modules/com.bea.core.jarbuilder_1.5.0.0.jar (ensure that you have java 1.6 in classpath)
6.Copy wlfullclient.jar from server to $ORACLE_HOME\designconsole\ext directory on Design Console Machine
7.Start OIM design console from $ORACLE_HOME\designconsole\xlclient.cmd
8.Login to Design Console using xelsysadm user
.
OIM Design Console Configuration Screens
.

step by step installation of Oracle Identity Management (OAM, OIM, OAAM, OAPM & OIN) which covers configuring LDAP Sync with OIM 11g.
LDAP Sync with OIM 11g : OIM will sync users to LDAP (OID in this case) . OIM LDAP Synchronization will use OVD/OID to synchronize users from OIM to OID. LDAP Sync is mandatory for integration of Oracle Identity Manager (OIM) with Oracle Access Manager (OAM) .
- For Part I Download Software and create Schema click here
- For Part II Install WebLogic Server 10.3.3 click here
- For Part III Install SOA Server and Upgrade to 11.1.1.3 click here
- For Part IV Install IDAM 11.1.1.3 click he
- For Part V Create Domain for OIM, OAM, OAAM, OAPM & OIN here
- For Part VI Configure Identity Manager click here
- For Part VII Configure OIM Design Console click here
Requirement : OIM (11g R1) LDAP Sync requires Oracle Virtual Directory (OVD) and Oracle Internet Directory. (In this release of OIM, LDAP sync is limited to OID server)
What happens when you configure LDAP Sync in OIM 11g ? - Configuration process creates schema (objectclass) in OID for OIM & OAM. It also creates a IT Resource in OIM which will automatically synchronize user in OID when you create/modify/delete user in OIM.
.
High Level steps for LDAP Sync configuration with OIM
1. Run LDAP Pre Configuration Setup (on OIM Server)
2. Create two adapters in OVD (on OVD via ODSM)
3. Run LDAP Post Configuration Setup (on OIM Server)
.
OIM LDAP Sync configuration
1. Run LDAP Preconfiguration Utility
1.1 Edit $OIM_ORACLE_HOME/server/ldap_config_util/ldapconfig.props and add OIMProviderURL, OIDURL, OIDAdminUsername, OIDSearchBase, UserContainerName, RoleContainerName, ReservationContainerName
ReservationContainerName - This is container name in OID in which users will stay who are created but not approved in OIM (once they are approved they will be moved to container represented by UserContainerName)
1.2 Set WL_HOME & JAVA_HOME
1.3 Run $ORACLE_HOME/server/ldap_config_util/LDAPConfigPreSetup.sh (when prompted enter password of orcladmin)
Above command will
a) Extend OID schema using (More on OID Schema here )
i) oimadminuser.ldif, oimcontainers.ldif from $ORACLE_HOME/server/ldap_config_util
ii) OID_oblix_schema_add.ldif, OID_oblix_schema_index_add.ldif, OID_oblix_pwd_schema_add.ldif from $ORACLE_HOME/oam/server/oim-intg/schema/ (Oblix Schema extenstion is required for OIM integration with OAM)
b) Create user oimadmin under cn=oim,cn=products,cn=oracleContext
____________
2. Create two LDAP adapters in OVD
To know more about adapters in OVD click here
2.2 Create adapter of type user_OID
2.2.1 Login to ODSM to connect to OVD (If you have installed OVD with default settings then use SSL port 8899 for OVD). More on ODSM here
2.2.2 Select Adapter tab in ODSM
2.2.3 Click Create Adapter button
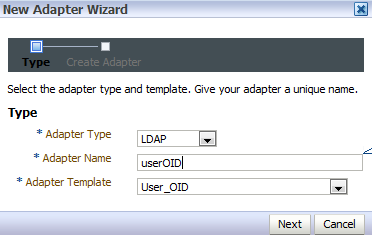
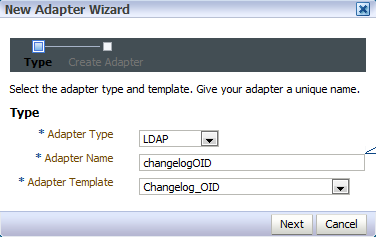
2.2.4 In new Adapter Wizard select
Adapter Type : LDAP
Adapter Name : userOID
Adapter Template : user_OID
.

.
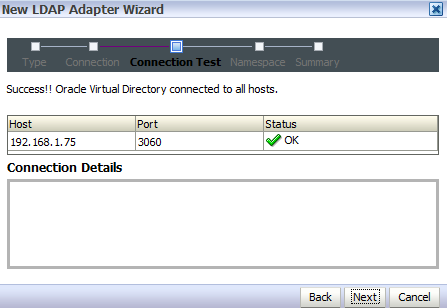
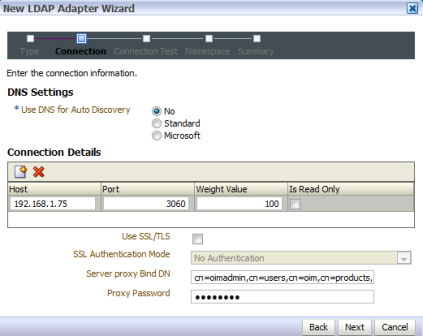
Add OID details under connection details (3060 is OID Port and 192.168.1.75 is OID Server IP)

.
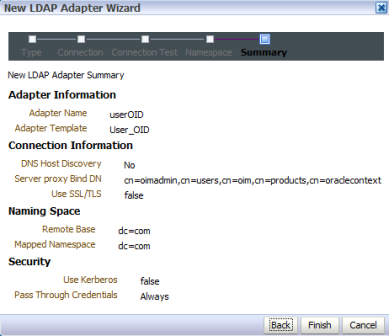
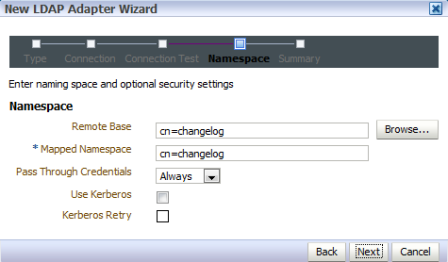
Naming Space : dc=com (Realm Name aka OID domain in my case is com - Change this as per your OID settings)
.
.
2.3 Create Adapter of type changelog_OID
2.3.1 Select Adapter tab in ODSM
2.3.2 Click Create Adapter button

.
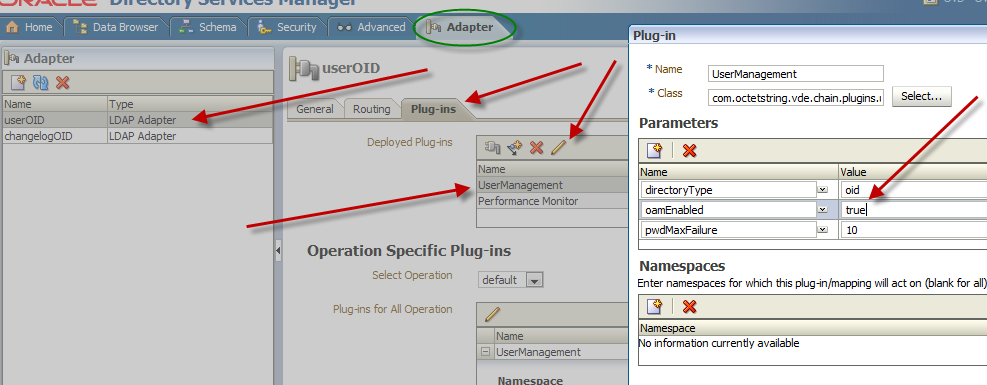
2.3 Change plug-in value (oamEnabled) of userOID adapter from false to true
2.3.1 From ODSM login to OVD -> Select Adapter -> select userOID -> Select tab Plug-ins -> Select UserManagement -> Select Edit Plug-in/Mapping -> Change value of oamEnabled from false to true -> click OK -> Click Apply
.
.
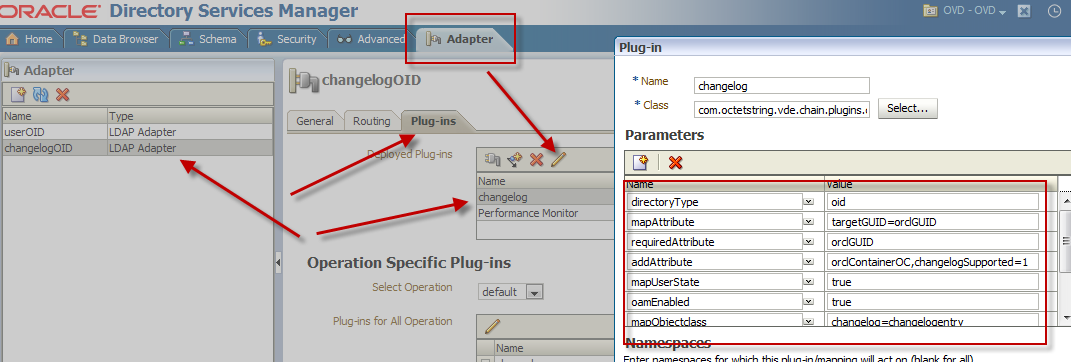
2.4 Add/Modify plug-in parameter for changelogOID adapter
2.4.1 From ODSM login to OVD -> Select Adapter -> select changlogOID -> Select tab Plug-ins -> Select UserManagement -> Select Edit Plug-in/Mapping -> Change/Add value of parameter as shown below -> click OK -> Click Apply
directoryType - oid
mapAttribute - targetGUID=orclGUID
requiredAttribute - orclGUID
addAttribute - orclContainerOC,changelogSupported=1
modifierDNFilter - cn=oimadmin,cn=users,cn=OIM,cn=Products,cn=OracleContext
sizeLimit - 1000
targetDNFilter - dc=com (Change this value as per your OID realm/domain)
mapUserState - true
oamEnabled - true

.
___________
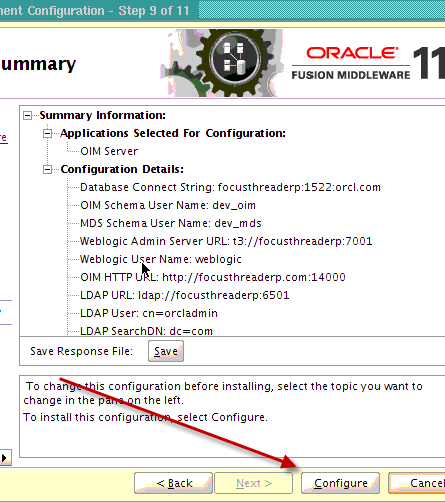
3. Configure OIM for LDAP Synch
3.1 Run $ORACLE_HOME/bin/config.sh
3.2 Select OIM Server, follow post here with exception of step 6 of 9
.

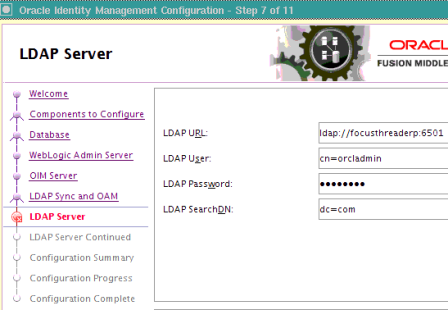
6501 is OVD’s non SSL LDAP Port .

.
Realm/domain for OID in my case is dc=com (change this value as per your OID realm)
.
.
_________________
4. Run LDAP Post-Configuration Utility
4.1 Set WL_HOME & JAVA_HOME
4.2 Run $ORACLE_HOME/server/ldap_config_util/LDAPConfigPostSetup.sh (when prompted enter password of orcladmin & OIM Administrator i.e. XELSYSADM - OIM Managed Server oim_server1 should be running)
You should see message like “Succesfully Update Changelog based schedule jobs with change number : XXXX”
________________
5. Test LDAP Sync configuration
5.1 Login to OIM Administration Console (http://oimserver:14000/oim) and create a user
5.2 Login to OID via ODSM and check if this user is synchronized to OID
I encountered two issues while running LDAPConfigPostSetup.sh
Error 1 :
____________
javax.security.auth.login.LoginException: unable to find LoginModule class:
weblogic.security.auth.login.UsernamePasswordLoginModule at
javax.security.auth.login.LoginContext.invoke(LoginContext.java:808) at
javax.security.auth.login.LoginContext.access%content0(LoginContext.java:186) at
javax.security.auth.login.LoginContext.run(LoginContext.java:683) at javax.security.auth.login.LoginContext.invokePriv(LoginContext.java_____________
Fix 1 : Create wlfullclient.jar . More information here
.
.
Error 2:
__________
java.lang.NullPointerException
at oracle.iam.platformservice.utils.
LDAPConfigPostSetup.updateLDAPSync
ScheduleJobs(LDAPConfigPostSetup.java:168)
at oracle.iam.platformservice.utils.LDAPConfig
PostSetup.main(LDAPConfigPostSetup.java:95)__________
Fix 2 : Make sure that OIM is configured with LDAP Sync option (Follow step 3) before running LDAPConfigPostSetup.sh
.
References/Related
- OIM/OAM integration
- Setting up LDAP Synchronization with OIM
- Creating adapters in OVD
- 1163093.1 Running LDAPConfigPostSetup script Leads to Exception: unable to find LoginModule class.
“How to integrate Oracle WebLogic Server with OID (Oracle Internet Directory) for user Login/Authentication”
By Default Oracle WebLogic Server uses security realm with name “myrealm” that uses embedded LDAP server (two default users WebLogic & OracleSystemUser) that acts as data store for Authentication, Authorization, Credential Mapping and Role Mapping Provider.
You can view Embedded LDAP Server configuration from WebLogic Console Page (/console) : Domain -> Security -> Embedded LDAP Server
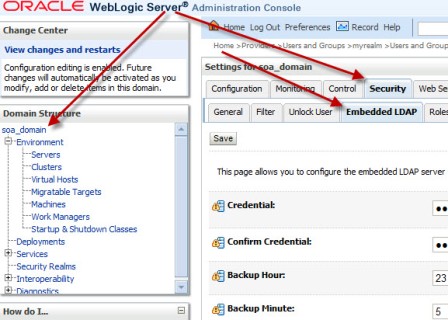
.
If you wish to login to WebLogic Server using users in Oracle Internet Directory (more on OID here) or allow access to your WebServices to users in OID (OWSM Policy) then you will have to define new Authentication Providers in your WebLogic realm (myrealm) . Authentication Provider supported by WebLogic are LDAP, RDBMS, Windows NT, SAML, Password Validator, Identity Assertion etc..
Before I jump to step by step OID (LDAP) authentication provider configuration for WebLogic, lets first check few important things
1.You can configure one or more (minimum one) Authentication Provider in a security realm in WebLogic.
2. For multiple Authentication Providers, they are called in order in which they were configured in the security realm.
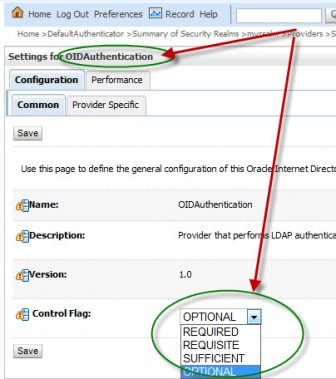
3. Control Flag: (as shown in 4th image from top) is used to control how authentication providers are used in login sequence. These are also called as JAAS control flag and values are : REQUIRED , REQUISITE, SUFFICIENT, OPTIONAL
REQUIRED - The Authentication provider is always called, and the user must always pass its authentication test. Regardless of whether authentication succeeds or fails, authentication still continues down the list of providers
REQUISITE - The user is required to pass the authentication test of this Authentication provider. If the user passes the authentication test of this Authentication provider, subsequent providers are executed but can fail (except for Authentication providers with the JAAS Control Flag set to REQUIRED).
SUFFICIENT - The user is not required to pass the authentication test of the Authentication provider. If authentication succeeds, no subsequent Authentication providers are executed. If authentication fails, authentication continues down the list of providers.
OPTIONAL - The user is allowed to pass or fail the authentication test of this Authentication provider. However, if all Authentication providers configured in a security realm have the JAAS Control Flag set to OPTIONAL, the user must pass the authentication test of one of the configured providers.
.
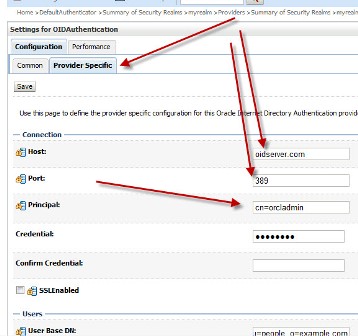
Things required to configure OID as authentication Provider in WebLogic
1. OID Server Name
2. OID Port
3. Password for cn=orcladmin account -> WebLogic Server uses this account to connect to LDAP Server
4.BASE DN of your user base in OID -> cn=users, [default OID realm] (usually of format cn=users, dc=uk, dc=co, dc=focusthread)
5.BASE DN of your group base in OID -> cn=groups, [default OID realm] (usually of format cn=groups, dc=uk, dc=co, dc=focusthread)
For steps on how to find OID Port or OID realm click here
.
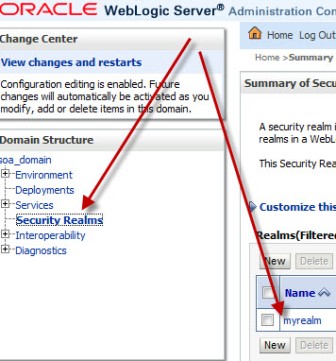
How to configure OID as Authentication Provider in WebLogic
1. Login to WebLogic Console -> Security Realm -> myrealm
.
.
2. Select tab Providers -> Authentication -> Default Provider
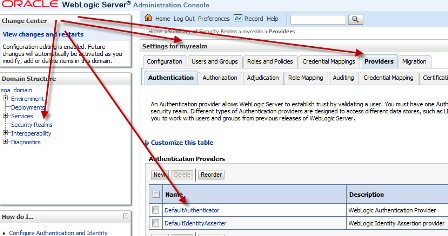
.
3. Change Control Flag (JAAS Flag) from REQUIRED to SUFFICIENT

.
4. Click on New to add new Authentication Provider
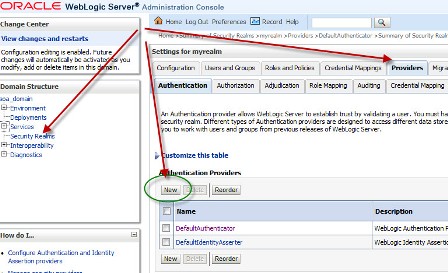
.
5. Select OracleInternetDirectoryAuthenticator
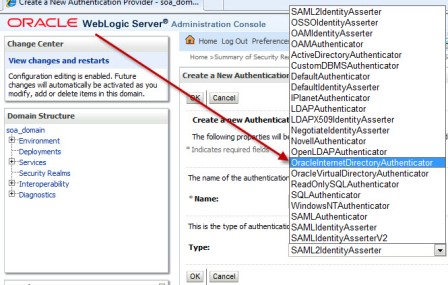

.
6. Change control flag to SUFFICIENT for OID Authentication Provider added above
.
7. Select Provider Specific tab and enter your OID server details
Do not forget to change “User Base DN” and “Group Base DN” as per your OID
8. Bounce WebLogic Server
To test if Integration is working :Create a group (Administrators or Deployers or Operators or Monitors) and dummy user as member of group in OID and try to login to WebLogic Server using user in OID who is member of one of group in OID.
.
How to Debug if Login to WebLogic via OID user fails ?
You can enable debug on Login (Security) to find debug messages in log file for actions (behind the scenes in WebLogic Server)
Servers -> AdminServer -> Debug Select WebLogic -> Security and click on Enable button
You can see debug messages in $DOMAIN_HOME/servers/AdminServer/logs


I am trying to integrate OIM with OID but got stuck up with the following error
ReplyDeleteWonder if you could kindly comment. on it. Appreciate the response.
while running the OID Connector Group Lookup Reconciliation task
I am getting this error
org.identityconnectors.framework.common.exceptions.ConfigurationException: Bundle oimjar://local:0ldapbp.jar is missing required attribute ‘ConnectorBundle-FrameworkVersion’.
I ‘ve done the Pre & Post installation task of the connector software (OID-11.1.1.6.0.zip) without any Issue.
Here is the IT resource Details and Parameters that i configured.
Parameter Value
Configuration Lookup Lookup.OID.Configuration
Connector Server Name
baseContexts "dc=oracle,dc=com"
credentials ********
failover
host oracle.com
port 3060
principal cn=orcladmin
ssl false
also Extracted ldap.jar and ldapbp.jar
from the lib directory of ldap-1_2_4.zip. and copied these two jar files to
the $OIM_ORACLE_HOME/server/ThirdParty directory AND run the PurgeCache.sh all without any issue.
Also there is no Issue with the OID server as ldapbind is successful.
Could you tell what am missing here.
Thanks
Priya
This issue will because of the Manifest file present in the jar file.
DeleteIf you downloaded the jar, and then you explode jar to add some file and then making this jar file again. The Manifest file will get override.
While creating a jar file it will overwrite the existing Manifest file and adding new one.
What is the command you are using for creating the jar file ?
Please use following command to create a jar file:
jar cmf existing-manifest jar-file input-file(s)
Also you can refer the following link for more information:
http://docs.oracle.com/javase/tutorial/deployment/jar/build.html
Let me know if you have any queries.
Regards,
Arunkumar R
I really appreciate information shared above. It’s of great help. If someone want to learn Online (Virtual) instructor lead live training in Oracle Access Manager
ReplyDelete, kindly contact us http://www.maxmunus.com/contact
MaxMunus Offer World Class Virtual Instructor led training on in Oracle Access Manager We have industry expert trainer. We provide Training Material and Software Support. MaxMunus has successfully conducted 100000+ trainings in India, USA, UK, Australlia, Switzerland, Qatar, Saudi Arabia, Bangladesh, Bahrain and UAE etc.
For Demo Contact us:
Name : Arunkumar U
Email : arun@maxmunus.com
Skype id: training_maxmunus
Contact No.-+91-9738507310
Company Website –http://www.maxmunus.com
Great Post!!! I have read your blog and it's very informative & really impressed.
ReplyDeleteMike Miller,
-Director,
SSOgen.
Hi,
ReplyDeleteWe are using Oracle 11g version of OIM,OID.
My issue is we have one attribute in OIM and while passing that field value can not be sync to OID. Except this other values are getting sync but this can't be sync.
Could you please tell me how we can resolve this issue?
Thanks.
Great read! Thank you for such useful insights. Visit here for advanced technical courses on ORACLE VIRTUAL DIRECTORY ADMIN ONLINE TRAINING
ReplyDelete