Tuesday 26 March 2013

Oracle SOA 11G – lookupXRef1M function

lookupXRef() and lookupXRef1M() functions can be used to look up single and multiple values correspondingly from SOA 11G Cross Reference table (DEV_SOAINFRA.XREF_DATA).
lookupXRef1M() function will be used to look up multiple values of target system associated with the one value of source system.
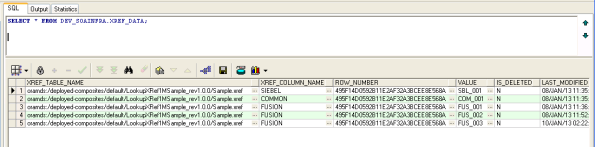
Example Table Structure :

lookupXRef1M
lookupXRef1M

Cross Reference Table ( DEV_SOAINFRA.XREF_DATA ) Structure :

XREF_DATA_TABLE
XREF_DATA_TABLE
Issue:
lookupXRef1M() function looking up values differently for BPEL Assign activity and for BPEL Transformation (XSL).
While using with Assign activity it is giving the response like the below.
BPEL Assign activity :


<assign name="assignLookupXRef1M">
           <copy>
             <from expression="xref:lookupXRef1M('Sample.xref','SIEBEL','SBL_001','FUSION',true())"/>
             <to variable="outputVariable" part="payload"
                 query="/client:processResponse/client:result"/>
           </copy>
         </assign>
BPEL Assign activity response :


<outputVariable>
<part  name="payload">
<client:result>
<value>FUS_001</value>
<value>FUS_002</value>
<value>FUS_003</value>
</client:result>
</processResponse>
</part>
</outputVariable>
While using it with XSL Transformation in BPEL it is just returning the concatenated values of target system.
BPEL Transformation:

<xsl:template match="/">
    <client:processResponse>
      <client:result>
        <xsl:value-of select='xref:lookupXRef1M("Sample.xref",/client:process/client:xrefReferenceColumnName,/client:process/client:xrefReferenceColumnValue,/client:process/client:xrefColumnName,true())'/>
      </client:result>
    </client:processResponse>
  </xsl:template>
BPEL Transformation response :

<outputVariable>
    <part  name="payload">
        <processResponse>
            <client:result>FUS_001FUS_002FUS_003</client:result>
        </processResponse>
    </part>
</outputVariable>
Solution to get the values properly in BPEL XSL Transformation :
Assign the lookupXRef1M() response in variable and iterate it using node() function like shown below with in the xsl to get the proper result as we get it in Assign activity.

<?xml version="1.0" encoding="UTF-8" ?>
<?oracle-xsl-mapper
  <!-- SPECIFICATION OF MAP SOURCES AND TARGETS, DO NOT MODIFY. -->
  <mapSources>
    <source type="WSDL">
      <schema location="../LookupXRef1M.wsdl"/>
      <rootElement name="process" namespace="http://xmlns.oracle.com/CompositesSamples/LookupXRef1M"/>
    </source>
  </mapSources>
  <mapTargets>
    <target type="WSDL">
      <schema location="../LookupXRef1M.wsdl"/>
      <rootElement name="processResponse" namespace="http://xmlns.oracle.com/CompositesSamples/LookupXRef1M"/>
    </target>
  </mapTargets>
  <!-- GENERATED BY ORACLE XSL MAPPER 11.1.1.5.0(build 110418.1550.0174) AT [THU JAN 10 12:18:08 EST 2013]. -->
?>
<xsl:stylesheet version="1.0"
                xmlns:bpws="http://schemas.xmlsoap.org/ws/2003/03/business-process/"
                xmlns:bpel="http://docs.oasis-open.org/wsbpel/2.0/process/executable"
                xmlns:xsi="http://www.w3.org/2001/XMLSchema-instance"
                xmlns:bpm="http://xmlns.oracle.com/bpmn20/extensions"
                xmlns:plnk="http://schemas.xmlsoap.org/ws/2003/05/partner-link/"
                xmlns:wsdl="http://schemas.xmlsoap.org/wsdl/"
                xmlns:ora="http://schemas.oracle.com/xpath/extension"
                xmlns:client="http://xmlns.oracle.com/CompositesSamples/LookupXRef1M"
                xmlns:dvm="http://www.oracle.com/XSL/Transform/java/oracle.tip.dvm.LookupValue"
                xmlns:hwf="http://xmlns.oracle.com/bpel/workflow/xpath"
                xmlns:med="http://schemas.oracle.com/mediator/xpath"
                xmlns:xsl="http://www.w3.org/1999/XSL/Transform"
                xmlns:ids="http://xmlns.oracle.com/bpel/services/IdentityService/xpath"
                xmlns:xdk="http://schemas.oracle.com/bpel/extension/xpath/function/xdk"
                xmlns:xsd="http://www.w3.org/2001/XMLSchema"
                xmlns:ldap="http://schemas.oracle.com/xpath/extension/ldap"
                xmlns:exsl="http://exslt.org/common"
                exclude-result-prefixes="xsi xsl plnk wsdl client xsd bpws xp20 bpel bpm ora socket mhdr oraext dvm hwf med ids vha xdk xref ldap"
                extension-element-prefixes="exsl">
                <xsl:output method="xml" indent="yes"/>
  <xsl:template match="/">
    <xsl:variable name="response" select='xref:lookupXRef1M("Sample.xref",/client:process/client:xrefReferenceColumnName,/client:process/client:xrefReferenceColumnValue,/client:process/client:xrefColumnName,true())'/>
    <client:processResponse>
      <client:result>
        <xsl:for-each select="exsl:node-set($response)/node()">
            <xsl:element name="value">
                <xsl:value-of select="."/>
            </xsl:element>
        </xsl:for-each>
      </client:result>
    </client:processResponse>
  </xsl:template>
</xsl:stylesheet>

Wednesday 13 March 2013

Ant scripts for Oracle SOA Suite 11g code deployment (Windows)

This blog post provides Ant scripts that simplify the deployment, undeployment, and management of code to Oracle SOA Suite 11g. These scripts are designed for Windows (will release the Linux instructions soon). For those familiar with it, I do not use the configuration plan (long story).

Who these scripts are designed for:
  • Developers who want an automated approach to deploy/undeploy/manage code
  • App Admins who want to manage code from a Windows-based operating system

What you can do with the scripts:
  • Deploy multiple composites using a single Ant command
  • Undeploy multiple composites using a single Ant command
  • Start multiple composites using a single Ant command
  • Stop multiple composites using a single Ant command
  • List deployed composites
  • Tokenize and detokenize code
  • Import artifacts (XSDs, DVMs, WSDLs, fault policies) to the MDS
  • Export the entire MDS (for backup or browsing purposes)

To see how these scripts work, check out:


One-time Setup and Configuration

1. Download ant_soa11g_windows.zip from here

2. Unzip ant_soa11g_windows.zip to your local c:\ drive (it should exist as c:\ant)

3. Edit setEnvironmentVars.bat and modify the following:
CODE_FOLDER  <-- top-level directory where your code exists (e.g., c:\ant\code)
ORACLE_HOME  <-- directory of JDev 11g (e.g., c:\jdev11g)
JAVA_HOME    <-- ensure that the JDK path is correct
4. Edit soa-environment.properties and modify only the following variables:
wn.bea.home=C:/jdev11g              <-- directory of JDev 11g (similar to ORACLE_HOME above)
tmp.output.dir=c:/ant/temp          <-- temp directory for MDS generation, default is c:\ant\temp
local.mds.repository=c:/ant/apps    <-- location of local MDS copy (for MDS imports)
local.mds.export=c:/ant/apps.backup <-- location of local MDS backup folder (for MDS exports)
5. Double-click on winInstall.bat so that it copies the necessary JARs to the appropriate directories

6. For every SOA Suite 11g environment, create the following 3 files.
For example, if you have a DEV, TEST, and PROD environments, then create the following 9 files:
soa-build-dev.properties
soa-build-test.properties
soa-build-prod.properties
soa-cfgplan-dev.xml
soa-cfgplan-test.xml
soa-cfgplan-prod.xml
soa-token-dev.properties
soa-token-test.properties
soa-token-prod.properties
The ant_soa11g_windows.zip file includes samples for a DEV environment, so just make copies of those files for your other environments.
7. Edit all soa-build-*.properties and soa-token-*.properties files and modify the following:
USERNAME    <-- weblogic username (e.g., 'weblogic')
PASSWORD    <-- weblogic password
SOAHOST     <-- hostname or IP address of SOA Suite 11g server
SOAPORT     <-- port for the soa_server1 managed server (e.g., 8001)
DBUSERNAME  <-- MDS database username (e.g., 'dev_mds')
DBPASSWORD  <-- MDS database password
DBHOST      <-- database host
DBPORT      <-- database port
DBSID       <-- database name

Deploy, Undeploy, Start, Stop, and Detokenize Composites

1. Define the CustomProcessList.txt (see Define the Custom Process List below)

2. Open a command prompt window and type the following
cd c:\ant
call setEnvironmentVars.bat
call ant -f build.soa.xml <target> -Dtargetenv=<env>
Where <target> is deployComposites, undeployComposites, startComposites, stopComposites, or detokenizeComposites. This will loop through and perform the action against all the composites listed in the CustomProcessList.txt file.
Where <env> is your dev, test, or whatever environments you configured earlier.

List Composites

1. Open a command prompt window and type the following
cd c:\ant
call setEnvironmentVars.bat
call ant -f build.soa.xml listComposites -Dtargetenv=<env>
Where <env> is your dev, test, or whatever environments you configured earlier.

Export MDS

1. Open a command prompt window and type the following
cd c:\ant
call setEnvironmentVars.bat
call ant -f build.soa.xml exportMDS -Dtargetenv=<env>
Where <env> is your dev, test, or whatever environments you configured earlier.
2. The export file will be saved to c:\ant\apps.backup in the format of MDSbackup.<env>.YYYY-MM-DD-HHMI.jar (e.g., MDSbackup.dev.2011-01-20_1140.jar)


Import Artifacts to MDS

1. Define the CustomMDSList.txt (see Define the Custom MDS List below)

2. Add all the schemas, WSDLs, DVMs, fault policies, to the c:\ant\apps\<application> directory.
For example:
c:\ant\apps\App1MetaData\dvm\Currency.dvm
c:\ant\apps\App1MetaData\dvm\Country.dvm
c:\ant\apps\App1MetaData\config\fault-bindings.xml
c:\ant\apps\App1MetaData\config\fault-policies.xml
c:\ant\apps\App1MetaData\schemas\shared\Types.xsd
c:\ant\apps\App1MetaData\schemas\hr\Account.xsd
3. Open a command prompt window and type the following
cd c:\ant
call setEnvironmentVars.bat
call ant -f build.soa.xml importMDS -Dtargetenv=<env>
Where <env> is your dev, test, or whatever environments you configured earlier.

Define the Custom Process List

Before using any of these Ant scripts that are related to code, you must create a CustomProcessList.txt file.

1. Create the c:\ant\CustomProcessList.txt file, using the following format:
<composite_name>,<partition>,<revision>,<default_composite>,<relative_directory_of_code>

For example, the file may look like this:
HelloWorld1,default,1.0,true,hrprojects\employees\HelloWorld1
HelloWorld2,default,1.0,true,hrprojects\employees\HelloWorld2
HelloWorld3,hello99,2.0,false,hrprojects\test\synchronize\HelloWorld3
This says that there are 3 composites to loop through; HelloWorld1, HelloWorld2, and HelloWorld3. If deployed, the first 2 will be deployed to the 'default' partition and a revision of '1.0' while the last one will be deployed to the 'hello99' partition with a revision of '2.0'. The last composite will not be set as the default composite, designated by the value of 'false'.
  
The directory path shown is relative to the %CODE_FOLDER% environment variable set earlier. For example, if %CODE_FOLDER% is set to c:\ant\code, then the three projects above should exist in the following local directories:
c:\ant\code\hrprojects\employees\HelloWorld1
c:\ant\code\hrprojects\employees\HelloWorld2
c:\ant\code\hrprojects\test\synchronize\HelloWorld3

Define the Custom MDS List

Before using any of the Ant targets that are related to the MDS, you must create a CustomMDSList.txt file.

1. Create the c:\ant\CustomMDSList.txt file, using the following format:
<app_name>,false

For example, the file may look like this:
App1MetaData,false
App2MetaData,false
If you run the MDS import script, it will import the following local directory to its relative MDS directory as follows:
c:\ant\apps\App1MetaData  -->  oramds:/apps/App1MetaData
c:\ant\apps\App2MetaData  -->  oramds:/apps/App2MetaData
For example, you may have a combination of XSDs, DVMs, and fault policies as shown: 
c:\ant\apps\App1MetaData\dvm\Currency.dvm
c:\ant\apps\App1MetaData\dvm\Country.dvm
c:\ant\apps\App1MetaData\config\fault-bindings.xml
c:\ant\apps\App1MetaData\config\fault-policies.xml
c:\ant\apps\App1MetaData\schemas\shared\Types.xsd
c:\ant\apps\App1MetaData\schemas\hr\Account.xsd
When you run the MDS import script, because the CustomMDSList.txt file is referencing the local c:\ant\apps\App1MetaData directory, all files under that local directory will be imported to the MDS.

Adding Additional Tokens

The detokenizeComposites target loops through all code in your CustomProcessList.txt file, and detokenizes your code. For example, if your code has the following string @SOAServer@, the command below will replace it with whatever value is specified in the soa-token-*.properties file. This allows you to not hardcode values in your code.

If you want to add additional token variables, say @SomeEndpoint@, you must do the following:

1. Add the new token to the soa-token-*.properties file. For example:
SomeEndpoint = http://dev.ipnweb.com:7777
2. Edit build.soa.xml and add the token in two separate targets (detokenizeComposites and tokenizeComposites):
<replacefilter token="@SomeEndpoint@" value="${SomeEndpoint}"/> 
<replacefilter token="${SomeEndpoint}" value="@SomeEndpoint@"/>

Monday 11 March 2013

Configuring Email Notification

To support email notification from SOA Suite 11g the UMS email driver and workflow notification properties to be configured with the mail server details. This can be done through the Enterprise Manager Fusion Middleware Control console (e.g. http://localhost:7001/em) as follows:
  1. Navigate to the Email Driver Properties page available under User Messaging Service > usermessagingdriver-email

  2. Update the following properties according to your mail server configuration:

    OutgoingMailServer - The SMTP hostname
    OutgoingMailServerPort - The SMTP port
    OutgoingMailServerSecurity - The type of security (e.g. SSL)
    OutgoingUsername - The mail user account
    OutgoingPassword - The mail user password


  3. Click Apply to save the changes.
     
  4. Right-click on soa-infra under SOA and navigate to the Workflow Notification Properties page available under SOA Administration.


  5. Set the Notification Mode to 'Email' and enter the default values which you wish to use for from, actionable and reply to email addresses.


  6. Click Apply to save the changes to the workflow notification properties.
     
  7. Restart the SOA server for the changes to take effect. If you are using Gmail or any other mail server that requires SSL you will need to perform the steps in the next section. In this case, you may wish to hold off on restarting the server before these steps are performed. This will save you the trouble of having to restart twice.

Import the SSL Certificates to the Java Keystore

Before SOA Suite can send emails with Gmail there are some SSL certificates that will need to be imported. This step can be ignored if sending from an alternative mail server that does not require SSL.
  1. Download the Gmail IMAP and SMTP certificates. This can be done with OpenSSL (Unix / Windows) by running the following from command prompt:
    • openssl s_client -connect host:port
      • where Gmail SMTP host:port is smtp.gmail.com:465
      • where Gmail IMAP host:port is imap.gmail.com:993
         
  2. Create a new file for the SMTP and IMAP certificates using the content between BEGIN CERTIFICATE & END CERTIFICATE

  3. Use the Java Keytool to import the two certificates into a new or existing keystore. The keytool executable is available under the JAVA_HOME/bin directory. The following command can be used to import a certificate:
    • keytool -import -alias AliasName -keystore KeystoreLocation -file CertificateLocation
      • For example:
        • keytool -import -alias gmail-imap -keystore gmail-keystore.jks -file imap.txt
        • keytool -import -alias gmail-smtp -keystore gmail-keystore.jks -file smtp.txt
    • When prompted, enter a password for the keystore.
       
  4. Add the following system properties to the WebLogic server startup arguments:
    -Djavax.net.ssl.trustStore=CertificateLocation-Djavax.net.ssl.trustStorePassword=CertificatePassword
    This can be done in Arguments field available under the Server Start tab for the SOA Server (e.g. soa_server1) in the WebLogic Administration Console (e.g. http://localhost:7001/console) or by adding the properties to the DOMAIN_HOME/bin/setDomainEnv.cmd (or setDomainEnv.sh). For example:
    set EXTRA_JAVA_PROPERTIES=%EXTRA_JAVA_PROPERTIES% -Djavax.net.ssl.trustStore=%WL_HOME%\server\lib\gmail-keystore.jks -Djavax.net.ssl.trustStorePassword=changeit
  5. Start the SOA server (or restart it if it is already running).

Testing Email Notification

Now that we have configured outbound email notification, we want to test our configuration easily without having to create a BPEL process or human task to do this. Fortuntately, we can do this from Enterprise Manager Fusion Middleware Control.
  1. Right-click on soa-infra under SOA and navigate to the Human Workflow page available under Service Engines.


  2. Select the Notification Management tab.
     
  3. Click Send Test Notification


  4. The Send Test Notification dialog box should now appear. Enter the email subject, content, to address and be sure to select 'Email' for the channel. Click Send. Once the email has been sent, you should receive a value of 'SENT' for Response. You can now close the dialog box.


  5. Ensure that the email has been received.

Troubleshooting

If you encounter an issue with the outgoing email notification, it is a good idea to check the SOA server log for error messages. There are log files available at:
  • DOMAIN_HOME/servers/<soa server name>/logs/<soa server name>.log
  • DOMAIN_HOME/servers/<soa server name>/logs/<soa server name>.out
  • DOMAIN_HOME/servers/<soa server name>/logs/<soa server name>-diagnostic.log
Furthermore, it is a good idea to tick the UMS email driver debug flag.
Listed below are some common errors with their solution:
  • Error Message: javax.net.ssl.SSLHandshakeException: sun.security.validator.ValidatorException: PKIX path building failed: sun.security.provider.certpath.SunCertPathBuilderException: unable to find valid certification path to requested target

    Diagnosis: There is an issue with the SSL certificate.

    Remedy: Ensure all of the steps have been followed as described in "Import the SSL Certificates to the Java Keystore". Also make sure that the mail server certificates in the Java Keystore have not expired. You can ensure a fresh copy of the certificates are downloaded by executing the openssl s_client -connect command followed by the host and port details for the mail server.
     
  • Error Message: ORABPEL-31023 - Cannot send email notification to <email address> address. The address is being marked as invalid and no further notification would be sent to this address.

    Diagnosis: Due to a number of previous failed send attempts to an email address, SOA Suite has added the address to the Bad Address List thus preventing subsequent sends to this address from failing. The previous failed attempts may been caused by a configuration issue.

    Remedy: Remove the email address from the Bad Address List. This can be done by selecting View Bad Addresses from the Notification Management page in Enterprise Manager. When the Bad Address List dialog box is displayed, remove the email address from this list.
     
  • Error Message: No matching drivers found for sender address

    Diagnosis: The UMS Driver for the appropriate channel is configured with a specific list of SenderAddresses, and the message sent by the application has a Sender Address that does not match.

    Remedy: Make the Sender Address blank. This will ensure that all outbound messages will be sent regardless of the sender address.

Thursday 7 March 2013

Installing Oracle Business Process Management Suite 11g

Purpose

This tutorial shows you how to install the Oracle Business Process Management (OBPM) Suite 11g Release 1 software and how to test it to see if it was installed successfully.

Time to Complete

Approximately 2hours.

Overview

After installing the OBPM 11gR1 server software, you will install the JDeveloper-based IDE, called Studio. You will test the installation by logging into the BPM Workspace.

Scenario

The OBPM 11gR1 Suite is delivered as part of patch set 2 (PS 2) to the Oracle Service Oriented Architecture (SOA) Suite 11gR1 product. It is installed on top of a SOA installation which has already been updated to patch set 1 (PS 1). SOA Suite is, in turn dependent upon a JEE application server and a database. This tutorial assumes that you already have a suitable database installed and that you have already downloaded the various binaries needed for the installation. (see Software and Hardware Requirements).
The diagram below shows the software components that you will install during this tutorial. Notice that the server and development IDE software are installed on different machines for this tutorial.
Software to install
You will install WebLogic Server 11gR1 and then install RCU in order to configure a database schema for SOA. Next you will install SOA Suite with PS1, followed by the SOA PS 2 patch set containing BPM. All of this software will be installed in a Linux environment.
Studio, the development IDE, which is based on Oracle JDeveloper, can be installed in either a Windows or a Unix environment. In this tutorial, you will install it on a Windows machine and access the Linux-based BPM server remotely. You may opt to install all of the software on the same Linux machine if you wish, however this would require more memory and disk space on the Linux machine, as indicated in the next section. Be aware that these instructions assume that JDeveloper is installed on a Windows machine.

Software and Hardware Requirements

There is a wide range of hardware and software platform options from which to choose when installing the SOA Suite 11gR1 with PS2 (BPM). For a detailed list of system certifications for this suite, see The Oracle Technology Network (OTN) For this tutorial, however, the following hardware and software requirements will be supported:

  • A Linux machine with Oracle Enterprise Linux (OEL) 4.0 for server installations, and a Windows machine with XP or Windows 2003 (SP2) for the JDeveloper installation.
  • Linux machine: 3GB of memory ( 4GB is preferred if JDeveloper is to be installed on this machine along with SOA and WebLogic)
  • Linux machine: Disk space 10GB for installed software, an additional 10GB for installation working files
  • Linux machine: Oracle Database Express Edition (XE) Universal 10.2. You can download it here if you need to install it.
  • Windows machine: 2 GB of memory
  • Windows machine: Disk space 3GB
  • Browsers: Firefox 3.x or IE 7.x

Prerequisites

Before starting this tutorial, you should download the binaries required for installing all of the software and unzip the files that need to be unzipped. You can use the following instructions for guidance in downloading software and staging the files.
Software for Linux Machine
Log into the Linux machine as a user who has sufficient permissions to install software. From a browser, go to EDelivery.oracle.com. If you haven't downloaded software from this site before, you will be prompted to enter some information in order to create an account (name, email, company).
  1. On the Welcome page, select a language and click Continue.
  2. On the Media Pack Search page, select "Oracle Fusion Middleware" as the Product Pack and "Linux x86" as the Platform.
  3. Click Go
  4. A list of media packs appears in a Results table. Select "Oracle Fusion Middleware 11g Media Pack for Linux x86" (Release 11.1.1.3).
  5. Click Continue
  6. The Download page appears. Click the Download button for each of the products listed below. Save them all to a directory called stageBPM
1. Oracle WLS11gR1 10.3.3 for Linux x86
2. Oracle SOA Suite 11g (11.1.1.2.0) (This is Patch Set 1)
Unzip this file to stageBPM
3. Oracle SOA Suite 11g Patch Set 2 (11.1.1.3.0)
Unzip this file to stageBPM
4. Oracle Fusion Middleware Repository Creation Utitlity 11g (11.1.1.3.0) for Linux x86 (This version of RCU assumes that your database is installed on Linux. If it is not, choose the appropriate version.)
Create a new directory (parallel to stageBPM) called rcuHome and unzip this file to rcuHome.
Software for Windows Machine
1. JDeveloper 11.1.1.3
On the Windows machine, open a browser and go to the OTN download site for JDeveloper 11.1.1.3 .
  1. In the Windows Install row and the Studio Edition column, click the link for the filename given. This is an .exe file.
  2. Accept the license agreement when prompted and finish the download.
  3. Save this file anywhere you wish.
This version of the JDeveloper binary contains the required version of the JDK. You will download two additional JDeveloper extensions from within JDeveloper after installing it.
2. Demo Community Seed Application This is a sample web application that you use to seed the users and groups in the WebLogic server's LDAP realm. This will provide a community of users to support other OBEs for this product and to support several sample applications for the SOA Suite.
Download this zip file and extract it to C:\Labs\BPM11gOBE

Installing the Server Software

You will begin by installing and configuring the OBPM 11g server software on the Linux machine. To accomplish these tasks, perform the following steps:
Note: The filenames for the binaries that you downloaded might be slightly different than those you see referenced here.

Installing and Configuring the WebLogic Server

1. First you must modify some parameters of the database that will be used by the SOA server. Open a SQLPlus session with the Oracle XE database on the Linux machine, logging in as the sys user as shown below and replacing "oracle" with the appropriate password for your sys user.
Screenshot for Step
2. To view the current parameter values, type the command show parameter session. After the results are displayed, type show parameter processes. Both outputs are shown here.
Screenshot for Step
Change the two parameter values by entering the following two commands:
Screenshot for Step
3. In order for this change to take effect you must shutdown and restart the server. Note that the shutdown can take a few minutes.
Type the following two commands at the SQL prompt, waiting for the shutdown to complete before executing the restart.
Screenshot for Step
Exit the SQLPlus session once the database has resumed.
4. Install WebLogic Server.
From a terminal window, navigate to /stageBPM and run the installer for WebLogic Server by typing
./wls1033_linux32.bin
If you receive a message indicating that you do not have the necessary permission on the file to execute it, you must first change the file permissions as follows:
chmod +x wls1033_linux32.bin
5. Upon successful execution of the installer binary, the Install Wizard opens. ,Click Next.
Screenshot for Step
6. In the Choose Middleware Home Directory window, create a new Middleware Home. Enter or browse to the directory in which you would like to install both WebLogic and SOA. Type the name of the new middleware home directory. In this example we use mwhome.
Screenshot for Step
Click Next.
7. In the next screen, enter your email address to receive security alerts or deselect the checkbox and decline - whichever you prefer. Click Next.
8. In the next screen, select a Typical install and click Next.
9. In the Choose Product Installation Directories window, review the installation directories and click Next.
Screenshot for Step
10. Review the Installation Summary in the next window and then click Next to start the install process. This should take about three minutes.
Screenshot for Step
11. When the installation is complete, deselect the Run Quickstart checkbox in the final screen and click Done.

Creating and Configuring Schema for SOA


1. Open a terminal window and navigate to the bin directory within rcuHome (this is the directory where you unzipped the Repository Creation Utility zip file). Enter ./rcu
Screenshot for Step
2. When the Welcome screen of the RCU Wizard appears, click Next.
3. In the Create Repository screen, select Create and then click Next.
Screenshot for Step
4. In the Database Connection Details screen, enter the following information:
Field Name Value
Hostname <your hostname> (localhost used in this example)
Port 1521
Service Name XE
Username sys
Password <password for sys user>
Role SYSDBA
Screenshot for Step
Click Next
5. The RCU will begin to process the schema information and check prerequisites. If you receive the following warning message indicating that the version of the database you are using is not supported. You can safely ignore it.
Screenshot for Step
Review the Prerequisite information displayed on the next screen. It should indicate that all prerequisites have been satisfied. Click OK.
Screenshot for Step
6. In the Select Components screen, enter DEV as the value for the Create a new Prefix field (if not already there by default). Also, select SOA and BPM Infrastructure from the Component list. This will cause all dependent schemas to be automatically selected as well, as seen in this image.
Screenshot for Step
Click Next. Once again the prerequistes are checked. Click OK to the Prerequisites window.
7. In the Schema Passwords screen, click the radio button to Use same passwords for all schema. For this tutorial welcome1 is used for all passwords. Enter that in the Password and Confirm Password fields. Then click Next.
Screenshot for Step
8. In the Map Tablespaces screen, review the tablespaces and schema owners for the components. Accepting the defaults, click Next.
Screenshot for Step
9. Click OK when prompted to confirm creation of the tablespaces. When tablespace creation is complete you will see this screen showing the results. Click OK.
Screenshot for Step
10. The Summary screen appears. Review the information and click Create. It takes about two minutes to create the schemas.
Screenshot for Step
11. Review the details in the final Completion Summary screen and click Close.
Screenshot for Step

Installing SOA Suite


1. Recall that before you began this tutorial, you unzipped the SOA install files into a directory structure that looks like this.
Screenshot for Step
Open a terminal window and navigate to the Disk1 directory within the soa directory. Type the following command, making any adjustments necessary to accurately reference the location of your /mwhome/jdk160_18 directory (your JDK 1.6 installation):
./runInstaller -jreLoc <path to mwhome>/mwhome/jdk160_18
Screenshot for Step
Note: If you have not installed any Oracle products on this machine yet, you will be prompted to first create the Oracle Inventory. This is a directory structure to contain all Oracle product install file inventories. You will also have to specify the operating system group that owns this. After entering the information on this screen, you will be prompted to enter a command as the root user to create the inventory.
Screenshot for Step
2. When the Welcome screen of the wizard appears, click Next.
Screenshot for Step
3. Wait for the prerequisite check to complete (it's very quick). Then click Next.
Screenshot for Step
4. On the Specify Installation Location screen, select your Middleware home: mwhome (This should be the default value). Also enter an Oracle home value of Oracle_SOA1. (Again, this should be the default value.). Click Next.
Screenshot for Step
5. Review the Summary. When satisfied, click Install.
Screenshot for Step
6. Wait for the install to complete. This takes a few minutes. When it reaches 100%, click Next then Finish.
Screenshot for Step

Installing SOA Patch Set 2


1. The install for this patch set (which includes BPM 11gR1) is almost identical to the SOA installation.
From a terminal window, navigate to /stageBPM/soa_patchset/Disk1 and type the following command (adjust the path as needed to point to your JDK 1.6 installation as you did in the last step) :
./runInstaller -jreLoc <path to mwhome>/mwhome/jdk160_18
Screenshot for Step
2. Continue clicking through the screens of the install wizard as you did in the SOA installation. When you get to the Specify Installation Location screen, be sure that the Oracle Home directory is the same as it was for the SOA install (Oracle_SOA1).
Screenshot for Step
3. In the Installation Summary screen, confirm that all information is correct and click Install.
Screenshot for Step
4. Wait for the install to complete. It takes a few minutes. When it reaches 100%, click Next, then click Finish.

Creating and Configuring a Domain for the WebLogic Server


1. From a terminal window, navigate to /mwhome/Oracle_SOA1/common/bin and type the following command in order to launch the Oracle Fusion Middleware Configuration Wizard:
./config.sh
Screenshot for Step
2. When the wizard opens, select Create a new WebLogic Domain in the Welcome screen. Click Next.
Screenshot for Step
1. In the Select Domain Source screen, select the Generate a domain radio button and then select the following products (dependent products will be selected automatically):
  • Oracle BPM Suite
  • Oracle SOA Suite
  • Oracle Enterprise Manager
  • Oracle Business Activity Monitoring
Screenshot for Step
Click Next.
2. In the Specify Domain Name and Location screen, enter the Domain name as domain1. Click Next.
Screenshot for Step
3. In the Configure Administrator User Name and Password screen, enter weblogic as the user name and welcome1 as the password. Confirm the password and then click Next.
Screenshot for Step
4. In the Configure Server Start Mode and JDK screen, select the Development Mode radio button and choose the Sun SDK in the Available JDKs panel.
Screenshot for Step
Click Next.
5. In the Configure JDBC Component Schema screen, you need to change property values for each of the components listed. Property values are modified at the top portion of the window and these changes affect only selected components from the bottom portion of the window (the table of components). You will change the Schema Password, DBMS/Service, Host Name, and Port for each of the component schemas.
Select all of the component schemas in the table portion of the screen. Enter the following values in the top portion of the screen. This will change the respective property value for each of the component schemas.
Field Name Value
Schema Password welcome1
DBMS/Service XE
Host Name <your hostname> (localhost used in this example
Port 1521
Screenshot for Step
Notice that the values you enter appear in each row of the table as you type.
The Schema Owners in this table should match the schema owners as configured by the RCU utility earlier in this install. Click Next.
6. In the next screen, the data source connections are all tested. If they are successful, click Next, otherwise, click Previous and correct any errors.
Screenshot for Step
7. In the Select Optional Configuration screen, you have the option to configure the WebLogic server to run as a managed server or in a single server configuration. In this simple tutorial, you will choose the single server configuration.
Select the Managed Servers, Clusters and Machines option. Click Next.
Screenshot for Step
8. In the Configure Managed Servers screens, select the bam_server1 entry and then click Delete.
Screenshot for Step
Now select the soa_server1 entry and click Delete as well.
Screenshot for Step
9. Click Next four times to move through the remaining optional configuration screens without making any changes. On the fourth click, you arrive at the Configuration Summary screen. Click Create.
Screenshot for Step
10. Wait for it to finish and then click Done.

Installing the Client Side IDE Software

In this topic, you will install JDeveloper on the Windows machine and update it with extensions that enable BPM Studio and SOA functionality.

Installing JDeveloper on the Windows Machine

1. Using Windows Explorer, find the JDeveloper installer file you downloaded (ending in .exe) and double click it to launch the installer. The splash screen appears, indicating that it is preparing the installer.
Screenshot for Step
It takes several minutes to finish decompressing all the files.
2. The Installer Wizard opens and the Welcome screen appears. Click Next.
Screenshot for Step

3. In the Choose Middleware Home Directory screen, select Create a new Middleware Home. Enter the following as the Middleware Home path:
C:\Oracle\Middleware\jdev_bpm11g
Screenshot for Step
Click Next.
4. In the Choose Install Type window, select Complete. Click Next.
Note: You will not be using the WebLogic server that is installed with JDeveloper. Instead, you will deploy to the WebLogic server installed as part of the SOA Suite.
Screenshot for Step
5. In the Confirm Product Installation Directories screen, examine the directory structures. Click Next.
Screenshot for Step
6. In the Choose Shortcut Location screen, select "All Users" Start Menu folder . Click Next.
Screenshot for Step
7. The Installation Summary screen appears. Review the information, then click Next.
Screenshot for Step
8. Installation now begins. When it is complete, deselect Run Quickstart and click Done.
Screenshot for Step

Updating JDeveloper


1. Update JDeveloper with the two extensions that provide BPM and SOA functionality. In essence, this update turns JDeveloper in BPM Studio.
Start JDeveloper from the Windows Task Bar:
Start > All Programs > Oracle Fusion Middleware 11.1.1.3.0 > JDeveloper Studio 11.1.1.3.0
When prompted to select a role, accept the Default Role and click OK.
Screenshot for Step
2. Close the Tip of the Day window and select Help > Check for Updates from the JDeveloper main menu.
3. The Check for Updates Wizard opens and the Welcome page appears. Click Next.
Screenshot for Step
4. The Source page of the wizard is next. Select Oracle Fusion Middleware Products and Official Oracle Extensions and Updates.
Click Next.
Screenshot for Step
5. On the Updates page, select the following checkboxes (build numbers may be slightly different at the time you perform this tutorial):
  • Oracle BPM Studio 11g
  • Oracle SOA Composite Editor 11.x
Screenshot for Step
Click Next.
6. Enter your login credentials for your Oracle Web Account and click OK.
Screenshot for Step
7. The download begins. It takes several minutes to complete.
Screenshot for Step
8. The Summary screen appears after the download has completed, showing the new extensions that have been installed. Click Finish, then click Yes to restart JDeveloper.
Screenshot for Step
9. Once again, select the Default role when prompted as JDeveloper is opening. You can close JDeveloper now.

Testing the Install

In this topic, you start the server and log into the BPM Workspace. A successful launch and login to the Workspace proves the success of the BPM installation.
1. On the Linux machine, start the WebLogic server. Open a terminal window and navigate to:
<path to your mwhome>/mwhome/user_projects/domains/domain1
2. Type the following command: nohup ./startWebLogic.sh & Screenshot for Step
It should take about 5 minutes for the server to complete its startup and be ready to accept requests. Server output will be written to the nohup.out file in the domain1 directory. When this file gets to be about 34K in size, you can check it, using a text editor, to see if the server is accepting requests.
Note: The nohup command makes it possible for you to close the terminal window without aborting the process. The & causes process output to be written to the nohup.out file.
3. When the server is accepting requests, open a browser and enter the following URL:
http://localhost:7001/bpm/workspace
It will take several seconds to load the web application for the first time.
4. Log into the BPM Workspace as the user weblogic using the password welcome1.
Screenshot for Step
Any user interaction with a deployed process would occur in this Workspace. Some administrative tasks are also available in this interface, given the appropriate permissions.

Seeding the Demo Community

In this section, you will work from the windows machine to deploy the sample web application that you downloaded earlier to the LDAP server within the remote WebLogic. This web application will seed the LDAP server with a collection of users and groups, meeting the requirements of many Oracle SOA sample applications and several tutorials that require a community of users and groups for their business use cases. If you go on to perform the Building Your First Process with Oracle BPM 11g tutorial, you will need to have completed this step.
Recall that in the Prerequisite section, you downloaded DemoCommunitySeedApp.zip and unzipped it to C:\Labs\BPM11g.
 
1. Open a DOS command window and navigate to C:\Labs\BPM11gOBE\DemoCommunitySeedApp
The setAntEnv.bat file in this folder will set environment variables required by the ANT program that deploys the web application. Assuming that you have used the same naming conventions specified in this tutorial, this file is pre-edited to work for your environment.
Enter the following command: setAntEnv.bat
Screenshot for Step
2. Deploy the DemoCommunitySeedApp and seed the LDAP server by entering the following command, using the parameter values listed in the table below as command line parameters. Make any adjustments necessary to fit your own environment.
ant seedDemoUsers -Dbea.home=C:\Oracle\Middleware\jdev_bpm11g -Doracle.home=C:\Oracle\Middleware\jdev_bpm11g\jdeveloper -Dtarget=AdminServer -Dadmin.url=t3://host01.example.com:7001 -Dserver.url=http://host01.example.com:7001 -Dadmin.name=weblogic -Dadmin.pwd=welcome1
Parameter Description
-Dbea.home The Middleware Home on the machine where this script will be run
example: C:\Oracle\Middleware\jdev_bpm11g
-Doracle.home The ORACLE HOME on the machine where this script will be run
example: C:\Oracle\Middleware\jdev_bpm11g\jdeveloper
-Dtarget AdminServer
-Dadmin.url t3://<your hostname>:7001
example: t3://host01.example.com:7001
-Dserver.url http://<your hostname>:7001
example:http://host01.example.com:7001
-Dadmin.name weblogic
-Dadmin.pwd welcome1
Screenshot for Step
When the script completes you should see something like this:
Screenshot for Step
You will be able to see some of the users and groups that were added to the security realm in the WebLogic server as displayed in the command window output.
Troubleshooting Tips:
  • Be sure you have included all of the parameters (including both admin.url and server.url).
  • Be sure that both of the url parameters reference the server - not your windows machine.
  • The admin.url uses the t3: protocol; the server.url uses http:
  • Make sure you are invoking seedDemoUsers
  • Check for any other typos
  • Did you remember to first run the setAntEnv.bat command?

Summary

In this tutorial, you learned how to install the OBPM

xslt padding with characters call template for left pad and right pad

  Could a call-template be written that took two parameters ?   a string, and a   number) return the string with empty spaces appended t...