The first time you deploy a SOA Composite to SOA Server, a default version label of 1.0 is automatically created. A version identifies a specific deployed instance of a SOA Composite. The version label is appended to the end of the JAR file name created when you deploy the SOA Composite.
If this label version is already deployed and the server mode is production, you are prompted to overwrite the existing version or enter a different version label. If you overwrite the version, the old process definition on the server is replaced by the new definition. You cannot revert to the old definition. In addition, any process instances that ran under the old definition are marked as stale. The stale instances cannot be examined, and all flow and audit information is lost.
If you enter a different version label for the new process definition (for example, 2.0), it is deployed to SOA Server, while the older, deployed process definition (1.0) also continues to run simultaneously on SOA Server. The instances that ran under the old definition are retained, and not marked as stale. You can still examine the flow and audit information for these instances. If the server mode is development, you are not prompted and the version is automatically overwritten.
In a development environment, it is recommended that you always deploy processes to the same version on SOA Server. This way, you avoid marking processes explicitly as the default. The steps to follow for development environment is as follows:
- Design your process.
- Deploy the process to SOA Server (version is 1.0). This becomes the default process for any new instances.
- Redesign the process as needed.
- Redeploy the process as version 1.0 (this is a newer version that overwrites the older version, but version 1.0 remains the default process).
In a production environment, it is recommended that you increment version numbers as you deploy newer versions. For example, if Composite version 1.0 is running in a production environment, then deploy the newer version of Composite to version 2.0. When you have adequately tested and verified your process, mark it as the default. New instances are started using this definition. All version 1.0 instances switch seamlessly to version 2.0. This enables you to decide when a process is ready for production mode. The steps to follow for production environment is as follows:
- Design your process.
- Deploy the process to SOA Server with a different version number (for example, use version 2.0 if the older default version is 1.0).
- Test version 2.0 of the process.
- Activate version 2.0 by marking it as the default process.
Note: Do not overwrite existing versions of a process with newer versions in a production environment. This marks all existing instances of the overwritten process as stale. Stale instances cannot be examined, and all flow and audit information is lost. Instead, create a separate version as described and mark the newer version as the default.
Posted in BPEL, Service Oriented Architecture (SOA 11g) Tagged default, deploy, Production, stale Leave a comment
What is the difference between RequestDispatcher’s forward(ServletRequest request, ServletResponse response) method and HttpServletResponse’s sendRedirect(String location) method?
The forward method of RequestDispatcher will forward the ServletRequest andServletResponse that it is passed to the path that was specified ingetRequestDispatcher(String path).
The response will not be sent back to the client and so the client will not know about this change of resource on the server. This method is useful for communicating between server resources, (servlet to servlet). Because the request and response are forwarded to another resource all request parameters are maintained and available for use. Since the client does not know about this forward on the server, no history of it will be stored on the client, so using the back and forward buttons will not work. This method is faster than usingsendRedirect as no network round trip to the server and back is required.
An example using forward:
protected void doGet(HttpServletRequest request, HttpServletResponse response)throws ServletException, IOException { RequestDispatcher rd = request.getRequestDispatcher("pathToResource"); rd.forward(request, response);}The sendRedirect(String path) method of HttpServletResponse will tell the client that it should send a request to the specified path. So the client will build a new request and submit it to the server, because a new request is being submitted all previous parameters stored in the request will be unavailable. The client’s history will be updated so the forward and back buttons will work. This method is useful for redirecting to pages on other servers and domains.
An example using sendRedirect:
protected void doGet(HttpServletRequest request, HttpServletResponse response)throws ServletException, IOException { response.sendRedirect("pathToResource");}Posted in Java Tagged forward, HttpServletResponse, request, RequestDispatcher, response, sendRedirect,servlet, ServletRequest, ServletResponse Leave a comment
How to setup Session-Timeout in ADF application
Scenario: When there was no user activity performed in the ADF page for 5 minutes in my application, the session was getting timed-out. Due to this the User need to re-loginagain into the ADF application.
But in my case the session timeout need to increase from 5min to 30min.
Resolution: In your ADF application, within web.xml file, add the below code with in <web-app> </web-app> tags -
<session-config>
<session-timeout>30</session-timeout>
</session-config>
<session-timeout>30</session-timeout>
</session-config>
30, It’s the time in minutes a session will exist when there’s no user interaction with the session. After this period the session will be invalidated.
You can modify to value as per your requirement.
Posted in ADF (Application Development Framework) Tagged ADF, page, Session, Timeout, Web, xml Leave a comment
Is SOA Suite 11g can be installed in Windows 7 64-bit operating system?
Few points about SOA installation in Windows7 64-bit OS. I hope it will be useful for you.
It is not an ideal solution and I does not recommend to run 32-bit versions of the Fusion Middleware product on a 64-bit platform. If you are using a 64-bit platform, you should use a 64-bit Operating System (OS), a 64-bit JVM, and the 64-bit (i.e. ‘Generic’) versions of all of the Fusion Middleware products. You should use a 64-bit database too if it is on the same box.
Weblogic server is certified on windows 7 (for both X86 and X64) but Oracle SOA is not yet certified on Windows 7, though it did run well on Windows 7 beta. But many users are using it on the same platform. Even though SOA suite is not certified, it will perfectly work on windows 7. If your OS is a 64 bit, then you might have to install a64-bit JDK prior to installation, for the installer requires a 64-bit JDK and then go with your installation.
During and after installation in Windows 7, always run as Administrator.
To start AdminServer in Window7,
Go to Start–> All Programs –> Oracle Weblogic –> User Domains–> Domain Name –> Right click on start server for .. domain and select “Run as administrator” option.
Go to Start–> All Programs –> Oracle Weblogic –> User Domains–> Domain Name –> Right click on start server for .. domain and select “Run as administrator” option.
Everybody should consider installing on a certified platform. Windows 7, Vista, andWindows XP are not certified SOA Suite platforms. I know we will say “it can work” and we are right. However, we have to keep in mind that when our company buys SOA Suite the odds of we actually getting a desktop copy are next to zero. The licensing costs are just way over the top at over $100K list for everything you need to run on a dual core desktop.
Get used to working off a shared server early for which there are many certified platforms to choose from. I have complete SOA Suite installed in Solaris environment and Im able to access the Enterprise Manager console, Weblogic Server Admin console and BPM Worklist console.
How to install the SOA extensions in Jdeveloper 11g ?
Once you install the Jdeveloper 11g, you cannot Create or Open SOA projects in it. In order to use Jdeveloper 11g for SOA project development, you need to install SOA Extensions in Jdeveloper 11g.
I installed Jdeveloper 11.1.3.0 version and followed below steps to install the SOA extensions -
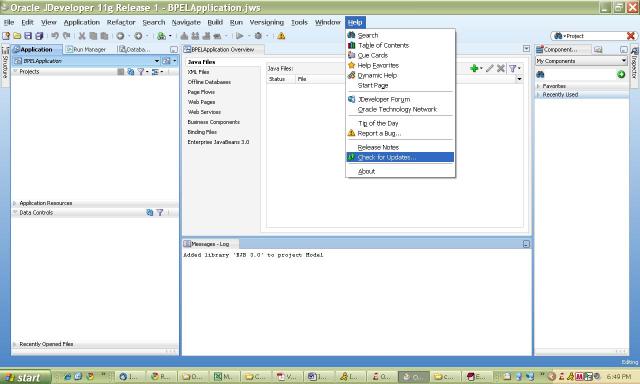
1) Open your Jdeveloper 11g and Click on Help menu and select “Check for Updates” as shown below
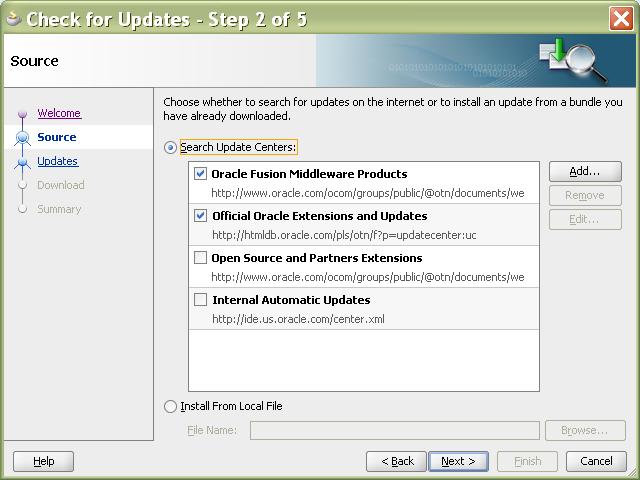
2) A wizard “Check for Updates” is displayed as shown below and click “Next”
3) Under ‘Search Update Centers‘, select “Oracle Fusion Middleware Products” and “Official Oracle Extensions and Updates” options as shown below & Click Next
4) You will view all the available Extensions and Updates in the wizard as shown below
5) Search for SOA from the available list as shown below
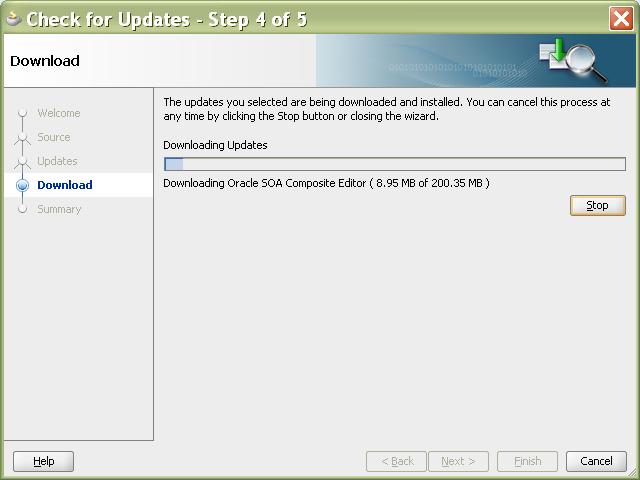
6) Select the “Oracle SOA Composite Editor 11.1.1.3.0.25.57” and click Next. Now the extension will get downloaded and installed in to your Jdeveloper 11g. You can see the progress bar as shown below
7) Once the extension is installed click “Finish“.
Now you will be able to Create or Open the SOA projects in the Jdeveloper 11g.
Posted in Jdeveloper, Service Oriented Architecture (SOA 11g) Tagged Exension, Jdeveloper 11g, SOA 11g, Update Leave a comment
How to get the current system Date and Time in Java?
In order to get the current system Date and Time include the below code in you java class -
import oracle.jbo.domain.Date;
/**
* Get Current Date
* @return
*/
public Date getCurrentDateTime()
{
return new Date(new java.sql.Timestamp(System.currentTimeMillis()));
}
* Get Current Date
* @return
*/
public Date getCurrentDateTime()
{
return new Date(new java.sql.Timestamp(System.currentTimeMillis()));
}
The getCurrentDateTime() method returns the system Date and Time in the format “2011-08-08 17:02:24.0″.
How to display the text-area in the Table in ADF.
Inorder to show the multiple lines of text data (generally for Description column) in thetable column, you have to increase the number of rows in the <inputText> tag as shown
<af:column sortProperty=”DocumentDescr” filterable=”true”
sortable=”true”
headerText=”#{bindings.AttachmentsVO1.hints.DocumentDescr.label}”
id=”c1″ align=”center” width=”240″>
<af:inputText value=”#{row.bindings.DocumentDescr.inputValue}”
label=”#{bindings.AttachmentsVO1.hints.DocumentDescr.label}”
required=”#{bindings.AttachmentsVO1.hints.DocumentDescr.mandatory}”
columns=”#{bindings.AttachmentsVO1.hints.DocumentDescr.displayWidth}”
maximumLength=”#{bindings.AttachmentsVO1.hints.DocumentDescr.precision}”
shortDesc=”#{bindings.AttachmentsVO1.hints.DocumentDescr.tooltip}”
readOnly=”#{!row.bindings.IsRemoveAttachmentEnabled.inputValue}”
rows=”4″
id=”it4″>
<f:validator binding=”#{row.bindings.DocumentDescr.validator}”/>
</af:inputText>
</af:column>
Default value for “rows” is 1. You can give any positive number. It will be displayed (‘Document Description’ field) as below –
How to conditionally enable / disable the column contents in the ADF 11g table
Scenario: I have below contents in my table –
In the “Remove Attachment” column have Delete Icon when clicked, it will deletes the record. I want to Enable this Delete Icon based on the Condition. Then it will look as below –
Solution: To achieve the above functionality follow below steps –
Step 1: Create a Transient atribute in your View Object (VO) that is used in the table as shown
a) Double click on the View Object.
b) Go to Attributes section in the View Object.
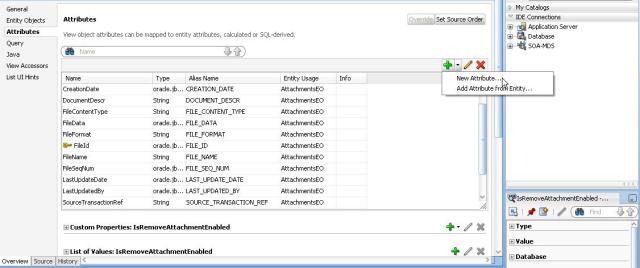
c) Click on the New Attribute option as shown -
d) In the “New View Object Attribute” window give the name for the Transient atribute, I have used “IsRemoveAttachmentEnabled” as Name. In the same window, under Updatable section, select the “Always” radio button. By default this option will be with “Never” and Click “OK” as shown -
e) Now the new Transient attribute (“IsRemoveAttachmentEnabled”) will get created in the View Object as shown
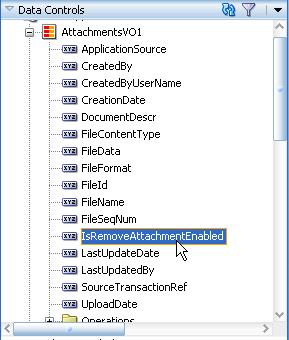
Step 2: Refresh the Data Control and you can see the newly added Transientattribute under the View Object as shown -
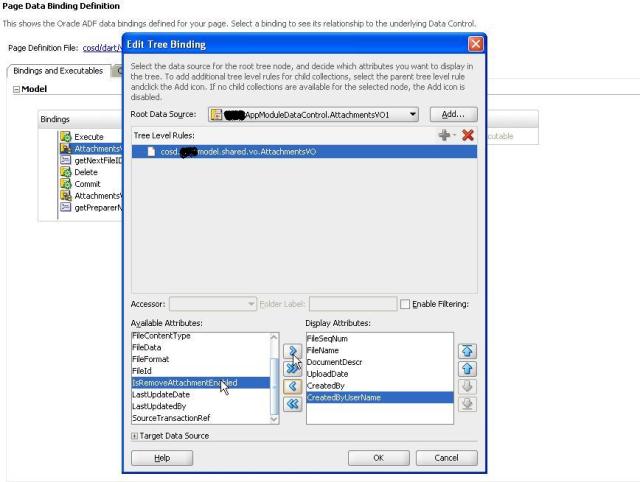
Step 3: Now you need to add this transient attribute (“IsRemoveAttachmentEnabled”) to your Bindings in the JSPX page.
a) Go to your JSPX bindings section and select the iterator (AttachmentsVO1) that you were using for your table to display the records.
 b) Select the Iterator and click on the Edit icon as shown in the above screen shot and “Edit Tree Bindings” window will be displayed. “Under Available Attributes” section select the newly created Transient attribute and move it to the “Display Attributes” section as shown below. Now you will be able to access the Transient variable in your JSPX page.
Step 4: Now to include the conditional logic create a method in the Managed bean as shown below
/**
* Set values on transient attributes, set read-only indicators, etc. Called by View, Copy, and Reverse listeners
* @param
*/
public void enableRemoveAttachment() {
try{
BindingContext bc = BindingContext.getCurrent();
DCBindingContainer bindings = (DCBindingContainer)bc.getCurrentBindingsEntry();
// Get the Attachments iteraor
DCIteratorBinding glIter = bindings.findIteratorBinding(“AttachmentsVO1“);
if (glIter != null && glIter.getRowSetIterator().getRowCount() > 0) {
RowSetIterator rsi = glIter.getViewObject().createRowSetIterator(null);
Row glRow;
while (rsi.next() != null) {
glRow = rsi.getCurrentRow();
// Set “rendered” indicators
if (Your_Conditional_Logic){
glRow.setAttribute(“IsRemoveAttachmentEnabled”, “false“);
}else{
glRow.setAttribute(“IsRemoveAttachmentEnabled”, “true“);
}
}
rsi.closeRowSetIterator();
}
}catch(Exception e){
e.printStackTrace();
throw new RuntimeException(e);
}
}
In the above method (enableRemoveAttachment()) based on your condition you are setting the values (true, false) to the Transient attribute for each row in the iterator. This Transient attribute value we will use for RENDERED parameter for the column, where we want to conditionally display the column contents in the table in JSPX page.
In my case, I have done as below –
<af:column id=”c8″ headerText=”Remove Attachment” align=”center” width=”80″>
<af:commandImageLink id=”cil1″
icon=”/resources/graphics/DeleteIcon.gif”
actionListener=”#{UploadFile.confirmDelete}”
text=” “
disabled=”false”
inlineStyle=”text-decoration:underline;”
rendered=”#{row.bindings.IsRemoveAttachmentEnabled.inputValue}“>
</af:commandImageLink>
</af:column>
By doing this way, based on the Transient attribute values (true, false) the Command link under the “Remove Attachment” column is Rendered and the outcome is as below –
The above approach can be used for any other parameter in the ADF tags, such as “read-only” etc.
If you want to call the method “enableRemoveAttachment()” from Managed Bean before the JSPX page loads, to know how to call a method on JSPA page loads click here
Posted in ADF (Application Development Framework) Tagged ADF, Column, COndition, Disable, Enable, JSPX,Managed bean, Table 1 Comment
How to invoke a method from Managed Bean when JSPX Page Loads in ADF
Scenario: In order to restrict the number displayed rows in the table, I have to set the View Criteria on the Iterator before the page loads.
Solution: I have created a method (fetchSourceRecords()) in the Managed bean (Attachments.java) in which I’m setting the View Criteria on the iterator. In order to call this method (fetchSourceRecords()) on Page loads
1) You have to add the below code into your Managed bean (Attachments.java).
public void beforePhase(PagePhaseEvent pagePhaseEvent) {
if (pagePhaseEvent.getPhaseId() == Lifecycle.PREPARE_MODEL_ID) {
onPageLoad();
}
}
if (pagePhaseEvent.getPhaseId() == Lifecycle.PREPARE_MODEL_ID) {
onPageLoad();
}
}
public void afterPhase(PagePhaseEvent pagePhaseEvent) {
if (pagePhaseEvent.getPhaseId() == Lifecycle.PREPARE_RENDER_ID) {
// onPagePreRender();
}
}
if (pagePhaseEvent.getPhaseId() == Lifecycle.PREPARE_RENDER_ID) {
// onPagePreRender();
}
}
public void onPageLoad() {
if (!AdfFacesContext.getCurrentInstance().isPostback()) {
// add your onPageLoad event here
if (!AdfFacesContext.getCurrentInstance().isPostback()) {
// add your onPageLoad event here
// to set the View Criteria on the Iterator
fetchSourceRecords();
}
}
fetchSourceRecords();
}
}
2) Your Managed bean should implements PagePhaseListener as shown below –
public class Attachments implements PagePhaseListener{ }
You have to Import “oracle.adf.controller.v2.lifecycle.PagePhaseListener;”
3) Next, in your JSPX page defination make sure you add the ControllerClass that points to the managed bean that handles the onPageLoad event.
/* PageDef file */
<pageDefinition xmlns=”http://xmlns.oracle.com/adfm/uimodel”
version=”11.1.1.51.88″ id=”SamplePageDef” Package=”com.sample.view“
ControllerClass=”#{Attachments}”>
…
</pageDefinition>
<pageDefinition xmlns=”http://xmlns.oracle.com/adfm/uimodel”
version=”11.1.1.51.88″ id=”SamplePageDef” Package=”com.sample.view“
ControllerClass=”#{Attachments}”>
…
</pageDefinition>
In the Page definition file specify the package path in “Package” attribute and Managed bean class name in “ControllerClass” attribute.
By this whenever you page loads, the onPageLoad() method gets invoked which inturn invokes the fetchSourceRecords() method. You can even call multiple methodsin onPageLoad() method.
Posted in ADF (Application Development Framework) Tagged ADF, Bean, JSPX, managed, On Page Load 3 Comments
How to display the Date and Time format in ADF page
In this post you will know how to display the DATE and TIME on the JSPX page.
If you want to display the DATE format in “DD-MON-YYYY ” and Time in “Hour:Min:Sec AM/PM” do as below -
12 hour format
In View Object (VO), Under Attributes, for the DATE column, the hints should have “dd-MMM-yyyy hh:mm:ss a” value.
dd-MMM-yyyy is for Date
hh:mm:ss is for Time
a is for AM/PM
This displays the value in the JSPX page as 12-Jun-2011 04:45:24 PM.
24 hour format
In View Object (VO), Under Attributes, for the DATE column, the hints should have “dd-MMM-yyyy hh:mm:ss” value.
dd-MMM-yyyy is for Date
hh:mm:ss is for Time
This displays the value in the JSPX page as 12-Jun-2011 16:45:24.
The above method works fine to display the Date and Time even in the Table in JSPX page.
Note: The above will work fine when we want to display only in the jspx page. But if we want to insert into the table for this DATE column we need to convert the format as the sysdate which will be accepted by the table.









No comments:
Post a Comment