In SOA 11g, Business events framework, below is the option that is used to control the delivery of business events to the target consumers.

Kavin.
2) Java Embedding Activity in BPEL Process.
Sample Project: http://kavin-sample-apps.googlecode.com/files/JavaEmbedding.rar
Description:
1) Access composite/component instance id in Java code:
Below is the java code to access composite instance id from a component instance id in the java code.
Tips from above code:
1) Create a variable compositeInstanceID in BPEL Process.
2) Using XPath, assign composite instance id to this variable using an assign activity.
3) In Java Embedding Activity, Access this variable value using below code snippet.
Where addAuditTrailEntry function is used to print the message on audit trail.
Option 2: Using the Java Code mentioned in 1st section of this post.
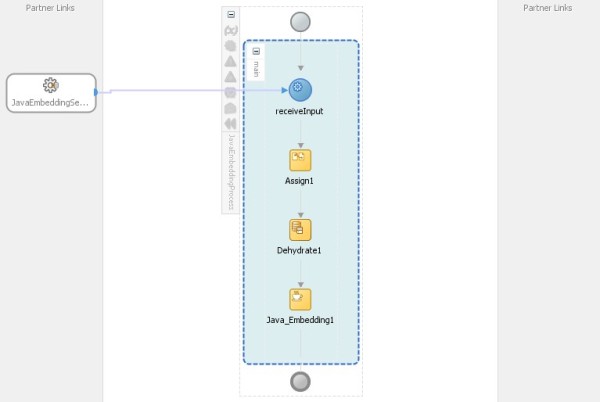
Next is the Java Embedding Activity to fetch the component instance id and composite instance id and print it on audit trail.

Kavin.


Using expression builder, select the count of employees coming in the incoming message/payload and the counter variable.
‘



Test your work:


Follow up:

Kavin.
Resolution: There are two classical solutions for this scenario.

Again this can be done by two options.
Option 1 to update JTA Transaction timeout:
Tip: Save this in a .py file [Eg: increaseJtaTimeout.py]. To invoke this file,
cd <folder-where-you-saved-this-file>
<ORACLE_COMMON>/common/bin/wlst.sh increaseJtaTimeout.py
Eg:
Eg output:
Navigate to WLS console in above given navigation and you can see that transaction timeout is increased to 300.
Option 2 to update JTA Transaction timeout:

Kavin.
List attached web service security policy:
Example usage:
Output:
Attaching a web service policy:
Let’s attach the log policy, oracle/log_policy, to the web service.
Syntax:
Example usage:
Output:
As it clearly says in output, restart of Application is required to get this configuration change activated. This can be verified using listWebServicePolicies or this new policy can be seen from EM.

Detach a web service security policy:
This can be used to detach a security policy applied to the service.
Syntax:
Example usage:
Output:
As it clearly says in output, restart of Application is required to get this configuration change activated. This can be verified using listWebServicePolicies or this new policy can be seen from EM.
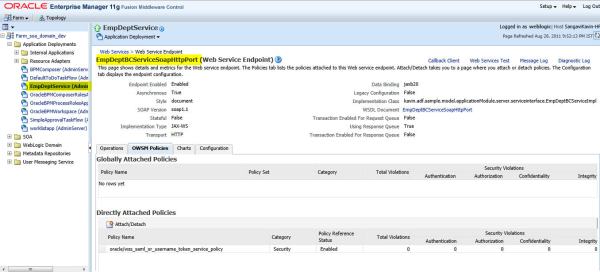
Enable or Disable security policy attached with service:
This is used to enable or disable a security policy that is attached with a service.
Syntax:
Here enable property value set to “true” is going to enable the security policy. This value set to “false” is going to disable the security policy.
Example usage:
Output:
As it clearly says in output, restart of Application is required to get this configuration change activated. This can be verified using listWebServicePolicies or this new policy can be seen from EM.

Thanks for reading and Keep Smiling
Kavin.
Table Details: This uses the EMPLOYEES and DEPARTMENTS table in default HR schema.
Required WLS Data Source Name on WLS: AdfAppDB
Introduction:

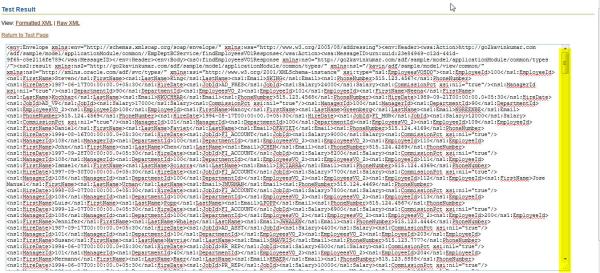

Uncheck the “Generate Property in SDO” option and click ok.


Adding view criteria to findXX and exposing it as service:
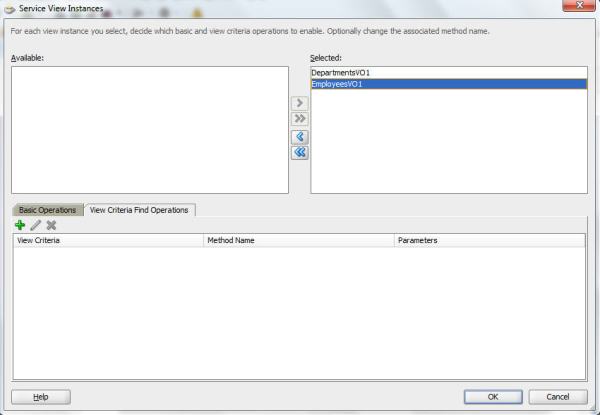

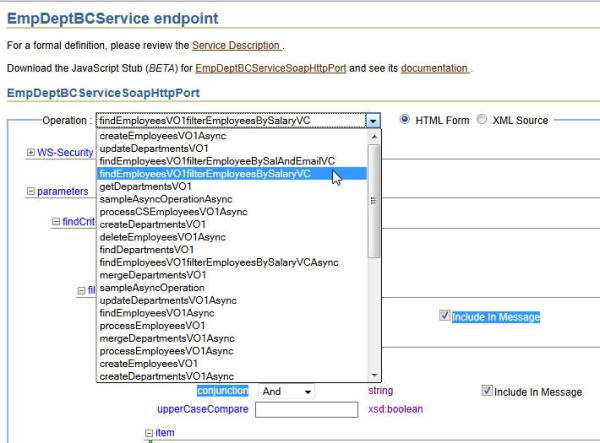
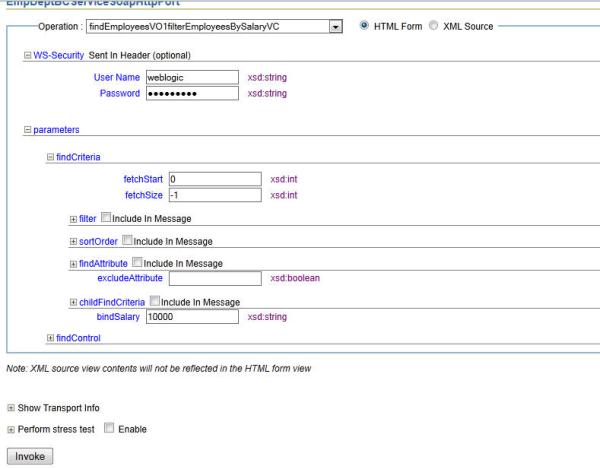
Click Invoke to see the result. Now go back and remove both bindEmail and bindSalary from input payload and click Invoke. The input XML would be something like below.
Click Invoke. This would work fine and return all employees since all attributes of this VC is selected as optional.
Now going back to employee salary view criteria [findEmployeesVO1filterEmployeesBySalaryVC], in the inputPayload, if you don’t pass bindSalary, it would fail with AttrValException since this view criteria item is selected as required.
Source code for input XML for this is,
Output:
Thanks for reading and Keep Smiling 
Kavin.
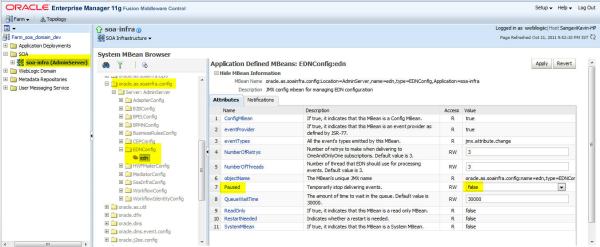
Login to Enterprise Manager -> Expand SOA. Right click on soa_server1 -> Administration -> System Mbean browser. Expand Application Defined MBeans -> oracle.as.soainfra.config -> Server:****** -> EDNConfig -> edn.
You can see a property called Paused. When this property is set to true, then it temporarily suspends the delivery of business events.When this value is false, events are delivered as usual.

This comes very handy when you are debugging event subscription issues where you can see event properly in EDN Log, but the composite subscribing to that business event isn’t fired.
Thanks for Reading and Keep Smiling Kavin.
Categories: EDN, SOA 11.1.1.5, Business Event, Business Event Subscription, Business Events, EDN, EDNConfig, Event Delivery Network, FMW, Install SOA 11g, Oracle SOA Suite, oracle.as.soainfra.config, SOA, SOA 11g
Access Composite/Component details in Java Embedding Activity in BPEL
September 30, 2011 Leave a comment
Use case: We can use ora:getCompositeInstanceId() or ora:getComponentInstanceId() Xpath expressions in BPEL Process to get the composite instance id and the component instance id. In this post, I am going to talk about how to get the same in,
1) Java code2) Java Embedding Activity in BPEL Process.
Sample Project: http://kavin-sample-apps.googlecode.com/files/JavaEmbedding.rar
Description:
1) Access composite/component instance id in Java code:
Below is the java code to access composite instance id from a component instance id in the java code.
01 | package kavin.soa.samples.facade; |
02 |
03 | import java.util.Hashtable; |
04 |
05 | import java.util.List; |
06 |
07 | import javax.naming.Context; |
08 |
09 | import oracle.soa.management.facade.Component; |
10 | import oracle.soa.management.facade.ComponentInstance; |
11 | import oracle.soa.management.facade.Composite; |
12 | import oracle.soa.management.facade.Locator; |
13 | import oracle.soa.management.facade.LocatorFactory; |
14 | import oracle.soa.management.util.ComponentInstanceFilter; |
15 |
16 | public class FetchComposite { |
17 | public FetchComposite() { |
18 | super(); |
19 | } |
20 |
21 | private static void getConnection() { |
22 | Locator locator = null; |
23 | Hashtable jndiProps = new Hashtable(); |
24 | jndiProps.put(Context.PROVIDER_URL, "t3://localhost:7001/soa-infra"); |
25 | jndiProps.put(Context.INITIAL_CONTEXT_FACTORY, |
26 | "weblogic.jndi.WLInitialContextFactory"); |
27 | jndiProps.put(Context.SECURITY_PRINCIPAL, "weblogic"); |
28 | jndiProps.put(Context.SECURITY_CREDENTIALS, "weblogic1"); |
29 | jndiProps.put("dedicated.connection", "true"); |
30 |
31 | String componentInstanceID = "120005"; |
32 |
33 | try { |
34 | locator = LocatorFactory.createLocator(jndiProps); |
35 | Composite composite = |
36 | (Composite)locator.lookupComposite("default/JavaEmbedding!1.0"); |
37 | Component javaEmbeddingComponent = |
38 | (Component)locator.lookupComponent("default/JavaEmbedding!1.0/JavaEmbeddingProcess"); |
39 |
40 | ComponentInstanceFilter compInstFilter = |
41 | new ComponentInstanceFilter(); |
42 | compInstFilter.setCompositeDN(composite.getDN()); |
43 | compInstFilter.setComponentName("JavaEmbeddingProcess"); |
44 | compInstFilter.setId(componentInstanceID); |
45 |
46 | List<ComponentInstance> compInstances = |
47 | javaEmbeddingComponent.getInstances(compInstFilter); |
48 | if (compInstances != null) { |
49 | System.out.println("====JavaEmbeddingInstances==="); |
50 | for (ComponentInstance compInst : compInstances) { |
51 | String compositeInstanceId = |
52 | compInst.getCompositeInstanceId(); |
53 | String componentStatus = compInst.getStatus(); |
54 | System.out.println("Composite Instance ID is " + |
55 | compositeInstanceId); |
56 | System.out.println("Component Status is " + |
57 | componentStatus); |
58 | } |
59 | } |
60 | } catch (Exception e) { |
61 | System.out.println("Exception in getting locator/composite details"); |
62 | } |
63 | } |
64 |
65 | public static void main(String... a) { |
66 | getConnection(); |
67 | } |
68 | } |
- If you see in above code, we are having the component instance ID and from that we are trying to retrieve the related composite instance ID. Reason being, I was trying to write java version of my requirement in BPEL. In BPEL Java Embedding activity, API is available to directly get the component instance ID without any complexity. You would understand that more clearly when you read section 2 of this post.
- Locator -> Object used to locate and fetch composite/component instances and details.
- LocatorFactory -> Used to fetch the locator object. If a context is already established, the JNDI Properties are not required and the overloaded version, createLocator() can be used.
- Composite -> Used to get the composite object. NOTE that this is the entire composite object as a whole and not a composite instance. It takes the composite JNDI name in pattern <partition-name>/<composite-name>!<revision-id>. Eg: default/JavaEmbedding!1.0
- Component -> Used to get the components of the provided JNDI name. The JNDI name is of format <partition-name>/<composite-name>!<revision-id>/<component-name>. Eg, default/JavaEmbedding!1.0/JavaEmbeddingProcess where JavaEmbeddingProcess is my BPEL Component Name.
- ComponentInstanceFilter/CompositeInstanceFilter -> Filters that can be applied on top of Composite/Component objects to query for instances. Applying filter optimizes the query.
- ComponentInstance/CompositeInstance -> Used to get a specific Component/Composite Instance whose properties like state/instance id can be obtained.
Over all, above code assumes that Component instance ID is available, fetches all Components of type “default/JavaEmbedding!1.0/JavaEmbeddingProcess”, filters them based on CompositeDN, ComponentName, ComponentInstanceId. Ideally this would give only one result which is going to be the Component Instance. Using that Component Instance, the Composite Instance ID corresponding to that Component is retrieved.
2) Access composite/component instance id in Java Embedding activity in BPEL code:This part talks about implementing above use case in BPEL Process within a Java Embedding Activity. Java Embedding Activity has an out of the box function called getInstanceId() which returns the Component Instance ID of the particular component. Hence retrieving component instance id in java embedding activity in BPEL isn’t a problem at all. Now how to get the Composite Instance ID. It can be done in two ways.
Option 1: Easiest option.1) Create a variable compositeInstanceID in BPEL Process.
2) Using XPath, assign composite instance id to this variable using an assign activity.
1 | <assign name="Assign1"> |
2 | <copy> |
3 | <from expression="ora:getCompositeInstanceId()"/> |
4 | <to variable="compositeIdUsingXPath"/> |
5 | </copy> |
6 | </assign> |
1 | String compositeInstanceId = getVariableData("compositeInstanceID"); |
2 |
3 | addAuditTrailEntry("Composite instance ID is "+compositeInstanceId); |
Option 2: Using the Java Code mentioned in 1st section of this post.

The first assign activity is a dummy place holder to add composite instance id and component instance id to a dummy variable which can be used to verify the code in java embedding activity at runtime.
01 | <assign name="Assign1"> |
02 | <copy> |
03 | <from expression="ora:getComponentInstanceId()"/> |
04 | <to variable="componentIdUsingXPath"/> |
05 | </copy> |
06 | <copy> |
07 | <from expression="ora:getCompositeInstanceId()"/> |
08 | <to variable="compositeIdUsingXPath"/> |
09 | </copy> |
10 | </assign> |
“Dehydrate1″ -> Dehydration activity to force dehydration API. This is very very important for the Java code using Locator inside Java Embedding activity to work. NOTE that the out of box functions like getInstanceId() or getVariableData() that we use in Java Embedding activity would fetch the data from memory. But the Locator APIs would fetch the data from DB. Hence if you don’t force a dehyderation, then data isn’t available in DB and hence you may not see the results that you may like to see. Hence I am forcing the dehydration in my sample application.
Followed by a series of imports of the class used in Java Embedding activity. This isn’t shown on the screenshot as the imports doesn’t come up on the designer.
1 | <bpelx:exec import="oracle.soa.management.facade.Component"/> |
2 | <bpelx:exec import="oracle.soa.management.facade.ComponentInstance"/> |
3 | <bpelx:exec import="oracle.soa.management.facade.Composite"/> |
4 | <bpelx:exec import="oracle.soa.management.facade.Locator"/> |
5 | <bpelx:exec import="oracle.soa.management.facade.LocatorFactory"/> |
6 | <bpelx:exec import="oracle.soa.management.util.ComponentInstanceFilter"/> |
7 | <bpelx:exec import="java.util.List"/> |
01 | <bpelx:exec name="Java_Embedding1" version="1.5" language="java"> |
02 | <![CDATA[/*Write your java code below e.g. |
03 | System.out.println("Hello, World"); |
04 | */ |
05 | try { |
06 | String componentInstanceID = new Long(getInstanceId()).toString(); |
07 | addAuditTrailEntry("Component Instance ID is "+componentInstanceID); |
08 |
09 | Locator locator = LocatorFactory.createLocator(); |
10 | Composite composite = (Composite)locator.lookupComposite("default/JavaEmbedding!1.0"); |
11 | Component javaEmbeddingComponent = (Component)locator.lookupComponent("default/JavaEmbedding!1.0/JavaEmbeddingProcess"); |
12 |
13 | ComponentInstanceFilter compInstFilter = new ComponentInstanceFilter(); |
14 | compInstFilter.setCompositeDN(composite.getDN()); |
15 | compInstFilter.setComponentName("JavaEmbeddingProcess"); |
16 | compInstFilter.setId(componentInstanceID); |
17 |
18 | List<ComponentInstance> compInstances = javaEmbeddingComponent.getInstances(compInstFilter); |
19 | if (compInstances != null) { |
20 | addAuditTrailEntry("====JavaEmbeddingInstances==="); |
21 | for (ComponentInstance compInst : compInstances) { |
22 | String compositeInstanceId = compInst.getCompositeInstanceId(); |
23 | String componentStatus = compInst.getStatus(); |
24 | addAuditTrailEntry("Composite Instance ID is "+compositeInstanceId); |
25 | addAuditTrailEntry("Component Status is "+componentStatus); |
26 | } |
27 | } |
28 |
29 | } catch (Exception e) { |
30 | addAuditTrailEntry("Exception in getting locator/composite details"); |
31 | }]]> |
32 | </bpelx:exec> |
The logic is same as I explained in section 1. Get component instance id using getInstanceId API and use it to filter components and get the composite instance id.
The above given code can be easily extended to play around with the composite or component instance. If you have a use case that you are trying to solve, feel free to comment your requirement. I can help you to figure out.
Testing the sample composite project:
1) Deploy the composite project.
2) Open the end-point tester for this composite service through soa-infra URL.
Enter an input and click on invoke button.
3) Open the composite Audit trail from EM to see the printed values on audit trail.
Thanks for Reading and Keep Smiling Kavin.
Categories: BPEL, Java, Oracle, SOA 11.1.1.5, addAuditTrailEntry, Audit Trail, BPEL, bpelx:dehydrate, Component, ComponentInstance, ComponentInstanceFilter, Composite, dehydrate, FMW, getCompositeInstanceId, getInstances, getStatus, Java, Java Embedding, Java Embedding Activity, Locator, LocatorFactory, ora:getComponentInstanceId(), ora:getCompositeInstanceId, Oracle SOA Suite, SOA, SOA 11g
Access Creator and Owner of Human workflow Task using HWF API
September 8, 2011 Leave a comment
Use case: How to access owner and creator of a task using Human workflow APIs.
Motivation for this post: https://forums.oracle.com/forums/thread.jspa?threadID=2280507&tstart=0
Download Project: http://kavin-sample-apps.googlecode.com/files/AccessHumanTaskOwnerCreator.rar
Pre-requisite: From WLS Console, create 3 users, user1, user2, user3 with Welcome1 password.
SOA Project Details: Just an overview of the composite.
The sample project consists of a BPEL Process which is exposes as a service. This BPEL uses Human task activity.
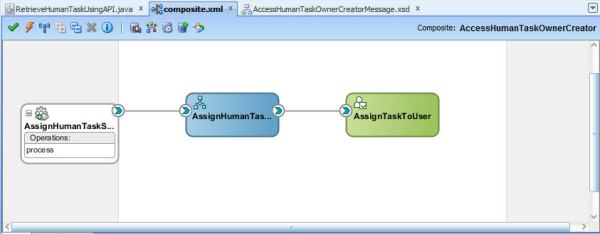
The BPEL process takes creator user name and owner user name as input.
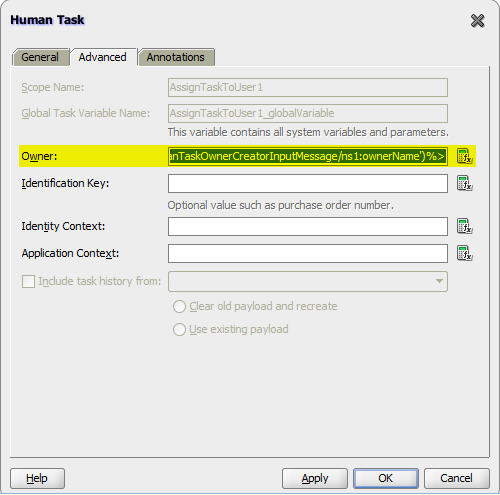
In BPEL Process, the creatorName and ownerName from BPEL Process input is populated as Initiator and Owner of the task while adding Human task activity in the BPEL Process.
Populate Creator:

Populate Owner:
This Human task has a single assignment which assigns the task to a user named “user3″.

Deploying and testing the task:
Deploy the provided sample composite project to the SOA Server. Launch soa-infra URL and click on the end point to initiate a task. Enter user2 and user1 for ownerName and creatorName fields as shown below and click Invoke.

Meeting the requirements:
How to access owner and creator of a task using Human workflow APIs:
Below is the java code snippet that can be used to access the owner username and creator username.
The above code is already part of uploaded project. Run RetrieveHumanTaskUsingAPI.java after adding the project to a Workspace in Jdeveloper and updating your SOA Server Connection information in SOAURL variable.
USERNAME -> This attribute can be user1 who will be the creator of the task or user2 who will be the owner of the task or user3 who will be the approver for the task. You can use various combinations of user1/user2/user3 and you can see the creator name and owner name returned.
getOwnerUser and getCreator of oracle.bpel.services.workflow.task.model.Task would return the creator name of the task and the owner name of the task.
Thanks for Reading and Keep Smiling
Kavin.
Motivation for this post: https://forums.oracle.com/forums/thread.jspa?threadID=2280507&tstart=0
Download Project: http://kavin-sample-apps.googlecode.com/files/AccessHumanTaskOwnerCreator.rar
Pre-requisite: From WLS Console, create 3 users, user1, user2, user3 with Welcome1 password.
SOA Project Details: Just an overview of the composite.
The sample project consists of a BPEL Process which is exposes as a service. This BPEL uses Human task activity.

The BPEL process takes creator user name and owner user name as input.
01 | <?xml version="1.0" encoding="windows-1252" ?> |
02 | <xsd:schema xmlns:xsd="http://www.w3.org/2001/XMLSchema" |
03 | xmlns:ns1="http://go2kavinkumar.com/soa/sample/AccessHumanTaskOwnerCreator/AccessHumanTaskOwnerCreatorMessage" |
04 | targetNamespace="http://go2kavinkumar.com/soa/sample/AccessHumanTaskOwnerCreator/AccessHumanTaskOwnerCreatorMessage" |
05 | elementFormDefault="qualified"> |
06 | <xsd:element name="AssignHumanTaskOwnerCreatorInputMessage"> |
07 | <xsd:complexType> |
08 | <xsd:sequence> |
09 | <xsd:element name="ownerName" type="xsd:string"/> |
10 | <xsd:element name="creatorName" type="xsd:string"/> |
11 | </xsd:sequence> |
12 | </xsd:complexType> |
13 | </xsd:element> |
14 | </xsd:schema> |
Populate Creator:

Populate Owner:

This Human task has a single assignment which assigns the task to a user named “user3″.

Deploying and testing the task:
Deploy the provided sample composite project to the SOA Server. Launch soa-infra URL and click on the end point to initiate a task. Enter user2 and user1 for ownerName and creatorName fields as shown below and click Invoke.

Meeting the requirements:
How to access owner and creator of a task using Human workflow APIs:
Below is the java code snippet that can be used to access the owner username and creator username.
001 | package kavin.soa.sample.hwfApiSample; |
002 |
003 | import java.util.ArrayList; |
004 | import java.util.HashMap; |
005 | import java.util.List; |
006 |
007 | import java.util.Map; |
008 |
009 | import oracle.bpel.services.workflow.IWorkflowConstants; |
010 | import oracle.bpel.services.workflow.WorkflowException; |
011 | import oracle.bpel.services.workflow.client.IWorkflowServiceClient; |
012 | import oracle.bpel.services.workflow.client.IWorkflowServiceClientConstants; |
013 | import oracle.bpel.services.workflow.client.WorkflowServiceClientFactory; |
014 | import oracle.bpel.services.workflow.query.ITaskQueryService; |
015 | import oracle.bpel.services.workflow.repos.Predicate; |
016 | import oracle.bpel.services.workflow.repos.TableConstants; |
017 | import oracle.bpel.services.workflow.task.model.Task; |
018 | import oracle.bpel.services.workflow.verification.IWorkflowContext; |
019 |
020 | public class RetrieveHumanTaskUsingAPI { |
021 | public RetrieveHumanTaskUsingAPI() { |
022 | super(); |
023 | } |
024 |
025 | private IWorkflowServiceClient wfSvcClient = null; |
026 | private ITaskQueryService taskQuerySvc = null; |
027 | private IWorkflowContext wfCtx = null; |
028 |
029 | private static String USERNAME = "user3"; |
030 | private static String PASSWORD = "Welcome1"; |
031 | private static String SOAURL = "t3://localhost:7001"; |
032 |
033 | private void connectToSoa() throws WorkflowException { |
034 |
035 | Map<IWorkflowServiceClientConstants.CONNECTION_PROPERTY, String> connProperties = |
036 | new HashMap<IWorkflowServiceClientConstants.CONNECTION_PROPERTY, String>(); |
037 | connProperties.put(IWorkflowServiceClientConstants.CONNECTION_PROPERTY.CLIENT_TYPE, |
038 | WorkflowServiceClientFactory.REMOTE_CLIENT); |
039 | connProperties.put(IWorkflowServiceClientConstants.CONNECTION_PROPERTY.EJB_PROVIDER_URL, |
040 | SOAURL); |
041 | connProperties.put(IWorkflowServiceClientConstants.CONNECTION_PROPERTY.EJB_INITIAL_CONTEXT_FACTORY, |
042 | "weblogic.jndi.WLInitialContextFactory"); |
043 | wfSvcClient = |
044 | WorkflowServiceClientFactory.getWorkflowServiceClient(connProperties, |
045 | null, null); |
046 | taskQuerySvc = wfSvcClient.getTaskQueryService(); |
047 |
048 | try { |
049 | wfCtx = |
050 | taskQuerySvc.authenticate(USERNAME, PASSWORD.toCharArray(), null); |
051 | } catch (WorkflowException e) { |
052 | e.printStackTrace(); |
053 | throw e; |
054 | } |
055 | System.out.println("Connection Established"); |
056 | } |
057 |
058 | private static Predicate getPredicate() throws WorkflowException { |
059 | Predicate keyPredicate = null; |
060 | try { |
061 | Predicate keyPredicate1 = |
062 | new Predicate(TableConstants.WFTASK_TASKNAMESPACE_COLUMN, |
063 | Predicate.OP_EQ, |
065 | Predicate keyPredicate2 = |
066 | new Predicate(TableConstants.WFTASK_STATE_COLUMN, |
067 | Predicate.OP_EQ, |
068 | IWorkflowConstants.TASK_STATE_ASSIGNED); |
069 | keyPredicate = |
070 | new Predicate(keyPredicate1, Predicate.AND, keyPredicate2); |
071 | } catch (WorkflowException e) { |
072 | e.printStackTrace(); |
073 | throw e; |
074 | } |
075 | return keyPredicate; |
076 | } |
077 |
078 | private void queryTasks() throws WorkflowException { |
079 | //Set up list of columns to query |
080 | List queryColumns = new ArrayList(); |
081 | queryColumns.add("TASKID"); |
082 | queryColumns.add("TASKNUMBER"); |
083 | queryColumns.add("TITLE"); |
084 | queryColumns.add("OUTCOME"); |
085 |
086 | //Query a list of tasks assigned to jstein |
087 | List tasks; |
088 | try { |
089 | tasks = |
090 | taskQuerySvc.queryTasks(wfCtx, queryColumns, null, //Do not query additional info |
091 | ITaskQueryService.AssignmentFilter.ALL, null, |
092 | //No keywords |
093 | getPredicate(), //No custom predicate |
094 | null, //No special ordering |
095 | 0, //Do not page the query result |
096 | 0); |
097 | System.out.println(tasks.size()); |
098 | for(int i=0;i<tasks.size();i++){ |
099 | Task currentTask = (Task)tasks.get(i); |
100 | System.out.println(currentTask.getSystemAttributes().getTaskNumber()); |
101 | System.out.println(currentTask.getOwnerUser()); |
102 | System.out.println(currentTask.getCreator()); |
103 | } |
104 | } catch (WorkflowException e) { |
105 | e.printStackTrace(); |
106 | throw e; |
107 | } |
108 | } |
109 |
110 | public static void main(String[] args) { |
111 | RetrieveHumanTaskUsingAPI retrieveHumanTaskUsingAPI = |
112 | new RetrieveHumanTaskUsingAPI(); |
113 | try { |
114 | retrieveHumanTaskUsingAPI.connectToSoa(); |
115 | retrieveHumanTaskUsingAPI.queryTasks(); |
116 | } catch (WorkflowException e) { |
117 | e.printStackTrace(); |
118 | } |
119 | } |
120 | } |
USERNAME -> This attribute can be user1 who will be the creator of the task or user2 who will be the owner of the task or user3 who will be the approver for the task. You can use various combinations of user1/user2/user3 and you can see the creator name and owner name returned.
getOwnerUser and getCreator of oracle.bpel.services.workflow.task.model.Task would return the creator name of the task and the owner name of the task.
Thanks for Reading and Keep Smiling
Kavin.
Use Entity Varaiable and FlowN in BPEL Process – SOA 11g
September 7, 2011 Leave a comment
In this post, I am going to show how to use Entity variables and FlowN in BPEL Process. The entity variable that I am creating here is based on SDO’s of Employees table of hr schema.
Pre-requisite: Setup EmpDeptService as described on my earlier blog post.
Entity Variable: An entity variable is a type of variable created in BPEL process where you can directly attach it with the underlying data provider service. For eg, in earlier versions, when you want to get an employee record from employees table, you can directly use a DB adapter. Or you can define a service to do the CRUD operation and return XML as appropriate DOM. Where as, with entity variable, you can directly connect the variable to the data provider service through SDOs.
FlowN: FlowN is an activity in BPEL process that is used to execute flows in parallel. Eg, when you have list of employees to process in BPEL, instead of processing them one-by-one, using a FlowN activity, you can process all the employees in parallel.
Use case for this post: A list of employee id and employee salary is given as input to BPEL Process. The BPEL fetches the data of those employees using the Employee SDO created in earlier ADF BC Service using entity variables and update those employees salary in the data base using that ADF BC Service. This update would happen for all employees in parallel.
Description:
The composite exposes a service EntityVaraiableProcessService_ep, has a BPEL process and a reference to EmpDeptService. EntityVaraiableProcessService_ep has “oracle/wss_saml_or_username_token_service_policy” security policy attached with it and EmpDeptService reference has oracle/wss10_saml_token_client_policy security policy attached with it.

BPEL Process takes list of employees message as input. It has employeeId and employeeSalary.
01 | <?xml version="1.0" encoding="windows-1252" ?> |
02 | <xsd:schema xmlns:xsd="http://www.w3.org/2001/XMLSchema" |
04 | targetNamespace="http://go2kavinkumar.com/soa/sample/EntityVariableInBPEL/EmployeeUpdateProcessMessage" |
05 | elementFormDefault="qualified"> |
06 | <xsd:element name="EmployeeDetails"> |
07 | <xsd:complexType> |
08 | <xsd:sequence> |
09 | <xsd:element name="employees" maxOccurs="unbounded"> |
10 | <xsd:complexType> |
11 | <xsd:sequence> |
12 | <xsd:element name="employeeID" type="xsd:string"/> |
13 | <xsd:element name="employeeSalary" type="xsd:string"/> |
14 | </xsd:sequence> |
15 | </xsd:complexType> |
16 | </xsd:element> |
17 | </xsd:sequence> |
18 | </xsd:complexType> |
19 | </xsd:element> |
20 | </xsd:schema> |
In BPEL Process, add a FlowN Activity from Oracle Extensions section of Component Palette. Name this as IterateEmployeesFlowN. This activity is basically used to iterate through the list of employees sent to the BPEL Process.

Using expression builder, select the count of employees coming in the incoming message/payload and the counter variable.
‘

Now the variable “IterateEmployeesFlowN_Variable” keeps track of the counter. Now add a scope in this flowN in which we will code the business process. Let’s call this scope “EntityVariableUsageScope”.

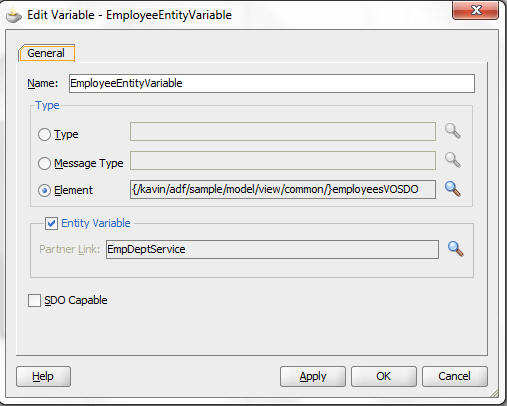
Now create a variable in BPEL Process. To make this entity variable, choose element type and browse through Partner links -> EmpDeptService -> Inline Schemas -> employeesVOSDO. Select the entity variable check box and bind it to the EmpDeptService partner link to bind it with underlying data provider service which owns this SDO. This makes this element variable as an entity variable.

NOTE: When you are using an entity variable in FlowN, always make sure you create the entity variable inside the scope which is inside FlowN. Inside the FlowN scope, DO NOT use the entity variable which is defined outside the scope of FlowN.
Now we must bind the incoming employeeId to the data provider service so that this variable is bound to that particular employee record. To do that, drag and drop a BindEntity activity inside the scope. Also we need to update the salary of this employee to the incoming employeeSalary payload value. Hence drag and drop an Assign activity following BindEntity activity. NOTE that both these must be inside EntityVariableUsageScope scope.

Now let’s map the incoming employeId to the Entity variable using BindEntity activity. Edit the Bind Entity activity. First Browse and select the entity variable to be used for this Bind Entity activity.

Next click on (+) icon next to Unique Keys to select the primary key of this entity variable and pass the primary key value, employeeId in our case, so that this variable is bound to that employee record using the SDO service.

Now browse and select the Key Local Part -> This would be the primary key attribute name that you must be selecting from the entity variable. Once you select this, the value for Key Namespace URI would get defaulted. Now from the incoming payload that has employeeId, select the employeeId for Key Value. If the incoming payload is directly having the id of only one employee, then you can directly map the id here. But in our case, the incoming payload carries a list of employee ids and hence we must select employee id of appropriate index/counter that is getting processed in the FlowN. So you can specify this value like,
bpws:getVariableData(‘inputVariable’,'payload’,'/ns4:EmployeeDetails/ns4:employees[$IterateEmployeesFlowN_Variable]/ns4:employeeID’)
[$IterateEmployeesFlowN_Variable] -> This is the counter variable of FlowN which says take the employee id of say 3rd employee in the incoming list. That’s how each and every employee from the incoming list would be processed using the FlowN index variable at runtime.
So that completes the configuration for BindEntity. This binds the entity variable in BPEL process to the underlying DB data through SDO Service.
Now any changes made on this variable would get automatically updated in DB. In our case, we need to update the salary of this employee with the incoming salary. Hence update the assign activity. Using expression builder, map the incoming Salary payload value to the salary attribute of entity variable.

NOTE that the salary value from the incoming payload should be used as below with appropriate FlowN index variable.
bpws:getVariableData(‘inputVariable’,'payload’,'/ns4:EmployeeDetails/ns4:employees[$IterateEmployeesFlowN_Variable]/ns4:employeeSalary’)
Reason is same as what I described for EmployeeId. Now right click and deploy the composite to SOA server.

Test your work:
select * from employees where employee_id in (100,101);
Launch soa-infra URL and access EntityVaraiableProcessService_ep service. Enter weblogic/weblogic1 in WS-Security section. Enter employeeId and employeeSalary for 1 pair as 100 and 98000. Add one more employee using (+) icon and enter employeeId and employeeSalary as 101 and 78000. Basically we expect to update the salaries of employees with id 100 and 101. Click Invoke button.

Now run the same SQL query again and make sure this data is updated in DB.
select * from employees where employee_id in (100,101);
Check instance on EM:
Now access this composite instance through EM. On the flow trace, make sure the BPEL Process has reached Completed state. On drilling further down into BPEL, you can see that two employes are processed in two parallel branches.


You can re-execute similar test case with 1 and 3 different employees and see how it appears on flow trace and BPEL flow details.
Insights:
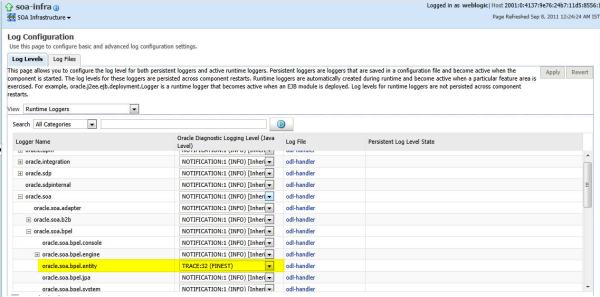
1) When you want to see more logs related to entity variables, you can enable the logger oracle.soa.bpel.entity level to TRACE:32 from EM.

2) When you use BindEntity activity, Entity variable internally uses findXXX operation of the SDO service. Example, in below case, it binds to employee id 100.
01 | <ns2:findEmployeesVO1 xmlns:ns2="http://go2kavinkumar.com/adf/sample/model/applicationModule/common/types/" xmlns:ns1="/kavin/adf/sample/model/view/common/" xmlns:ns0="http://xmlns.oracle.com/adf/svc/types/" xmlns:xsi="http://www.w3.org/2001/XMLSchema-instance"> |
02 | <ns2:findCriteria xmlns:tns="http://xmlns.oracle.com/adf/svc/errors/"> |
03 | <ns0:fetchStart>0</ns0:fetchStart> |
04 | <ns0:fetchSize>-1</ns0:fetchSize> |
05 | <ns0:filter> |
06 | <ns0:group> |
07 | <ns0:conjunction>And</ns0:conjunction> |
08 | <ns0:upperCaseCompare>false</ns0:upperCaseCompare> |
09 | <ns0:item> |
10 | <ns0:upperCaseCompare>false</ns0:upperCaseCompare> |
11 | <ns0:attribute>EmployeeId</ns0:attribute> |
12 | <ns0:operator>=</ns0:operator> |
13 | <ns0:value>100</ns0:value> |
14 | </ns0:item> |
15 | </ns0:group> |
16 | </ns0:filter> |
17 | <ns0:excludeAttribute>false</ns0:excludeAttribute> |
18 | </ns2:findCriteria> |
19 | <ns2:findControl xmlns:tns="http://xmlns.oracle.com/adf/svc/errors/"> |
20 | <ns0:retrieveAllTranslations>false</ns0:retrieveAllTranslations> |
21 | </ns2:findControl> |
22 | </ns2:findEmployeesVO1> |
3) When updates happens through Assign activity, entity variable internally uses processCSXXX Operation of SDO Service. Example, below updates salary of employeeId 100 from 200 to 2000.
01 | <ns2:processCSEmployeesVO1 xmlns:ns2="http://go2kavinkumar.com/adf/sample/model/applicationModule/common/types/" xmlns:ns1="/kavin/adf/sample/model/view/common/" xmlns:ns0="http://xmlns.oracle.com/adf/svc/types/" xmlns:xsi="http://www.w3.org/2001/XMLSchema-instance"> |
02 | <ns2:processData xmlns:tns="http://xmlns.oracle.com/adf/svc/errors/"> |
03 | <ns0:Value xsi:type="ns1:EmployeesVOSDO"> |
04 | <ns1:EmployeeId>100</ns1:EmployeeId> |
05 | <ns1:FirstName>Steven</ns1:FirstName> |
06 | <ns1:LastName>King</ns1:LastName> |
07 | <ns1:Email>SKING</ns1:Email> |
08 | <ns1:PhoneNumber>515.123.4567</ns1:PhoneNumber> |
09 | <ns1:HireDate>1987-06-16T18:30:00.0Z</ns1:HireDate> |
10 | <ns1:JobId>AD_PRES</ns1:JobId> |
11 | <ns1:Salary>2000</ns1:Salary> |
12 | <ns1:CommissionPct xsi:nil="true"/> |
13 | <ns1:ManagerId xsi:nil="true"/> |
14 | <ns1:DepartmentId>90</ns1:DepartmentId> |
15 | </ns0:Value> |
16 | <ns0:ChangeSummary xmlns:sdo="commonj.sdo"> |
17 | <ns0:Value sdo:ref="#/ns2:processCSEmployeesVO1/ns2:processData/ns0:Value[1]"> |
18 | <ns1:Salary>200</ns1:Salary> |
19 | </ns0:Value> |
20 | </ns0:ChangeSummary> |
21 | </ns2:processData> |
22 | <ns2:processControl xmlns:tns="http://xmlns.oracle.com/adf/svc/errors/"> |
23 | <ns0:partialFailureAllowed>false</ns0:partialFailureAllowed> |
24 | </ns2:processControl> |
25 | </ns2:processCSEmployeesVO1> |
In my next post, I will talk about how to create and remove data using entity variables in BPEL Process. Feel free to comment your feedback.
Keep Smiling and Thanks for Reading Kavin.
Categories: SOA, Oracle, Web Services, ADF 11.1.1.5, SOA, ADF BC Service, SOA 11g, FMW, BPEL, Composite, Oracle SOA Suite, web service, Entity Variable, SDO Service, FlowN, findCriteria, findEmployees, processControl, processCS, processCSEmployeesVO1, ChangeSummary, Entity
Transaction Timeout Exception while invoking ADF Service Synchronously from BPEL
August 29, 2011 Leave a comment
Scenario: A BPEL process invoking an ADF BC Service using invoke operation synchronously. The service is taking more than 30 seconds [default JTA Transaction Timeout that comes with Weblogic Server]. Since the service is taking more time than the JTATransaction timeout default value, it would throw below exception – Transaction Timeout Exception.
01 | <Aug 29, 2011 9:25:11 PM IST> <Error> <oracle.webservices.jaxws> <BEA-000000> <Error while invoking endpoint "http://localhost:7001/empDeptService/EmpDeptBCServ |
02 | ice" from client; Security Subject: Administrators> |
03 | <Aug 29, 2011 9:25:11 PM IST> <Error> <oracle.integration.platform.blocks.soap> <BEA-000000> <Unable to dispatch request to http://localhost:7001/empDeptService |
04 | /EmpDeptBCService due to exception |
05 | javax.xml.ws.soap.SOAPFaultException: Transaction timed out after 31 seconds |
06 | BEA1-4BBD4AACDCB928A25D5C |
07 | at oracle.j2ee.ws.client.jaxws.DispatchImpl.throwJAXWSSoapFaultException(DispatchImpl.java:1024) |
08 | at oracle.j2ee.ws.client.jaxws.DispatchImpl.invoke(DispatchImpl.java:808) |
09 | at oracle.j2ee.ws.client.jaxws.OracleDispatchImpl.synchronousInvocationWithRetry(OracleDispatchImpl.java:235) |
10 | at oracle.j2ee.ws.client.jaxws.OracleDispatchImpl.invoke(OracleDispatchImpl.java:106) |
11 | at oracle.integration.platform.blocks.soap.AbstractWebServiceBindingComponent.dispatchRequest(AbstractWebServiceBindingComponent.java:516) |
12 | at oracle.integration.platform.blocks.soap.WebServiceExternalBindingComponent.processOutboundMessage(WebServiceExternalBindingComponent.java:207) |
13 | at oracle.integration.platform.blocks.soap.WebServiceExternalBindingComponent.sendSOAPMessage(WebServiceExternalBindingComponent.java:826) |
14 | at oracle.integration.platform.blocks.soap.WebServiceExternalBindingComponent.request(WebServiceExternalBindingComponent.java:603) |
15 | at oracle.integration.platform.blocks.mesh.SynchronousMessageHandler.doRequest(SynchronousMessageHandler.java:139) |
16 | at oracle.integration.platform.blocks.mesh.MessageRouter.request(MessageRouter.java:182) |
1 | Caused by: com.oracle.bpel.client.BPELFault: faultName: {{http://schemas.oracle.com/bpel/extension}remoteFault} |
2 | messageType: {{http://schemas.oracle.com/bpel/extension}RuntimeFaultMessage} |
3 | parts: {{ |
4 | summary=<summary>Transaction timed out after 31 seconds |
5 | BEA1-4BBD4AACDCB928A25D5C</summary> |
6 | ,detail=<detail>javax.xml.ws.soap.SOAPFaultException: Transaction timed out after 31 seconds |
7 | BEA1-4BBD4AACDCB928A25D5C</detail> |
8 | ,code=<code>env:Server</code>} |
Resolution 1: To increase the JTATransaction timeout value of WLS. Firstly to check the WLS JTA Transaction Timeout value, Navigate to WLS Console -> Domain-Name -> Configuration -> JTA.

Again this can be done by two options.
Option 1 to update JTA Transaction timeout:
If you are a fan of WLST [like me  ], you can use below command to increase the JTA Transaction Timeout value of WLS. Replace DefaultDomain with your domain-name and update the WLS details on connect() command.
1 | connect('weblogic','weblogic1','t3://localhost:7001') |
2 | edit() |
3 | startEdit() |
4 | cd('/JTA/DefaultDomain') |
5 | cmo.setTimeoutSeconds(300) |
6 | activate() |
cd <folder-where-you-saved-this-file>
<ORACLE_COMMON>/common/bin/wlst.sh increaseJtaTimeout.py
Eg:
1 | C:\Oracle\fmw11g_11115\oracle_common\common\bin>cd C:\Oracle\SampleApps\Backups\Blog8_JTATransactionTimeout |
2 |
3 | C:\Oracle\SampleApps\Backups\Blog8_JTATransactionTimeout>C:\Oracle\fmw11g_11115\oracle_common\common\bin\wlst.cmd increaseJtaTimeout.py |
01 | ............................................. |
02 | ............................................. |
03 | ............................................. |
04 | Initializing WebLogic Scripting Tool (WLST) ... |
05 |
06 | Welcome to WebLogic Server Administration Scripting Shell |
07 |
08 | Type help() for help on available commands |
09 |
10 | Connecting to t3://localhost:7001 with userid weblogic ... |
11 | Successfully connected to Admin Server 'AdminServer' that belongs to domain 'soa_domain_dev'. |
12 |
13 | Warning: An insecure protocol was used to connect to the |
14 | server. To ensure on-the-wire security, the SSL port or |
15 | Admin port should be used instead. |
16 |
17 | Location changed to edit tree. This is a writable tree with |
18 | DomainMBean as the root. To make changes you will need to start |
19 | an edit session via startEdit(). |
20 |
21 | For more help, use help(edit) |
22 | You already have an edit session in progress and hence WLST will |
23 | continue with your edit session. |
24 |
25 | Starting an edit session ... |
26 | Started edit session, please be sure to save and activate your |
27 | changes once you are done. |
28 | Activating all your changes, this may take a while ... |
29 | The edit lock associated with this edit session is released |
30 | once the activation is completed. |
31 | Activation completed |
32 | C:\Oracle\SampleApps\Backups\Blog8_JTATransactionTimeout> |
Option 2 to update JTA Transaction timeout:
Navigate to WLS Console -> Domain-Name -> Configuration -> JTA. Increase the “Timeout seconds” value to 300 and click Save. This would update the JTA Transaction Timeout value.
Tip: Reason for pointing the script is to make it once and reuse for all other domains in future instead of re-doing it again and again.
Resolution 2: Ideally if your ADF Service is a very long running service, then its not a good practice to increase the JTA transaction timeout to that big value. Eg, its not good practice to set this value to 1000 or 2000 seconds. Instead, expose an asynchronous version of your ADF Service operation and invoke the service asynchronously from BPEL Process.
To know how to invoke async service from BPEL, you can refer to one of my earlier posts – Invoking an ADF BC Service Asynchronously from SOA Composite, BPEL 11g.
Thanks for reading and Keep Smiling Kavin.
Categories: ADF, Oracle, SOA, Web Services, Weblogic, WLST 11.1.1.5, ADF BC, ADF BC Service, BPEL, Composite, JTA Transaction Timeout, Oracle SOA Suite, Service, SOA, TimedOutException, timeout, Transaction timed out
Using WLST to manage Web Service Policies
August 28, 2011 Leave a comment
Security policies can be added and managed for your web services using Fusion Middeware Control, Enterprise Manager, by browsing appropriate web service on EM. But WLST offers more convenient way to manage policies. I find WLST more handy in many many cases. So I will talk about the common WLST commands that will be used to list/attach/detach/enable/disable security policies with your Web Service.
Dev Guide Reference: http://download.oracle.com/docs/cd/E21764_01/web.1111/e13813/custom_webservices.htm#CHDBGDBF
The commands that I am going to talk about here are,
listWebServicePolicies
attachWebServicePolicy
detachWebServicePolicy
enableWebServicePolicy
The tricky part here is not using these commands. But knowing the hack on how to identify these parameters correct and use those parameters. I am going to focus on that in this post.
Knowing the common parameters:
All the WLST commands for doing above operations share a common parameters. If you know how to derive them, then this is a cake walk. This post will help you in know that hack.
Syntax:1 | listWebServicePolicies(application,moduleOrCompName,moduleType,serviceName,subjectName) |
2 |
3 | attachWebServicePolicy(application, moduleOrCompName, moduleType, serviceName, subjectName, policyURI, [subjectType=None]) |
4 |
5 | detachWebServicePolicy(application, moduleOrCompName, moduleType, serviceName, subjectName, policyURI, [subjectType=None]) |
6 |
7 | enableWebServicePolicy(application, moduleOrCompName, moduleType, serviceName, subjectName, policyURI, [enable], [subjectType=None] )) |
| Parameter | Description | How to derive the value |
| application | For J2EE App: Name of the J2EE App relative to domain name, server name and application name in pattern “domain-name/server-name/application-name”. Eg: /wls_domain/AdminServer/EmpDeptService For SOA Composite: None. | For J2EE App: Navigate to <domain-home>\servers\AdminServer\upload and take the Application name from there. For SOA Project: The value can be entered as None. Its a static value. |
| moduleOrCompName | For J2EE App: Name of the moduleOrCompName represents the name of the web module for an ADF BC Service. For SOA Composite: This represents the SOA Composite name in pattern <partition-name>/<composite-name>[revision-id] | For J2EE App: Navigate to WLS console -> Deployments and drill down into the Application. In Overview -> Modules section, you can find the web module name for the service. Eg: for my EmpDeptService App, the web module name you would see if “empDeptService”. For SOA Composite: Navigate to soa-infra URL. You would find the composite name mentioned as “default/AsyncServiceCallUsingPick!1.0″. Remove ! and cover the revision id with []. Eg: valid name for above composite would be “default/AsyncServiceCallUsingPick[1.0]“ |
| moduleType | For J2EE App: web. For SOA Composite: soa. | Static values.. For J2EE App: web. For SOA Composite: soa. |
| serviceName | This represents the name of the service. | Navigate to the WSDL file. Navigate to the wsdl:service tag. Fetch the value from “name” attribute. |
| subjectName | This represents the port name of the service. | Navigate to the WSDL file.Navigate to the wsdl:port tag. Fetch the value from “name” attribute. |
| policyURI | The security policy URI which needs to be used in appropriate command. | List of available security policies can be obtained from wsm-pm/validator URL. Eg: http://localhost:7001/wsm-pm/validator |
In all these examples/demos, I am going to take my EmpDeptBCService. This would list all security policy attached with this ADF BC Service.
Syntax:1 | listWebServicePolicies(application,moduleOrCompName,moduleType,serviceName,subjectName) |
1 | listWebServicePolicies('/soa_domain_dev/AdminServer/EmpDeptService','empDeptService','web','EmpDeptBCService','EmpDeptBCServiceSoapHttpPort') |
1 | wls:/soa_domain_dev/serverConfig> listWebServicePolicies('/soa_domain_dev/AdminServer/EmpDeptService','empDeptService','web','EmpDeptBCService','EmpDeptBCServic |
2 | eSoapHttpPort') |
3 |
4 | EmpDeptBCServiceSoapHttpPort : |
5 | security : oracle/wss_saml_or_username_token_service_policy, enabled=true |
6 | Attached policy or policies are valid; endpoint is secure. |
7 |
8 | wls:/soa_domain_dev/serverConfig> |
Let’s attach the log policy, oracle/log_policy, to the web service.
Syntax:
1 | attachWebServicePolicy(application, moduleOrCompName, moduleType, serviceName, subjectName, policyURI, [subjectType=None]) |
1 | attachWebServicePolicy('/soa_domain_dev/AdminServer/EmpDeptService', 'empDeptService', 'web', 'EmpDeptBCService', 'EmpDeptBCServiceSoapHttpPort', 'oracle/log_policy') |
1 | wls:/soa_domain_dev/serverConfig> attachWebServicePolicy('/soa_domain_dev/AdminServer/EmpDeptService', 'empDeptService', 'web', 'EmpDeptBCService', 'EmpDeptBCS |
2 | rviceSoapHttpPort', 'oracle/log_policy') |
3 |
4 | Please restart application to uptake any policy or configuration change. |
5 |
6 | wls:/soa_domain_dev/serverConfig> |

Detach a web service security policy:
This can be used to detach a security policy applied to the service.
Syntax:
1 | detachWebServicePolicy(application, moduleOrCompName, moduleType, serviceName, subjectName, policyURI, [subjectType=None]) |
1 | detachWebServicePolicy('/soa_domain_dev/AdminServer/EmpDeptService', 'empDeptService', 'web', 'EmpDeptBCService', 'EmpDeptBCServiceSoapHttpPort', 'oracle/log_policy') |
1 | wls:/soa_domain_dev/serverConfig> detachWebServicePolicy('/soa_domain_dev/AdminServer/EmpDeptService', 'empDeptService', 'web', 'EmpDeptBCService', 'EmpDeptBCSe |
2 | rviceSoapHttpPort', 'oracle/log_policy') |
3 |
4 | Please restart application to uptake any policy or configuration change. |
5 |
6 | wls:/soa_domain_dev/serverConfig> |

Enable or Disable security policy attached with service:
This is used to enable or disable a security policy that is attached with a service.
Syntax:
1 | enableWebServicePolicy(application, moduleOrCompName, moduleType, serviceName, subjectName, policyURI, [enable], [subjectType=None] |
2 | )) |
Example usage:
1 | enableWebServicePolicy('/soa_domain_dev/AdminServer/EmpDeptService', 'empDeptService', 'web', 'EmpDeptBCService', 'EmpDeptBCServiceSoapHttpPort', 'oracle/wss_saml_or_username_token_service_policy', false ) |
1 | wls:/soa_domain_dev/serverConfig> enableWebServicePolicy('/soa_domain_dev/AdminServer/EmpDeptService', 'empDeptService', 'web', 'EmpDeptBCService', 'EmpDeptBCSe |
2 | rviceSoapHttpPort', 'oracle/wss_saml_or_username_token_service_policy', false ) |
3 |
4 | Please restart application to uptake any policy or configuration change. |
5 |
6 | wls:/soa_domain_dev/serverConfig> |

Thanks for reading and Keep Smiling
Kavin.
Categories: Oracle, OWSM, Web Services, WLST 11.1.1.5, ADF BC Service, attachWebServicePolicy, Composite, detachWebServicePolicy, enableWebServicePolicy, listWebServicePolicies, oracle/log_policy, oracle/wss_saml_or_username_token_service_policy, OWSM, SAML, Security Policy, web service, WLST, WS-Security
Using ViewCriteria in find***** operation of ADF BC Service
August 28, 2011 Leave a comment
ADF BC Service provides default findXXXX operation which helps to run a custom filter query on a selected view object and get appropriate results. Here I will take my sample EmpDeptBCService to explain and focus more on findXXXX operation.
Completed Code Sample: http://kavin-sample-apps.googlecode.com/files/EmpDeptServiceApp_ViewCriteriaInFindOperation.rarTable Details: This uses the EMPLOYEES and DEPARTMENTS table in default HR schema.
Required WLS Data Source Name on WLS: AdfAppDB
Introduction:
Deploy the EmpDeptBCService as per the instructions on my earlier post. Let’s pick findEmployeesVO1 operation. Based on the filter condition that we are entering, this operation is going to return a list of employees meeting that filter condition. Let’s test one scenario.
Choose findEmployeesVO1 and enter username and password in WS-Security section. Enter fetchStart and fetchSize as 0 and -1 to fetch all rows matching the criteria condition. Under group -> item, let’s enter the first criteria. Enter Salary >= 20000 as shown below. Add one more criteria item to filter for Email like ‘S%’.

Remove sortOrder, findAttribute and childFindCriteria from the input message by unchecking “Include in Message”. The input payload would be something like below
01 | <soap:Envelope xmlns:soap="http://schemas.xmlsoap.org/soap/envelope/"><soap:Header><wsse:Security soap:mustUnderstand="1" xmlns:wsse="http://docs.oasis-open.org/wss/2004/01/oasis-200401-wss-wssecurity-secext-1.0.xsd"><wsse:UsernameToken><wsse:Username>weblogic</wsse:Username><wsse:Password Type="http://docs.oasis-open.org/wss/2004/01/oasis-200401-wss-username-token-profile-1.0#PasswordText">weblogic1</wsse:Password></wsse:UsernameToken></wsse:Security></soap:Header> |
02 | <soap:Body xmlns:ns1="http://go2kavinkumar.com/adf/sample/model/applicationModule/common/types/"> |
03 | <ns1:findEmployeesVO1> |
04 | <ns1:findCriteria xmlns:ns2="http://xmlns.oracle.com/adf/svc/types/"> |
05 | <ns2:fetchStart>0</ns2:fetchStart> |
06 | <ns2:fetchSize>-1</ns2:fetchSize> |
07 | <ns2:filter> |
08 | <ns2:conjunction>And</ns2:conjunction> |
09 | <ns2:group> |
10 | <ns2:conjunction>And</ns2:conjunction> |
11 | <ns2:upperCaseCompare/> |
12 | <ns2:item> |
13 | <ns2:conjunction>And</ns2:conjunction> |
14 | <ns2:upperCaseCompare>false</ns2:upperCaseCompare> |
15 | <ns2:attribute>Salary</ns2:attribute> |
16 | <ns2:operator>>=</ns2:operator> |
17 | <ns2:value>20000</ns2:value> |
18 | </ns2:item> |
19 | <ns2:item> |
20 | <ns2:conjunction>And</ns2:conjunction> |
21 | <ns2:upperCaseCompare>true</ns2:upperCaseCompare> |
22 | <ns2:attribute>Email</ns2:attribute> |
23 | <ns2:operator>like</ns2:operator> |
24 | <ns2:value>S%</ns2:value> |
25 | </ns2:item> |
26 | </ns2:group> |
27 | <ns2:nested/> |
28 | </ns2:filter> |
29 | <ns2:excludeAttribute/> |
30 | </ns1:findCriteria> |
31 | <ns1:findControl xmlns:ns3="http://xmlns.oracle.com/adf/svc/types/"> |
32 | <ns3:retrieveAllTranslations/> |
33 | </ns1:findControl> |
34 | </ns1:findEmployeesVO1> |
35 | </soap:Body> |
36 | </soap:Envelope> |
Output of above input payload would actually display only 1 employee with default seeded data in EMPLOYEES table on HR schema. The result would fetch the employee and his complete hierarchy due to the Manager -> Employee View link also being exposed.Below screenshot result includes only one employee data whose salary is greater than 20000.

In order to make this result more readable for current use case, let’s remove the Manager to Employee VL in service alone. This doesn’t mean we will have to remove complete VL. To remove a VL in SDO alone for get/find operations in SDO, edit Relationship -> Accessors.

Uncheck the “Generate Property in SDO” option and click ok.

Now redeploy the EAR to the application server and re-execute the test steps given above. You wont see the reporting employees in the result set and the result will be more readable.
For same input as given earlier, below is the output which does not include any of the reporting employees. Click Formatted XML to see a more clear XML version.

In previous input itself, change email input to the filter condition as “AK%” and see that no result would be returned.
Creating View Criteria for EmployeesVO:Open EmployeesVO and create a new bind variable “bindSalary” which we will use in View Criteria. Make sure the bind variable isn’t marked as Required.

Now let’s create a view criteria “filterEmployeesBySalaryVC” to filter employees based on their salary. Add an Item, select Salary as attribute, Operator as “Greater than or equal to” and map this to bind variable bindSalary that we created earlier. Mark this view criteria as required.

Now let’s create another bind variable to be used in view criteria based on email. Create bindEmail and mark the bind variable as not required. Create another View Criteria “filterEmployeeBySalAndEmailVC” with two Items. One Salary >= bindSalary and another Email Contains bindEmail. The conjunction used here is AND.

Adding view criteria to findXX and exposing it as service:
Creating view criteria doesn’t mean that this would be exposed through the service SDO find operation. We will have to manually enable these VCs through Service Interface section of AM. Open EmpDeptAppModule.xml -> Service Interface and edit Service Interface View Instances. Select EmploeesVO and navigate to View Criteria Find Operations.

Now click on the (+) icon to select and add a View Criteria. Select the view criteria filterEmployeesBySalaryVC. Now you will see the operation name as findEmployeesVO1filterEmployeesBySalaryVC. This means that the default findXXX operation will be unaltered. It would create a new find operation with the view criteria included in its name.

Similarly expose the view criteria filterEmployeeBySalAndEmailVC which would be exposed as findEmployeesVO1filterEmployeeBySalAndEmailVC.
NOTE: This would result in updation of Remote Common Interface file, Remote Server Class, Service Schema and Service Definition files since it exposes appropriate View criteria as new find operation.
Now deploy the EAR to the server.
Testing the new find operation with View criteria:Now launch the test page of the service.
http://localhost:7001/empDeptService/EmpDeptBCService
In the list of operations, we can see the two new find operations for two view criterias we created and added above. Select findEmployeesVO1filterEmployeesBySalaryVC.

Enter WS-Security as weblogic/weblogic1 and fetchStart and fetchSize as 0 and -1 respectively. Now let’s remove filter, sortOrder, findAttribute and childFindCriteria to be included in Message. Enter the bindSalary value as 10000 and click XML Source. This would enable us to get a list of employees whose salary is more than 10000.

The XML Payload would look like below.
01 | <soap:Envelope xmlns:soap="http://schemas.xmlsoap.org/soap/envelope/"><soap:Header><wsse:Security soap:mustUnderstand="1" xmlns:wsse="http://docs.oasis-open.org/wss/2004/01/oasis-200401-wss-wssecurity-secext-1.0.xsd"><wsse:UsernameToken><wsse:Username>weblogic</wsse:Username><wsse:Password Type="http://docs.oasis-open.org/wss/2004/01/oasis-200401-wss-username-token-profile-1.0#PasswordText">weblogic1</wsse:Password></wsse:UsernameToken></wsse:Security></soap:Header> |
02 | <soap:Body xmlns:ns1="http://go2kavinkumar.com/adf/sample/model/applicationModule/common/types/"> |
03 | <ns1:findEmployeesVO1filterEmployeesBySalaryVC> |
04 | <ns1:findCriteria xmlns:ns2="http://xmlns.oracle.com/adf/svc/types/"> |
05 | <ns2:fetchStart>0</ns2:fetchStart> |
06 | <ns2:fetchSize>-1</ns2:fetchSize> |
07 | <ns2:excludeAttribute/> |
08 | </ns1:findCriteria> |
09 | <ns1:bindSalary>10000</ns1:bindSalary> |
10 | </ns1:findEmployeesVO1filterEmployeesBySalaryVC> |
11 | </soap:Body> |
12 | </soap:Envelope> |
Click Invoke button to see the filtered list of employees with Salary more than 10000. Go back, change the bindSalary to 20000 to see employees getting salary more than 20000.
Now let’s test the second view criteria – filterEmployeeBySalAndEmailVC. Select operation findEmployeesVO1filterEmployeeBySalAndEmailVC, enter weblogic/weblogic1 in WS-Security. fetchStart and fetchSize as 0 and -1 respectively. Remove filter, sortOrder, findAttribute and childFindCriteria to be included in Message. Enter the bindSalary value as 20000 and bindEmail as S and click XML Source. This would enable us to get a list of employees whose salary is more than 20000 AND whose email contains S. XML Input Payload would look like below.
01 | <soap:Envelope xmlns:soap="http://schemas.xmlsoap.org/soap/envelope/"><soap:Header><wsse:Security soap:mustUnderstand="1" xmlns:wsse="http://docs.oasis-open.org/wss/2004/01/oasis-200401-wss-wssecurity-secext-1.0.xsd"><wsse:UsernameToken><wsse:Username>weblogic</wsse:Username><wsse:Password Type="http://docs.oasis-open.org/wss/2004/01/oasis-200401-wss-username-token-profile-1.0#PasswordText">weblogic1</wsse:Password></wsse:UsernameToken></wsse:Security></soap:Header> |
02 | <soap:Body xmlns:ns1="http://go2kavinkumar.com/adf/sample/model/applicationModule/common/types/"> |
03 | <ns1:findEmployeesVO1filterEmployeeBySalAndEmailVC> |
04 | <ns1:findCriteria xmlns:ns2="http://xmlns.oracle.com/adf/svc/types/"> |
05 | <ns2:fetchStart>0</ns2:fetchStart> |
06 | <ns2:fetchSize>-1</ns2:fetchSize> |
07 | <ns2:excludeAttribute/> |
08 | </ns1:findCriteria> |
09 | <ns1:bindEmail>S</ns1:bindEmail> |
10 | <ns1:bindSalary>20000</ns1:bindSalary> |
11 | </ns1:findEmployeesVO1filterEmployeeBySalAndEmailVC> |
12 | </soap:Body> |
13 | </soap:Envelope> |
01 | <soap:Envelope xmlns:soap="http://schemas.xmlsoap.org/soap/envelope/"><soap:Header><wsse:Security soap:mustUnderstand="1" xmlns:wsse="http://docs.oasis-open.org/wss/2004/01/oasis-200401-wss-wssecurity-secext-1.0.xsd"><wsse:UsernameToken><wsse:Username>weblogic</wsse:Username><wsse:Password Type="http://docs.oasis-open.org/wss/2004/01/oasis-200401-wss-username-token-profile-1.0#PasswordText">weblogic1</wsse:Password></wsse:UsernameToken></wsse:Security></soap:Header> |
02 | <soap:Body xmlns:ns1="http://go2kavinkumar.com/adf/sample/model/applicationModule/common/types/"> |
03 | <ns1:findEmployeesVO1filterEmployeeBySalAndEmailVC> |
04 | <ns1:findCriteria xmlns:ns2="http://xmlns.oracle.com/adf/svc/types/"> |
05 | <ns2:fetchStart>0</ns2:fetchStart> |
06 | <ns2:fetchSize>-1</ns2:fetchSize> |
07 | <ns2:excludeAttribute/> |
08 | </ns1:findCriteria> |
09 | </ns1:findEmployeesVO1filterEmployeeBySalAndEmailVC> |
10 | </soap:Body> |
11 | </soap:Envelope> |
Now going back to employee salary view criteria [findEmployeesVO1filterEmployeesBySalaryVC], in the inputPayload, if you don’t pass bindSalary, it would fail with AttrValException since this view criteria item is selected as required.
Source code for input XML for this is,
01 | <soap:Envelope xmlns:soap="http://schemas.xmlsoap.org/soap/envelope/"><soap:Header><wsse:Security soap:mustUnderstand="1" xmlns:wsse="http://docs.oasis-open.org/wss/2004/01/oasis-200401-wss-wssecurity-secext-1.0.xsd"><wsse:UsernameToken><wsse:Username>weblogic</wsse:Username><wsse:Password Type="http://docs.oasis-open.org/wss/2004/01/oasis-200401-wss-username-token-profile-1.0#PasswordText">weblogic1</wsse:Password></wsse:UsernameToken></wsse:Security></soap:Header> |
02 | <soap:Body xmlns:ns1="http://go2kavinkumar.com/adf/sample/model/applicationModule/common/types/"> |
03 | <ns1:findEmployeesVO1filterEmployeesBySalaryVC> |
04 | <ns1:findCriteria xmlns:ns2="http://xmlns.oracle.com/adf/svc/types/"> |
05 | <ns2:fetchStart>0</ns2:fetchStart> |
06 | <ns2:fetchSize>-1</ns2:fetchSize> |
07 | <ns2:excludeAttribute/> |
08 | </ns1:findCriteria> |
09 | </ns1:findEmployeesVO1filterEmployeesBySalaryVC> |
10 | </soap:Body> |
11 | </soap:Envelope> |
01 | <env:Envelope |
02 | xmlns:env="http://schemas.xmlsoap.org/soap/envelope/"> |
03 | <env:Header/> |
04 | <env:Body> |
05 | <env:Fault> |
06 | <faultcode>env:Server</faultcode> |
07 | <faultstring>JBO-27035: Attribute Salary is required.</faultstring> |
08 | <detail> |
09 | <tns:ServiceErrorMessage |
10 | xmlns:tns="http://xmlns.oracle.com/adf/svc/errors/" |
11 | xmlns:xsi="http://www.w3.org/2001/XMLSchema-instance" |
12 | xsi:type="tns:ServiceAttrValErrorMessage"> |
13 | <tns:code>27035</tns:code> |
14 | <tns:message>JBO-27035: Attribute Salary is required.</tns:message> |
15 | <tns:severity>SEVERITY_ERROR</tns:severity> |
16 | <tns:sdoObject |
17 | xmlns:tns="http://xmlns.oracle.com/adf/svc/errors/" |
18 | xmlns:ns0="http://xmlns.oracle.com/adf/svc/types/" |
19 | xmlns:xsi="http://www.w3.org/2001/XMLSchema-instance" |
20 | xsi:type="ns0:FindCriteria"> |
21 | <ns0:fetchStart>0</ns0:fetchStart> |
22 | <ns0:fetchSize>-1</ns0:fetchSize> |
23 | <ns0:excludeAttribute/> |
24 | </tns:sdoObject> |
25 | <tns:exceptionClassName>oracle.jbo.AttrValException</tns:exceptionClassName> |
26 | <tns:attributeName>Salary</tns:attributeName> |
27 | <tns:objectName>filterEmployeesBySalaryVC_temp</tns:objectName> |
28 | </tns:ServiceErrorMessage> |
29 | </detail> |
30 | </env:Fault> |
31 | </env:Body> |
32 | </env:Envelope> |
Kavin.
Configuring SOA on AdminServer for Development
August 20, 2011 Leave a comment
On my first post, I spoke about installing Oracle SOA Suite 11g on Windows 7 - Install SOA 11g [11.1.1.5] on Windows 7. If the install is done for development purpose for SOA and BPM Suite, then this might be helpful for you. During development, always the major constraint is the hardware resource. The traditional templates for SOA and BPM configures SOA on a managed server, soa_server1 by default. So we end up in running one AdminServer and one managed server along with DB. Instead how would that be if you can run SOA on AdminServer itself? Atleast we can get some better performance in our hardware. I am going to explain how can you do that. There are two options.
Option 1: Using SOA and BPM Developer Templates <Highly Recommended>
Oracle SOA Suite 11g provides developer templates for SOA and BPM Suite. Here is the documentation reference. All you need to do is, while configuring SOA Domain, make sure you choose
Oracle SOA Suite for developers and
Oracle BPM Suite for developers
instead of
Oracle SOA Suite
Oracle BPM Suite templates.
You just need to select these two templates. Every other installation step remains the same. Once domain is configured, if you start the AdminServer alone, you will get SOA in it as well. Just start the admin server and access soa-infra, worklist etc on that port itself.
Option 2: Using a custom script:
There were days where my computer suffered a lot because I was hosting many many servers on it. To release a bit of memory, I created a script which would convert SOA from soa_server1 managed server to AdminServer. You can use this option if you already have a SOA server installed with managed server templates and want to upgrade that to AdminServer itself. The script is below.
Things to replace before executing:
1. Modify the host:port information on line 1.
2. If the SOA Managed Server name is not soa_server1, the just do a find and replace to replace soa_server1 with your managed server name.
How to execute:
This script has to be executed from WLST.
cd to the location where you have downloaded the script.
Eg: C:\Oracle\SampleApps\Backups\Blog5\
Run this through WLST.
Eg: C:\Oracle\fmw11g_11115\oracle_common\common\bin\wlst.cmd add_soa_to_admin.py
01 | connect('weblogic','weblogic1','t3://localhost:7001') |
02 |
03 | def setSoaTargetToAdmin(s): |
04 | print('=========================') |
05 | print('METHOD called with '+s) |
06 | print('=========================') |
07 | try: |
08 | print(cmo) |
09 | cd(s) |
10 | print('----------------------') |
11 | print(cmo) |
12 | print('List child for '+s) |
13 | print('----------------------') |
14 | x=ls(returnMap='true') |
15 | for i in x: |
16 | cd(i) |
17 | print('myrealm' in s) |
18 | if('myrealm' in s): |
19 | cd('..') |
20 | break |
21 | if(i=='Targets'): |
22 | print('TARGETFOUND') |
23 | z=ls(returnMap='true') |
24 | hassoatarget='false' |
25 | hasadmintarget='false' |
26 | for k in z: |
27 | if( k == 'soa_server1'): |
28 | hassoatarget='true' |
29 | if(k=='AdminServer'): |
30 | hasadmintarget='true' |
31 | if(hassoatarget=='true' and hasadmintarget=='false'): |
32 | print('=============================Only soa target for '+i) |
33 | if('UMSJMSFileStore' in s or 'BPMJMSFileStore' in s or 'SOAJMSFileStore' in s or 'BPMJMSServer' in s or 'SOAJMSServer' in s or 'UMSJMSServer' in s): |
34 | startEdit() |
35 | set('Targets',jarray.array([ObjectName('com.bea:Name=AdminServer,Type=Server')], ObjectName)) |
36 | activate() |
37 | else: |
38 | startEdit() |
39 | set('Targets',jarray.array([ObjectName('com.bea:Name=AdminServer,Type=Server'), ObjectName('com.bea:Name=soa_server1,Type=Server')], ObjectName)) |
40 | activate() |
41 | fo.write(s+'\n') |
42 | else: |
43 | print('=============================Admin target available for '+i) |
44 |
45 | cd('..') |
46 | break |
47 | else: |
48 | setSoaTargetToAdmin(s+'/'+i) |
49 | cd('..') |
50 | except: |
51 | print('Exception with input '+s+'/'+i) |
52 | cd('..') |
53 | pass |
54 |
55 | edit() |
56 | fo = open("reconfigureSOA.log", "wb") |
57 | setSoaTargetToAdmin('/JDBCSystemResources') |
58 | setSoaTargetToAdmin('/SystemResources') |
59 | setSoaTargetToAdmin('/Libraries') |
60 | setSoaTargetToAdmin('/FileStores') |
61 | setSoaTargetToAdmin('/JMSSystemResources') |
62 | setSoaTargetToAdmin('/JMSServers') |
63 | setSoaTargetToAdmin('/SelfTuning') |
64 | setSoaTargetToAdmin('/StartupClasses') |
65 | setSoaTargetToAdmin('/Deployments') |
66 | setSoaTargetToAdmin('/AppDeployments') |
67 | fo.close() |
While running you might see errors like below. Don’t PANIC!! Just bounce your AdminServer. This error would go off and server would start neatly. You can start using SOA through AdminServer port itself.
1 | weblogic.descriptor.BeanUpdateFailedException: The following failures occurred: |
2 | -- Internalrror activating the JMS Server BPMJMSServer: weblogic.management.DeploymentException: The persistent store "BPMJMSFileStore" does not exist |
3 | weblogic.management.DeploymentException: Internalrror activating the JMS Server BPMJMSServer: weblogic.management.DeploymentException: The persistent store "BP |
4 | JMSFileStore" does not exist |
1 | <Aug 20, 2011 9:32:00 PM IST> <Error> <oracle.sdp.messaging.util> <SDP-25700> <An unexpected exception was caught. |
2 | javax.naming.NameNotFoundException: While trying to lookup 'OraSDPM.Queues.OraSDPMDriverDefSndQ1' didn't find subcontext 'Queues'. Resolved 'OraSDPM'; remaining |
3 | name 'Queues/OraSDPMDriverDefSndQ1' |
4 | at weblogic.jndi.internal.BasicNamingNode.newNameNotFoundException(BasicNamingNode.java:1139) |
5 | at weblogic.jndi.internal.BasicNamingNode.lookupHere(BasicNamingNode.java:247) |
6 | at weblogic.jndi.internal.ServerNamingNode.lookupHere(ServerNamingNode.java:182) |
7 | at weblogic.jndi.internal.BasicNamingNode.lookup(BasicNamingNode.java:206) |
8 | at weblogic.jndi.internal.BasicNamingNode.lookup(BasicNamingNode.java:214) |
Thanks for reading and Keep Smiling 
Kavin.
Install SOA 11g [11.1.1.5] on Windows 7
August 14, 2011 1 comment
Oracle SOA 11g installation steps – 11.1.1.5.0 on Windows 7.
Download below components from OTN Download link.
Oracle XE Data base to host required schemas.
Oracle Weblogic Server.
RCU – Repository creation utility to create required repository for SOA 11g.
SOA Suite Part 1 and Part 2.
Oracle JDeveloper – IDE to develop applications.
SOA Extension for Jdeveloper – To develop SOA Applications using Jdeveloper. Download from here.
Install Steps:
1) Install Oracle XE:
Launch Oracle XE Installer. Click Next and accept terms.
If required, change the location of DB install folder if required.
Enter the password for the sysdba [sys] user. Traditionally, I use manager.
Click Next and Install. Finally Finish. This completes the installation of Oracle XE Data base.
2) Setup Database:
On completion of install, Oracle XE Data base will get started by default. To start/stop it further, execute the shortcuts from start menu as administrator.
The minimum required processes parameter for the DB to host SOA schemas is 200. By default, it is set to 40. Hence,
C:\Oracle\oraclexe\app\oracle\product\10.2.0\server\BIN
sqlplus.exe sys/manager@XE as sysdba
show parameter processes; -> This would give an output of 40.
Run below command to increase this to 300.
ALTER SYSTEM set PROCESSES=300 SCOPE=SPFILE;
Restart the database to get the changes activated.
3) Run RCU: Repository Creation Utility. Repository creation utility is used to create required DB schemas that are required to host the appropriate technology stack component.
Unzip the downloaded RCU Zip file. Navigate to BIN folder of the unziped content. Launch rcu.bat.
Choose Next -> Create -> Enter Data base details and Next. Now when it checks for pre-requisites, as long as pre-requisites pass, click Ignore.
Now select Metadata Services under “AS Common Schemas” and entire “SOA and BPM Infrastructure”. Leave the prefix as “DEV”. Click Next.
Specify passwords for all schemas. As a convention, specify the password same as username.
Click Next and accept default till you complete the install.
4) Install Weblogic: This installs the required components to create a weblogic domain.
Launch the installation by clicking the wls installer exe file. Click Next and enter the directory to install your middleware. This is called Middleware home. Click Next.
Based on demand, register for security updates and click Next.
Choose defaults for all other steps and click Install.
5) Install SOA:
WLS Installer installs only the common components for basic J2EE+ADF support. To get SOA 11g Support enabled, we need to install SOA explicitly. Unzip the Disk 1 of 2 and Disk 2 of 2. This would create Disk1, Disk2, Disk3, Disk4 and Disk5. Run setup.exe from Disk1 folder. It would prompt for JDK location.
NOTE: Very importantly, when you are running on Windows 7 64 bit, this would accept only a 64 bit JDK path. Else it wouldn’t respond anything.
Now click Next -> Select update option [I have chosen skip] Next -> Next. Now select the middleware path that was given for weblogic and click Next.
Now this would default the weblogic server installed in that path. Now click Next with default till installation is complete.
Its an easy installation so far.
6) Create WLS Domain with SOA:
NOTE that what we have done so far is that we have prepared all the things that are required to create a weblogic domain.
What is domain: A domain is a global WLS component that would host this weblogic server. A domain would have an Admin server and many managed servers. Admin Server is like a parent server and managed servers are child which could even be clone of admin server with its properties, just without admin privileges. Except a domain, so far you have just created the required installers. No physical server yet.
To install a WLS Domain, launch Configure Application Server wizard from start menu.
Select to create a new domain and click Next. A weblogic server would be enabled for a technology stack component based on the template that are chosen while creating a weblogic domain.
Template Descriptions:
SOA and BPM Suite -> Enables SOA 11g to your WLS Domain.
Oracle Enterprise Manager -> To monitor the middleware.
Oracle WSM Policy Manager – To implement OWSM Security for WS.
Oracle JRF -> Dependent template for above.
Oracle JRF WebServices Asynchronous Services -> For asynchronous web services using default WLS queues for asynchronous invocation.
With templates selected, click Next. Enter domain name and domain install location and click Next.
Enter default weblogic user password [weblogic1 traditionally  ] and click Next. Select JDK based on demand [SUN by default] and click Next.
The templates/technology stack chosen for the domain would required certain data source connections as pre-requisite for the technology stack to work. Hence enter the data source schema details and click Next.
Once validation of the data source connection is successful, click Next. Just in case if you want to change the properties of Admin/Managed Servers, select appropriate servers and click next. Generally we do that to change the default port.
Change the properties as required and create the domain. If no change over default settings are required, you can acept default values itself till you create the domain. You will see below domain creation confirmation screen.
7) Start Servers:
Now comes the important part. In a weblogic server with SOA templates, AdminServer is not enabled for SOA. It creates a managed server named soa_server1 and that would be enabled for SOA. Hence we need to start both AdminServer and Managed Server.
Open a command prompt, navigate to DOMAIN_HOME/bin directory [DOMAIN_HOME -> Directory where the domain is installed.]
Run “start startWebLogic.sh” -> This is just to open the weblogic startup on a new prompt.
When you do this, in Windows 7, you could potentially see an error like below.
[waiting for the server to complete its initialization...]
\Java\jre6\lib\ext\QTJava.zip was unexpected at this time.
Process exited.
\Java\jre6\lib\ext\QTJava.zip was unexpected at this time.
Process exited.
This is because of a default CLASSPATH entry in windows 7. This has two workarounds. As shown in above screenshot, do a “set CLASSPATH=” to nullify classpath before startup. That would bring.
The root cause of this is because of “C:\Program Files (x86)\Java\jre6\lib\ext\QTJava.zip” in CLASSPATH entry. Hence do the below.
Right click on the “Computer” Icon from Desktop and Select Properties.
Click “Advanced system settings” -> “Advanced”.
Click “Environment Variables”.
In the “System variable” section highlight the variable.
Click on “CLASSPATH” and “edit” button.
Delete the “Java\jre6\lib\ext\QTJava.zip” entry.
Save and restart the machine.
Click “Advanced system settings” -> “Advanced”.
Click “Environment Variables”.
In the “System variable” section highlight the variable.
Click on “CLASSPATH” and “edit” button.
Delete the “Java\jre6\lib\ext\QTJava.zip” entry.
Save and restart the machine.
Easy workaround is to add below line in the start of startWebLogic.cmd.
“set CLASSPATH=” and then start the servers.
Once AdminServer comes to RUNNING mode, we are good to start ManagedServer.
Now start the soa_server1 Managed server as “start startManagedWebLogic.cmd soa_server1″. soa_server1 can be replaced with appropriate managed server name.
Now when the managed server startup command prompt shows “SOA Platform is running and accepting requests”, your SOA Runtime is up.
Useful URLs:
http://host:port/console -> Eg: http://localhost:7001/console
http://host:port/em -> Eg: http://localhost:7001/em
http://host:soaport/soa-infra -> Eg: http://localhost:8001/soa-infra
http://host:soaport/integration/worklistapp -> Eg: http://localhost:8001/integration/worklistapp
8 ) Upgrade SOA MDS:
Potentially soa-infra/soa server might not come up, and it might throw below error.
MDS-01329: unable to load element “persistence-config”
MDS-01370: MetadataStore configuration for metadata-store-usage “soa-infra-store” is invalid.
ORA-04063: package body “DEV_MDS.MDS_INTERNAL_SHREDDED” has errors
ORA-06508: PL/SQL: could not find program unit being called: “DEV_MDS.MDS_INTERNAL_SHREDDED”
ORA-06512: at line 1
at oracle.mds.internal.lcm.deploy.DeployManager.deploy(DeployManager.java:710)
at oracle.mds.internal.lcm.deploy.DeployManager.startDeployment(DeployManager.java:198)
at oracle.mds.internal.lcm.MDSLifecycleListenerImpl.start(MDSLifecycleListenerImpl.java:215)
at oracle.mds.lcm.weblogic.WLLifecycleListener.preStart(WLLifecycleListener.java:77)
at weblogic.application.internal.flow.BaseLifecycleFlow$PreStartAction.run(BaseLifecycleFlow.java:282)
If you are a victim of this, then you can stop the SOA Managed Server by using “stopManagedWebLogic.cmd soa_server1″ and let’s execute an upgrade mds script for SOA MDS Schema.
Open a new command prompt and navigate to MW_HOME\oracle_common\rcu\integration\mds\sql.
Eg: C:\Oracle\fmw11g_11115\oracle_common\rcu\integration\mds\sql
Connect to sqlplus and execute upgmds script in above location.
Eg: C:\Oracle\oraclexe\app\oracle\product\10.2.0\server\BIN\sqlplus.exe dev_mds/dev_mds@XE
@upgmds.sql
Not restart the SOA Managed Server and it would come up properly.
9) Install IDE:
Run JDEV studio installer exe. Click Next and if it defaults Middleware home, accept or select appropriate one and complete the install with defaults.
Now you are good to open JDeveloper IDE from Start Menu -> Oracle Weblogic.
Choose Default Role while opening the IDE.
10) Add SOA Extension to IDE:
NOTE that the default Jdeveloper IDE does not have default tools to develop a Oracle SOA Composite Application. An extension has to be downloaded and added to IDE. To do that, navigate Help -> Check for updates -> Next -> Choose Install From Local File and browse the SOA Extension Zip and click Next and accept default and complete it.
Reopen Jdeveloper and you will be able to create SOA Composite Applications.You are all set for amazing development/deployment experience with Oracle SOA 11g.

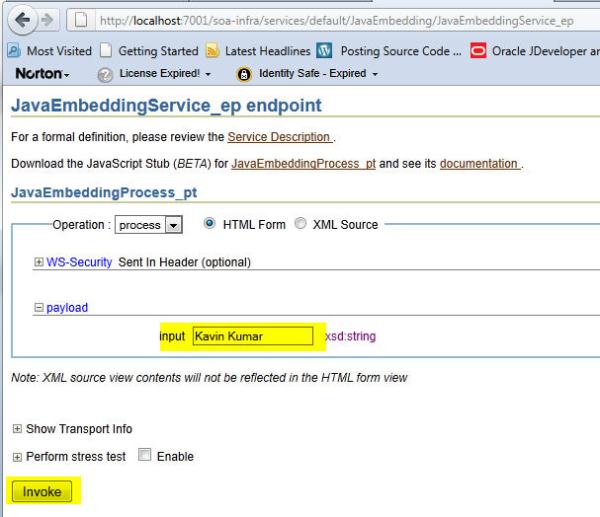
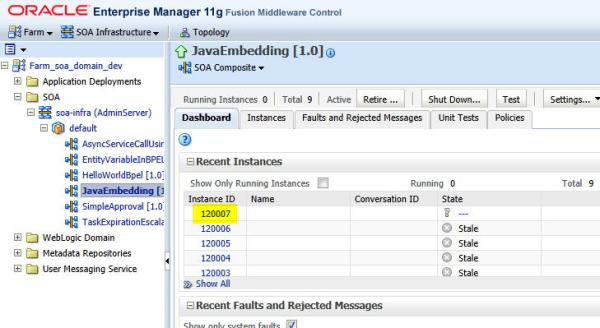


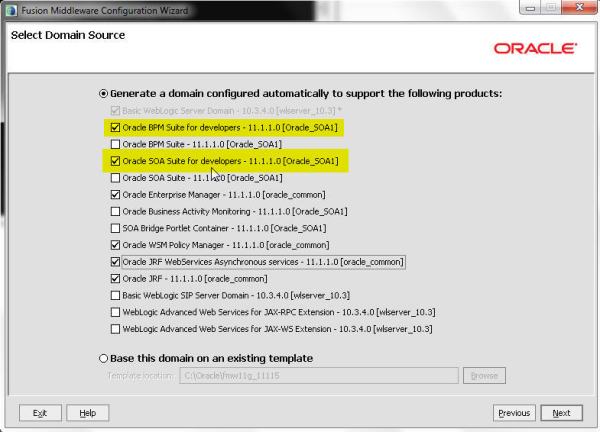
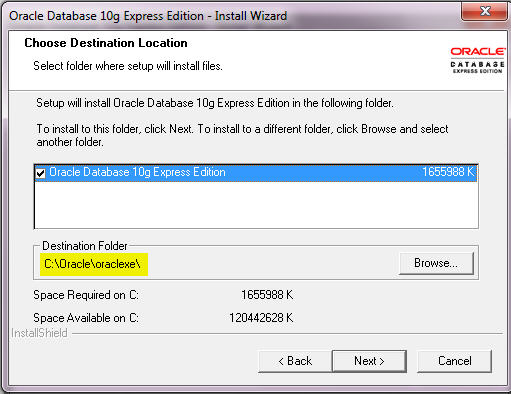
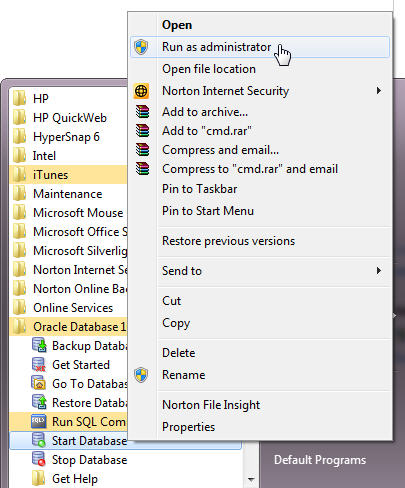
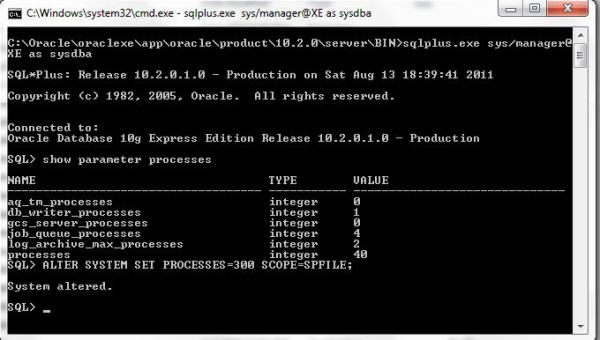
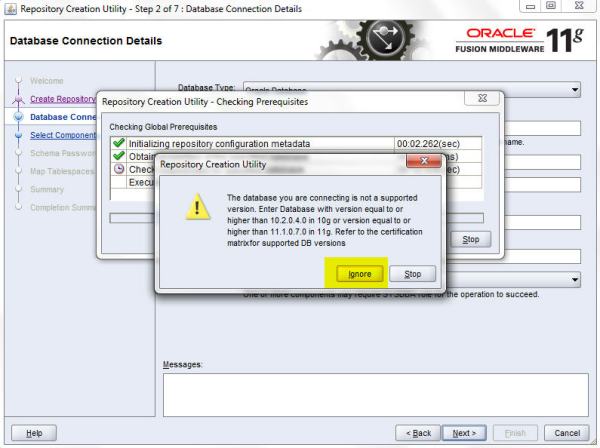


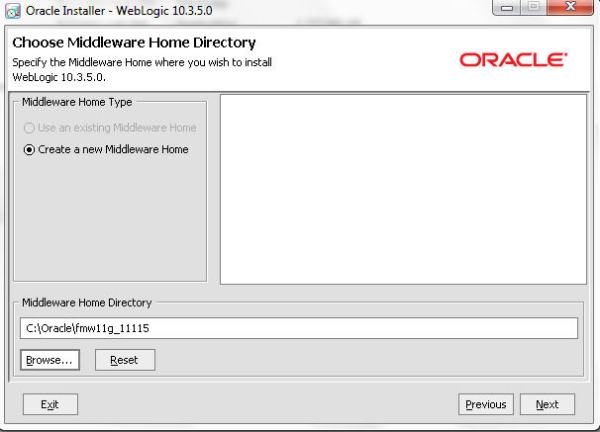


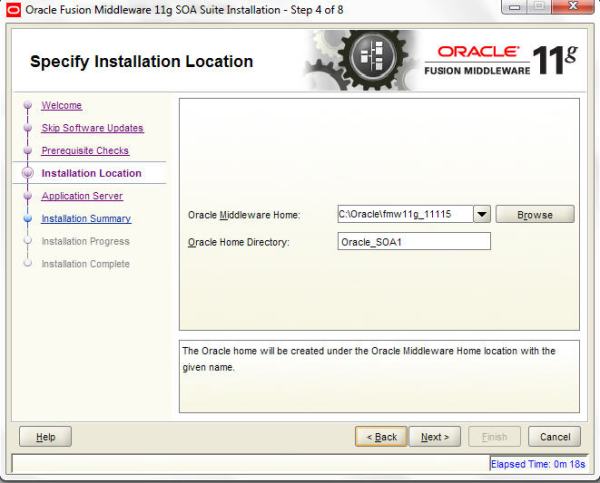


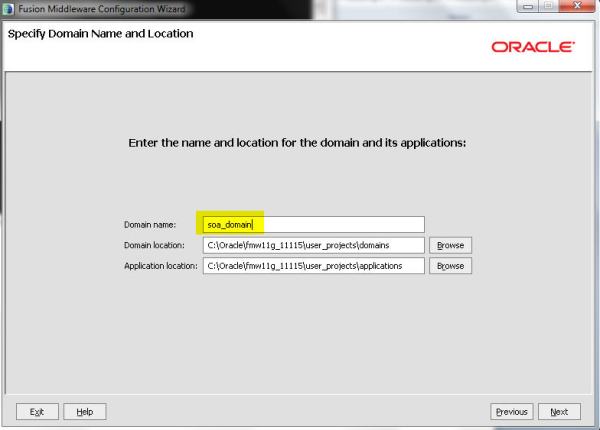
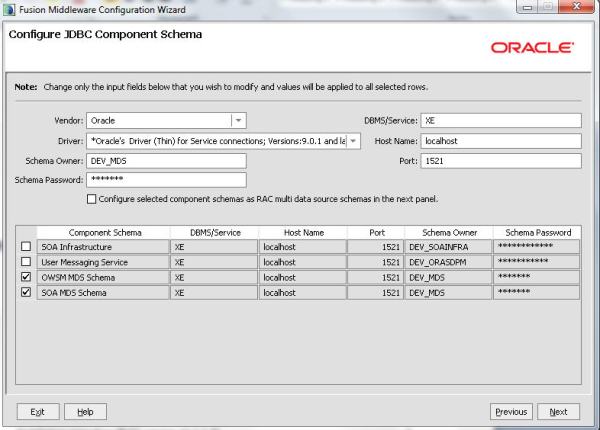
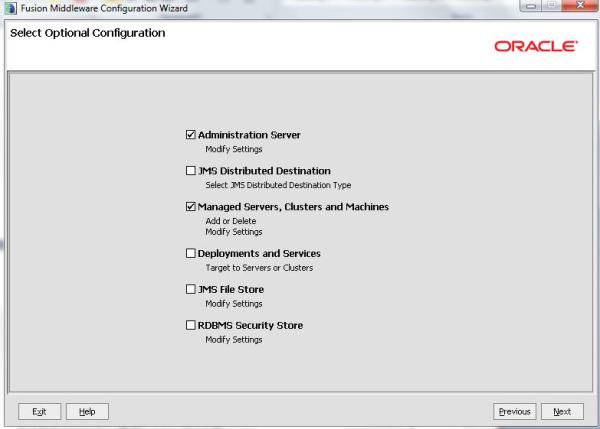


No comments:
Post a Comment