The tutorial application requires a database data source. You create this using the
WebLogic Server console. First you create the data source and then you create a
connection pool for that data source.
1. Make sure that your admin server is started using the instructions provided
earlier. If it is not already open, open http://localhost:7001/console
to open the Web Logic Server (WLS) console and log in using weblogic/
welcome1. Replace the host and port and username/password to match
your own configuration.
2. On the left navigation bar, click on Services | JDBC | Data Sources.
3. In the data source table, click on New.
4. Enter the data source information:
°° Name: soademoDatabase
°° JNDI Name: jdbc/soademoDatabase
°° Database Type: Oracle
°° The Database driver defaults to the correct driver: Oracle's
Driver (Thin XA) for Instance connections
5. Click on Next, click on Next again.
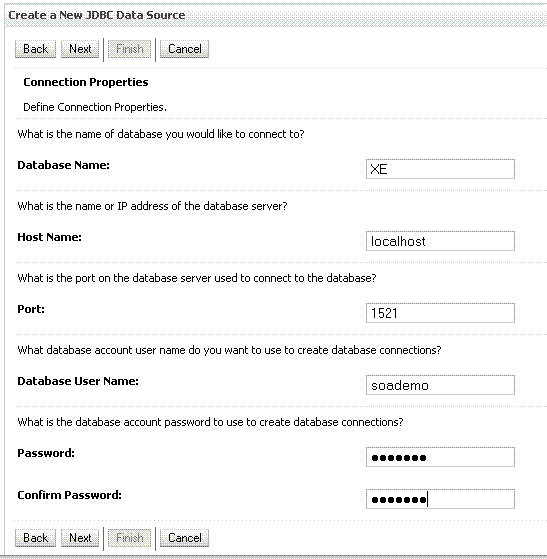
6. Enter the database information:
°° Database Name: XE (your database SID)
°° Host name: localhost (host where your database is running)
°° Port: 1521 (set according to your configuration)
°° Database user name: soademo (created in previous section)
°° Database user password: soademo

7. Click on Next.
8. Click on Test Configuration. Confirm success message at the top of the page.
9. Click on Next.
10. Select the Target server where your SOA component is running: soa_server1.
11. Click on Finish.
Now create the connection pool. You have to edit the database adapter application
and it uses a Deployment Plan. First, create a directory to contain that plan.
1. Create a directory here: C:\Oracle\Middleware\home_11gR1\Oracle_
SOA1\soa\DBPlan (adjust the path according to your installation).
2. In the left navigation bar, click on Deployments.
3. Click on the DbAdapter application (click on the name, not the checkbox).
4. Click on the Configuration tab, and then click on the Outbound Connection
Pools tab.
5. Click on New.
6. Select the radio button for javax.resource.cci.ConnectionFactory and
click on Next.
7. Enter the JNDI Name as: eis/DB/soademoDatabase.
8. This is not the same value as in the previous step. It matches the value you
enter in your database connection you create later when building your
application using JDeveloper. Click on Finish.
9. At this point, you are asked for the deployment plan location. Click on
the path to the directory you created earlier and enter the deployment plan
name Plan.xml.

10. Click on OK.
11. Confirm the name of the deployment plan.
12. Now, edit the connection pool to reference the data source. Click on the
Configuration tab, expand the connection factory and click on your new
connection pool, eis/DB/soademoDatabase (click on the name, not
the checkbox).
13. To change a property value you must enter the value and then press the Enter
key and then click on the Save button. Do not use the Tab key after entering
the value. Follow these instructions exactly:
i. In the Properties table, select the box to the far right of xADataSource.
ii. The edit box appears. Type in your data source name that you created
above: jdbc/soademoDatabase.
iii. Press the Enter key to apply the value. You must use the Enter key for
the value to be entered in the field.
14. Select Save. You must use the Save button to save the value.
15. Go back to the main Deployments page to update the DbAdapter as follows.
Click on Deployments in the left navigation bar.
16. Select the checkbox next to DbAdapter.
17. Click on Update.
18. Select Redeploy this application and confirm the deployment plan location.

19. Click on Finish.
20. Confirm that the connection pool is added by going back to the DbAdapter |
Configuration | Outbound Connection Pools and expanding the connection
factory listed there.
21. Confirm the value of the xADataSource property that you entered
previously. It should be jdbc/soademoDatabase. Look closely! This is the
most common place where the configuration is in error.
22. Go back to the JMSAdapter Outbound Connection Pools tab and review the
connection factory property value for the eis/Queue/demo connection pool
that you entered previously. It should be jms/demoCF. Look closely! This is
the most common place where the configuration is in error.
When the two resources are added and confirmed, you are ready to start building
the SOA composites. Continue with the next step to test your installation.
Testing your installation
This section shows you how to verify your installation and configuration.
After installing SOA Suite and JDeveloper, confirm that you have the correct
11.1.1.1.0 version.
You have three things to check:
1. JDeveloper: Start J Developer and select from the toolbar, Help | About. You
should see this build: JDEVADF_11.1.1.1.0_GENERIC_090615.0017.5407.
2. SOA Composite Editor: Select the Version tab on the JDeveloper Help | About
dialog. You should see this value: 11.1.1.0.0.52.19. It is OK that this
includes 11.1.1.0.0 instead of 11.1.1.1.0.
3. SOA Server: Run soaversion.cmd from C:\Oracle\Middleware\
home_11gR1\Oracle_SOA1\bin and you should see this build:
PCBPEL_11.1.1.1.0_GENERIC_090618.1440.5219.
Now verify the database table you created for the credit card information. This table
was created in the Configuration section earlier.
1. Use SQLPlus to show the table. Be sure to connect using the soademo user.
sqlplus soademo/soademo
select * from creditcardinfo;
Next, verify your database and JMS resources. These resources were created
in the Configuration section earlier.
2. In the WLS console, on the left navigation bar, expand Services | JDBC |
Data Sources. It is OK if you have a newer version that matches the version
from the Update Center.
3. Confirm that you see the resource soademoDatabase.
4. On the left navigation bar, expand Services | Messaging and click on
JMS Modules.
5. Click on SOAJMSModule (click on the name, not the checkbox).
6. In the Summary of Resources, confirm you see the queue and the connection
factory, demoFulfillmentQueue and demoCF.
7. Confirm that the database connection pool is added by going to
Deployments in the left navigation bar and clicking on DbAdapter |
Configuration | Outbound Connection Pools and expanding the eis/DB/
soademoDatabase connection factory listed there.
8. Confirm the value of the xADataSource property that you entered
previously. It should be jdbc/soademoDatabase.
9. From Deployments, click on JMSAdapter, then click the Outbound
Connection Pools tab and review the connection factory property value
for the eis/Queue/demo connection pool. It should be jms/demoCF.
Done Yupi..........................................
WebLogic Server console. First you create the data source and then you create a
connection pool for that data source.
1. Make sure that your admin server is started using the instructions provided
earlier. If it is not already open, open http://localhost:7001/console
to open the Web Logic Server (WLS) console and log in using weblogic/
welcome1. Replace the host and port and username/password to match
your own configuration.
2. On the left navigation bar, click on Services | JDBC | Data Sources.
3. In the data source table, click on New.
4. Enter the data source information:
°° Name: soademoDatabase
°° JNDI Name: jdbc/soademoDatabase
°° Database Type: Oracle
°° The Database driver defaults to the correct driver: Oracle's
Driver (Thin XA) for Instance connections
5. Click on Next, click on Next again.
6. Enter the database information:
°° Database Name: XE (your database SID)
°° Host name: localhost (host where your database is running)
°° Port: 1521 (set according to your configuration)
°° Database user name: soademo (created in previous section)
°° Database user password: soademo
7. Click on Next.
8. Click on Test Configuration. Confirm success message at the top of the page.
9. Click on Next.
10. Select the Target server where your SOA component is running: soa_server1.
11. Click on Finish.
Now create the connection pool. You have to edit the database adapter application
and it uses a Deployment Plan. First, create a directory to contain that plan.
1. Create a directory here: C:\Oracle\Middleware\home_11gR1\Oracle_
SOA1\soa\DBPlan (adjust the path according to your installation).
2. In the left navigation bar, click on Deployments.
3. Click on the DbAdapter application (click on the name, not the checkbox).
4. Click on the Configuration tab, and then click on the Outbound Connection
Pools tab.
5. Click on New.
6. Select the radio button for javax.resource.cci.ConnectionFactory and
click on Next.
7. Enter the JNDI Name as: eis/DB/soademoDatabase.
8. This is not the same value as in the previous step. It matches the value you
enter in your database connection you create later when building your
application using JDeveloper. Click on Finish.
9. At this point, you are asked for the deployment plan location. Click on
the path to the directory you created earlier and enter the deployment plan
name Plan.xml.

10. Click on OK.
11. Confirm the name of the deployment plan.
12. Now, edit the connection pool to reference the data source. Click on the
Configuration tab, expand the connection factory and click on your new
connection pool, eis/DB/soademoDatabase (click on the name, not
the checkbox).
13. To change a property value you must enter the value and then press the Enter
key and then click on the Save button. Do not use the Tab key after entering
the value. Follow these instructions exactly:
i. In the Properties table, select the box to the far right of xADataSource.
ii. The edit box appears. Type in your data source name that you created
above: jdbc/soademoDatabase.
iii. Press the Enter key to apply the value. You must use the Enter key for
the value to be entered in the field.
14. Select Save. You must use the Save button to save the value.
15. Go back to the main Deployments page to update the DbAdapter as follows.
Click on Deployments in the left navigation bar.
16. Select the checkbox next to DbAdapter.
17. Click on Update.
18. Select Redeploy this application and confirm the deployment plan location.

19. Click on Finish.
20. Confirm that the connection pool is added by going back to the DbAdapter |
Configuration | Outbound Connection Pools and expanding the connection
factory listed there.
21. Confirm the value of the xADataSource property that you entered
previously. It should be jdbc/soademoDatabase. Look closely! This is the
most common place where the configuration is in error.
22. Go back to the JMSAdapter Outbound Connection Pools tab and review the
connection factory property value for the eis/Queue/demo connection pool
that you entered previously. It should be jms/demoCF. Look closely! This is
the most common place where the configuration is in error.
When the two resources are added and confirmed, you are ready to start building
the SOA composites. Continue with the next step to test your installation.
Testing your installation
This section shows you how to verify your installation and configuration.
After installing SOA Suite and JDeveloper, confirm that you have the correct
11.1.1.1.0 version.
You have three things to check:
1. JDeveloper: Start J Developer and select from the toolbar, Help | About. You
should see this build: JDEVADF_11.1.1.1.0_GENERIC_090615.0017.5407.
2. SOA Composite Editor: Select the Version tab on the JDeveloper Help | About
dialog. You should see this value: 11.1.1.0.0.52.19. It is OK that this
includes 11.1.1.0.0 instead of 11.1.1.1.0.
3. SOA Server: Run soaversion.cmd from C:\Oracle\Middleware\
home_11gR1\Oracle_SOA1\bin and you should see this build:
PCBPEL_11.1.1.1.0_GENERIC_090618.1440.5219.
Now verify the database table you created for the credit card information. This table
was created in the Configuration section earlier.
1. Use SQLPlus to show the table. Be sure to connect using the soademo user.
sqlplus soademo/soademo
select * from creditcardinfo;
Next, verify your database and JMS resources. These resources were created
in the Configuration section earlier.
2. In the WLS console, on the left navigation bar, expand Services | JDBC |
Data Sources. It is OK if you have a newer version that matches the version
from the Update Center.
3. Confirm that you see the resource soademoDatabase.
4. On the left navigation bar, expand Services | Messaging and click on
JMS Modules.
5. Click on SOAJMSModule (click on the name, not the checkbox).
6. In the Summary of Resources, confirm you see the queue and the connection
factory, demoFulfillmentQueue and demoCF.
7. Confirm that the database connection pool is added by going to
Deployments in the left navigation bar and clicking on DbAdapter |
Configuration | Outbound Connection Pools and expanding the eis/DB/
soademoDatabase connection factory listed there.
8. Confirm the value of the xADataSource property that you entered
previously. It should be jdbc/soademoDatabase.
9. From Deployments, click on JMSAdapter, then click the Outbound
Connection Pools tab and review the connection factory property value
for the eis/Queue/demo connection pool. It should be jms/demoCF.
Done Yupi..........................................


No comments:
Post a Comment