You create this by using the WebLogic Server
console. First you create the JMS queue and connection factory and then a connection
pool for that connection factory.
1. Make sure thatyour server has started using the instructions above. If it is
not already open, open http://localhost:7001/console to start the Web
Logic Server (WLS) console and log in using weblogic/welcome1. Replace
the host and port and username/password to match your own configuration
if necessary.
First add the JMS Queue:
1. In the WLS console, on the left navigation bar, expand Services | Messaging
and click on JMS Modules.
2. Click on SOAJMSModule (click on the name, not the checkbox).
3. In the Summary of Resources table, click on New.
4. Select the resource type: Queue and click on Next.
5. Enter Name as demoFulfillmentQueue and JNDI Name as
jms/demoFulfillmentQueue.
6. Click on Next.
7. From the Subdeployments list, select SOASubDeployment.
8. From the JMS Servers list, select SOAJMSServer.
7. From the Subdeployments list, select SOASubDeployment.
8. From the JMS Servers list, select SOAJMSServer.
9. Click on Finish.
Now add the Connection Factory.
1. In the Summary of Resources table, click on New.
2. Select the resource type: Connection Factory and click on Next.
3. Enter Name as demoCF and JNDI name as jms/demoCF.
Now add the Connection Factory.
1. In the Summary of Resources table, click on New.
2. Select the resource type: Connection Factory and click on Next.
3. Enter Name as demoCF and JNDI name as jms/demoCF.
4. Click on Next.
5. Click on Finish.
You should see both the queue and the connection factory listed in the Summary of
Resources as shown here:
5. Click on Finish.
You should see both the queue and the connection factory listed in the Summary of
Resources as shown here:
Now add the connection pool. The connection pool is configured in the JMSAdapter
application and uses a Deployment Plan. First, create a directory to contain that plan.
1. Create a directory here: C:\Oracle\Middleware\home_11gR1\Oracle_
SOA1\soa\JMSPlan (adjust the path according to your installation).
2. In the left navigation bar of the WLS console, click on Deployments.
3. Click on JMSAdapter (click on the name, not the checkbox).
4. Click the Configuration tab and then the Outbound Connection Pools tab.
5. Click on New.
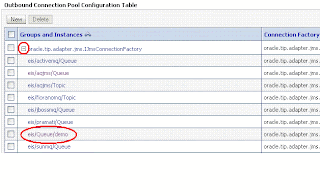
6. Select the oracle.tip.adapter.jms.IJmsConnectionFactory factory.
6. Select the oracle.tip.adapter.jms.IJmsConnectionFactory factory.
7. Click on Next.
8. Enter eis/Queue/demo.
8. Enter eis/Queue/demo.
9. Click on Finish.
10. At this point, you are asked for the deployment plan location. Click on
the path to the directory you created earlier and enter Plan.xml for the
plan name.
10. At this point, you are asked for the deployment plan location. Click on
the path to the directory you created earlier and enter Plan.xml for the
plan name.
If you are not asked for the plan location at this time, it means you
already have a plan for the JMS adapter from an existing configuration.
That plan file will be used for this configuration. You can skip ahead to
the next step to hook up the connection factory.
already have a plan for the JMS adapter from an existing configuration.
That plan file will be used for this configuration. You can skip ahead to
the next step to hook up the connection factory.
11. Click on OK.
12. Verify the plan name is set to Plan.xml in the JMSPlan directory.
1. Click on the Configuration tab.
2. Expand the group: oracle.tip.adapter.jms.IJmsConnectionFactory.
3. Click on eis/Queue/demo.
4. To change a property value you must enter the value and then press the Enter
key and then click on the Save button. Do not use the Tab key after entering
the value. Follow these instructions exactly:
i. Select the cell on the far right for the property
ConnectionFactoryLocation.
ii. An edit box appears. Type in the value jms/demoCF and press
the Enter key.
iii. You must use the Enter key for the value to be entered in the field.
5. Click on Save. You must use the Save button to save the value.
6. Now the adapter must be redeployed. Click on Deployments in the left
navigation bar.
7. Select the checkbox next to JMSAdapter.
8. Click on Update at the top of the Deployment table.
9. Verify that the correct deployment plan is selected.
10. Click on Next.
11. Click on Finish.
Done... YUPI


No comments:
Post a Comment