Purpose
This tutorial shows you how to install the Oracle Business Process Management (OBPM) Suite 11g Release 1 software and how to test it to see if it was installed successfully.Time to Complete
Approximately 2hours.Overview
After installing the OBPM 11gR1 server software, you will install the JDeveloper-based IDE, called Studio. You will test the installation by logging into the BPM Workspace.Scenario
The OBPM 11gR1 Suite is delivered as part of patch set 2 (PS 2) to the Oracle Service Oriented Architecture (SOA) Suite 11gR1 product. It is installed on top of a SOA installation which has already been updated to patch set 1 (PS 1). SOA Suite is, in turn dependent upon a JEE application server and a database. This tutorial assumes that you already have a suitable database installed and that you have already downloaded the various binaries needed for the installation. (see Software and Hardware Requirements).The diagram below shows the software components that you will install during this tutorial. Notice that the server and development IDE software are installed on different machines for this tutorial.

You will install WebLogic Server 11gR1 and then install RCU in order to configure a database schema for SOA. Next you will install SOA Suite with PS1, followed by the SOA PS 2 patch set containing BPM. All of this software will be installed in a Linux environment.
Studio, the development IDE, which is based on Oracle JDeveloper, can be installed in either a Windows or a Unix environment. In this tutorial, you will install it on a Windows machine and access the Linux-based BPM server remotely. You may opt to install all of the software on the same Linux machine if you wish, however this would require more memory and disk space on the Linux machine, as indicated in the next section. Be aware that these instructions assume that JDeveloper is installed on a Windows machine.
Software and Hardware Requirements
There is a wide range of hardware and software platform options from which to choose when installing the SOA Suite 11gR1 with PS2 (BPM). For a detailed list of system certifications for this suite, see The Oracle Technology Network (OTN) For this tutorial, however, the following hardware and software requirements will be supported:- A Linux machine with Oracle Enterprise Linux (OEL) 4.0 for server installations, and a Windows machine with XP or Windows 2003 (SP2) for the JDeveloper installation.
- Linux machine: 3GB of memory ( 4GB is preferred if JDeveloper is to be installed on this machine along with SOA and WebLogic)
- Linux machine: Disk space 10GB for installed software, an additional 10GB for installation working files
- Linux machine: Oracle Database Express Edition (XE) Universal 10.2. You can download it here if you need to install it.
- Windows machine: 2 GB of memory
- Windows machine: Disk space 3GB
- Browsers: Firefox 3.x or IE 7.x
Prerequisites
Before starting this tutorial, you should download the binaries required for installing all of the software and unzip the files that need to be unzipped. You can use the following instructions for guidance in downloading software and staging the files.
Software for Linux Machine
Log into the Linux machine as a user who has sufficient permissions to install software. From a browser, go to EDelivery.oracle.com.
If you haven't downloaded software from this site before, you will be
prompted to enter some information in order to create an account (name,
email, company). - On the Welcome page, select a language and click Continue.
- On the Media Pack Search page, select "Oracle Fusion Middleware" as the Product Pack and "Linux x86" as the Platform.
- Click Go
- A list of media packs appears in a Results table. Select "Oracle Fusion Middleware 11g Media Pack for Linux x86" (Release 11.1.1.3).
- Click Continue
- The Download page appears. Click the Download button for each of the products listed below. Save them all to a directory called stageBPM
| 1. | Oracle WLS11gR1 10.3.3 for Linux x86 |
|---|---|
| 2. | Oracle SOA Suite 11g (11.1.1.2.0) (This is Patch Set 1)
Unzip this file to stageBPM |
| 3. | Oracle SOA Suite 11g Patch Set 2 (11.1.1.3.0) Unzip this file to stageBPM |
| 4. | Oracle Fusion Middleware Repository Creation Utitlity 11g (11.1.1.3.0) for Linux x86 (This version of RCU assumes that your database is installed on Linux. If it is not, choose the appropriate version.) Create a new directory (parallel to stageBPM) called rcuHome and unzip this file to rcuHome. |
Software for Windows Machine
| 1. | JDeveloper 11.1.1.3 On the Windows machine, open a browser and go to the OTN download site for JDeveloper 11.1.1.3 .
|
|---|---|
| 2. | Demo Community Seed Application This
is a sample web application that you use to seed the users and groups
in the WebLogic server's LDAP realm. This will provide a community of
users to support other OBEs for this product and to support several
sample applications for the SOA Suite. Download this zip file and extract it to C:\Labs\BPM11gOBE |
Installing the Server Software
You will begin by installing and configuring the OBPM 11g server software on the Linux machine. To accomplish these tasks, perform the following steps:
Note: The filenames for the binaries that you downloaded might be slightly different than those you see referenced here.
Installing and Configuring the WebLogic Server
| 1. | First you must modify some parameters of the database that
will be used by the SOA server. Open a SQLPlus session with the Oracle
XE database on the Linux machine, logging in as the sys user as shown below and replacing "oracle" with the appropriate password for your sys user.  |
|---|---|
| 2. |
To view the current parameter values, type the command show parameter session. After the results are displayed, type show parameter processes. Both outputs are shown here.  Change the two parameter values by entering the following two commands:  |
| 3. |
In order for this change to take effect you must shutdown and
restart the server. Note that the shutdown can take a few minutes. Type the following two commands at the SQL prompt, waiting for the shutdown to complete before executing the restart. 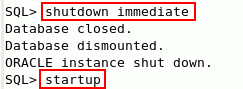 Exit the SQLPlus session once the database has resumed. |
| 4. | Install WebLogic Server. From a terminal window, navigate to /stageBPM and run the installer for WebLogic Server by typing ./wls1033_linux32.binIf you receive a message indicating that you do not have the necessary permission on the file to execute it, you must first change the file permissions as follows:
|
| 5. |
Upon successful execution of the installer binary, the Install Wizard opens. ,Click Next. 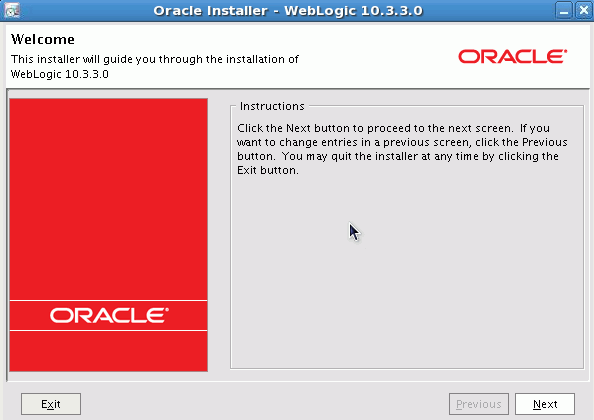 |
| 6. |
In the Choose Middleware Home Directory
window, create a new Middleware Home. Enter or browse to the directory
in which you would like to install both WebLogic and SOA. Type the name
of the new middleware home directory. In this example we use mwhome. 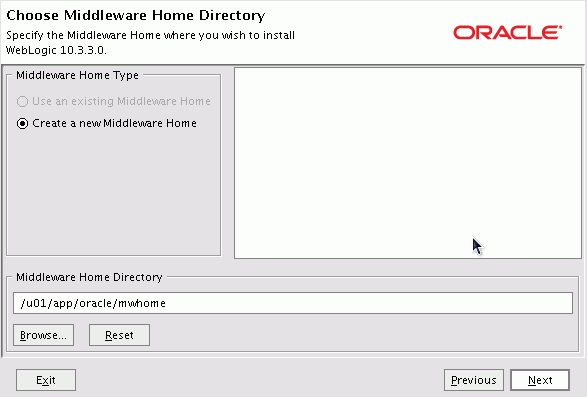 Click Next. |
| 7. |
In the next screen, enter your email address to receive
security alerts or deselect the checkbox and decline - whichever you
prefer. Click Next. |
| 8. |
In the next screen, select a Typical install and click Next. |
| 9. |
In the Choose Product Installation Directories window, review the installation directories and click Next.  |
| 10. |
Review the Installation Summary in the next window and then click Next to start the install process. This should take about three minutes. |
| 11. |
When the installation is complete, deselect the Run Quickstart checkbox in the final screen and click Done. |
Creating and Configuring Schema for SOA
| 1. | Open a terminal window and navigate to the bin directory within rcuHome (this is the directory where you unzipped the Repository Creation Utility zip file). Enter ./rcu  |
||||||||||||||
|---|---|---|---|---|---|---|---|---|---|---|---|---|---|---|---|
| 2. |
When the Welcome screen of the RCU Wizard appears, click Next. |
||||||||||||||
| 3. |
In the Create Repository screen, select Create and then click Next. |
||||||||||||||
| 4. |
In the Database Connection Details screen, enter the following information:
 Click Next |
||||||||||||||
| 5. |
The RCU will begin to process the schema information and
check prerequisites. If you receive the following warning message
indicating that the version of the database you are using is not
supported. You can safely ignore it. Review the Prerequisite information displayed on the next screen. It should indicate that all prerequisites have been satisfied. Click OK. 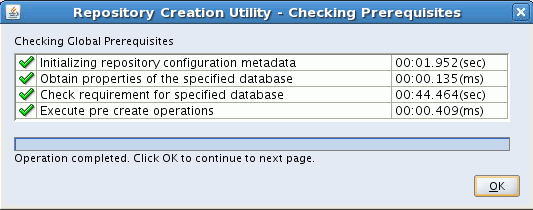 |
||||||||||||||
| 6. |
In the Select Components screen, enter DEV as the value for the Create a new Prefix field (if not already there by default). Also, select SOA and BPM Infrastructure from the Component list. This will cause all dependent schemas to be automatically selected as well, as seen in this image.
 Click Next. Once again the prerequistes are checked. Click OK to the Prerequisites window. |
||||||||||||||
| 7. |
In the Schema Passwords screen, click the radio button to Use same passwords for all schema. For this tutorial welcome1 is used for all passwords. Enter that in the Password and Confirm Password fields. Then click Next. |
||||||||||||||
| 8. |
In the Map Tablespaces screen, review the tablespaces and schema owners for the components. Accepting the defaults, click Next.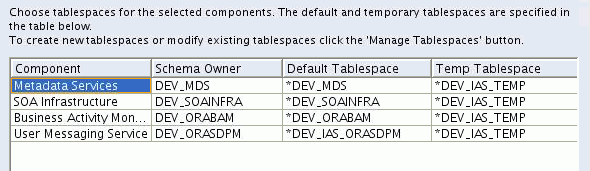 |
||||||||||||||
| 9. |
Click OK when
prompted to confirm creation of the tablespaces. When tablespace
creation is complete you will see this screen showing the results. Click
OK. 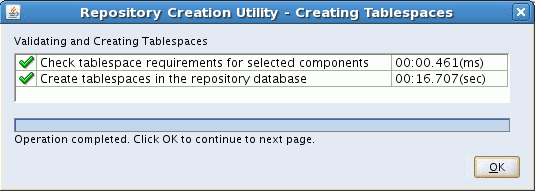 |
||||||||||||||
| 10. |
The Summary screen appears. Review the information and click Create. It takes about two minutes to create the schemas. 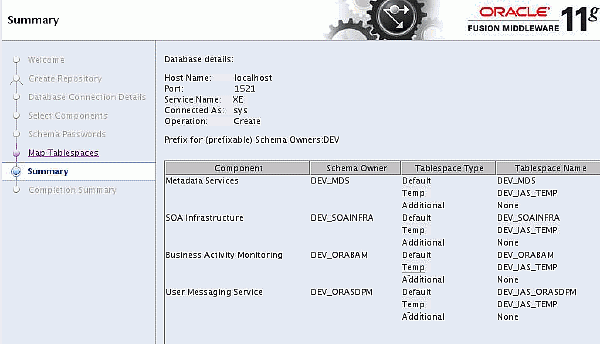 |
||||||||||||||
| 11. |
Review the details in the final Completion Summary screen and click Close.  |
Installing SOA Suite
| 1. | Recall that before you began this tutorial, you unzipped the SOA install files into a directory structure that looks like this. Open a terminal window and navigate to the Disk1 directory within the soa directory. Type the following command, making any adjustments necessary to accurately reference the location of your /mwhome/jdk160_18 directory (your JDK 1.6 installation): ./runInstaller -jreLoc <path to mwhome>/mwhome/jdk160_18  Note: If you have not installed any Oracle products on this machine yet, you will be prompted to first create the Oracle Inventory. This is a directory structure to contain all Oracle product install file inventories. You will also have to specify the operating system group that owns this. After entering the information on this screen, you will be prompted to enter a command as the root user to create the inventory. |
|---|---|
| 2. |
When the Welcome screen of the wizard appears, click Next.  |
| 3. |
Wait for the prerequisite check to complete (it's very quick). Then click Next. 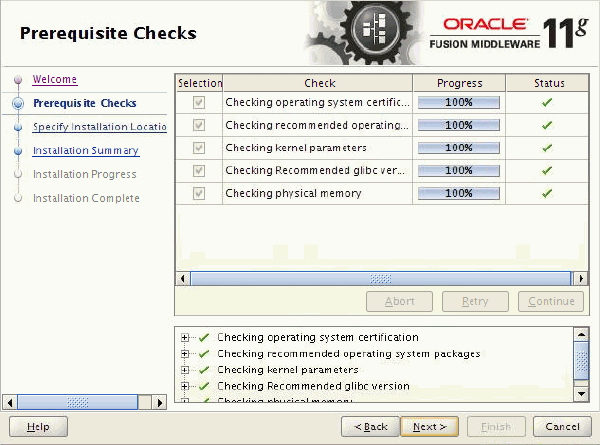 |
| 4. |
On the Specify Installation Location screen, select your Middleware home: mwhome (This should be the default value). Also enter an Oracle home value of Oracle_SOA1. (Again, this should be the default value.). Click Next.  |
| 5. |
Review the Summary. When satisfied, click Install. 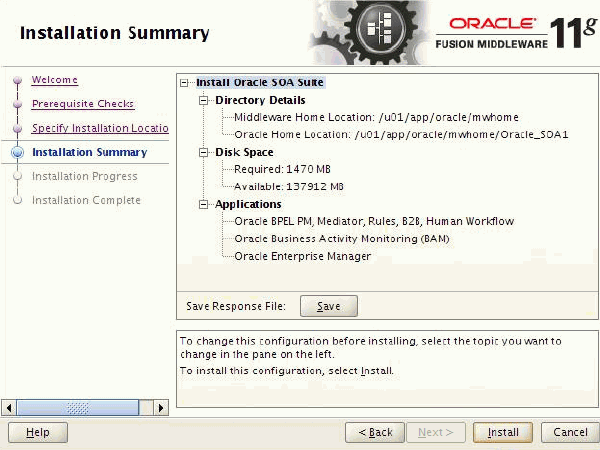 |
| 6. |
Wait for the install to complete. This takes a few minutes. When it reaches 100%, click Next then Finish. 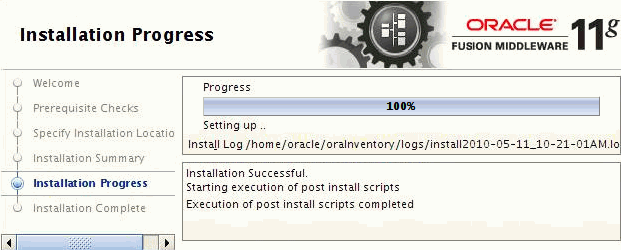 |
Installing SOA Patch Set 2
| 1. | The install for this patch set (which includes BPM 11gR1) is almost identical to the SOA installation. From a terminal window, navigate to /stageBPM/soa_patchset/Disk1 and type the following command (adjust the path as needed to point to your JDK 1.6 installation as you did in the last step) : ./runInstaller -jreLoc <path to mwhome>/mwhome/jdk160_18  |
|---|---|
| 2. |
Continue clicking through the screens of the install wizard as you did in the SOA installation. When you get to the Specify Installation Location screen, be sure that the Oracle Home directory is the same as it was for the SOA install (Oracle_SOA1).  |
| 3. |
In the Installation Summary screen, confirm that all information is correct and click Install. 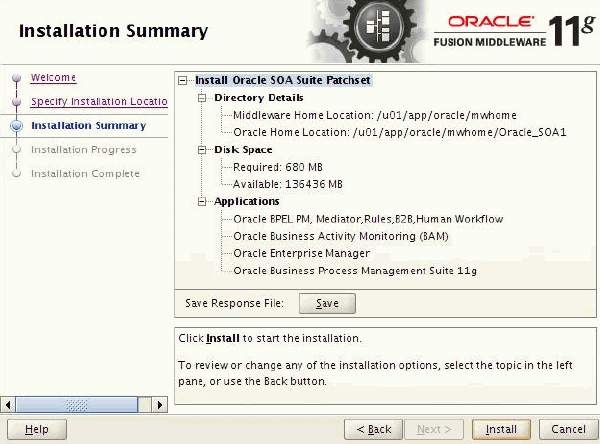 |
| 4. |
Wait for the install to complete. It takes a few minutes. When it reaches 100%, click Next, then click Finish. |
Creating and Configuring a Domain for the WebLogic Server
| 1. | From a terminal window, navigate to /mwhome/Oracle_SOA1/common/bin and type the following command in order to launch the Oracle Fusion Middleware Configuration Wizard:
 |
|---|---|
| 2. | When the wizard opens, select Create a new WebLogic Domain in the Welcome screen. Click Next.  |
| 1. |
In the Select Domain Source screen, select the Generate a domain radio button and then select the following products (dependent products will be selected automatically):
 Click Next. |
||||||||||
|---|---|---|---|---|---|---|---|---|---|---|---|
| 2. |
In the Specify Domain Name and Location screen, enter the Domain name as domain1. Click Next. 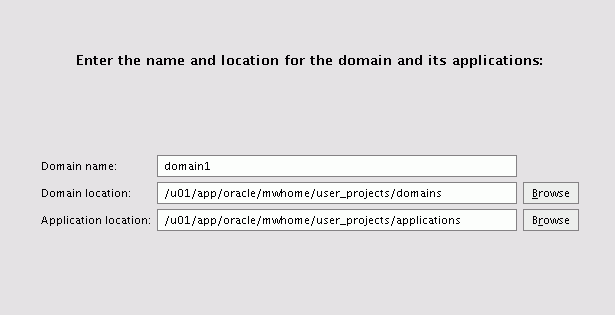 |
||||||||||
| 3. |
In the Configure Administrator User Name and Password screen, enter weblogic as the user name and welcome1 as the password. Confirm the password and then click Next.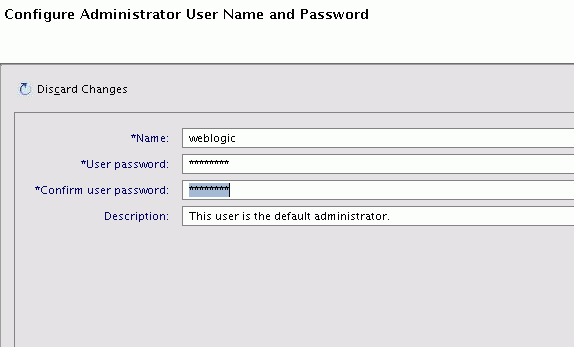 |
||||||||||
| 4. |
In the Configure Server Start Mode and JDK screen, select the Development Mode radio button and choose the Sun SDK in the Available JDKs panel. 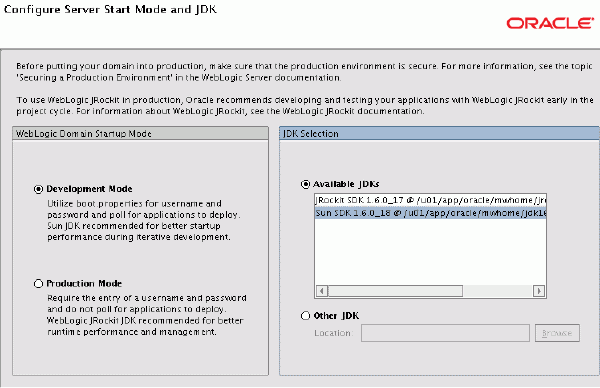 Click Next. |
||||||||||
| 5. |
In the Configure JDBC Component Schema screen, you need to
change property values for each of the components listed. Property
values are modified at the top portion of the window and these changes
affect only selected components from the bottom portion of the window
(the table of components). You will change the Schema Password, DBMS/Service, Host Name, and Port for each of the component schemas. Select all of the component schemas in the table portion of the screen. Enter the following values in the top portion of the screen. This will change the respective property value for each of the component schemas.
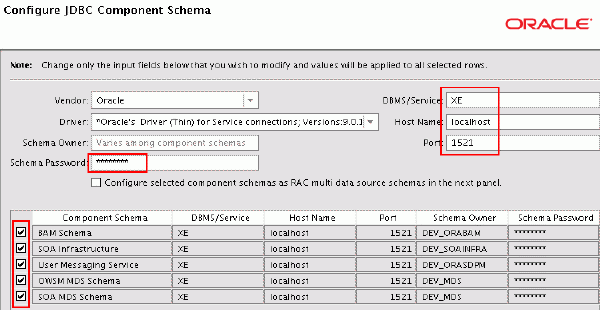 Notice that the values you enter appear in each row of the table as you type. The Schema Owners in this table should match the schema owners as configured by the RCU utility earlier in this install. Click Next. |
||||||||||
| 6. |
In the next screen, the data source connections are all tested. If they are successful, click Next, otherwise, click Previous and correct any errors. 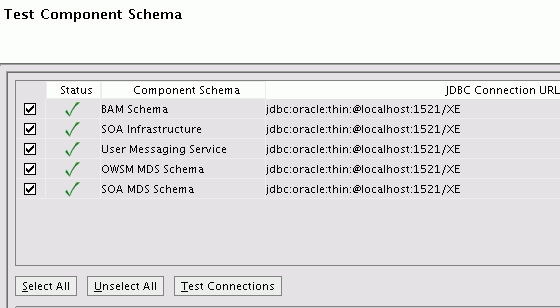 |
||||||||||
| 7. |
In the Select Optional Configuration
screen, you have the option to configure the WebLogic server to run as a
managed server or in a single server configuration. In this simple
tutorial, you will choose the single server configuration. Select the Managed Servers, Clusters and Machines option. Click Next.  |
||||||||||
| 8. |
In the Configure Managed Servers screens, select the bam_server1 entry and then click Delete.  Now select the soa_server1 entry and click Delete as well. 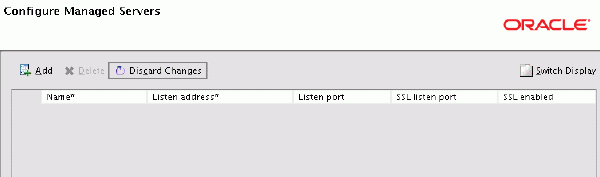 |
||||||||||
| 9. |
Click Next
four times to move through the remaining optional configuration screens
without making any changes. On the fourth click, you arrive at the Configuration Summary screen. Click Create.  |
||||||||||
| 10. |
Wait for it to finish and then click Done. |
Installing the Client Side IDE Software
In this topic, you will install JDeveloper on the Windows machine and update it with extensions that enable BPM Studio and SOA functionality.
Installing JDeveloper on the Windows Machine
| 1. |
Using Windows Explorer, find the JDeveloper installer file
you downloaded (ending in .exe) and double click it to launch the
installer. The splash screen appears, indicating that it is preparing
the installer.  It takes several minutes to finish decompressing all the files. |
|---|---|
| 2. | The Installer Wizard opens and the Welcome screen appears. Click Next. 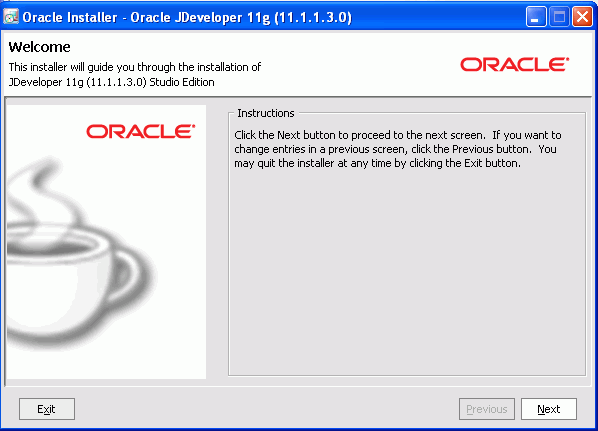 |
| 3. |
In the Choose Middleware Home Directory screen, select Create a new Middleware Home. Enter the following as the Middleware Home path:
 Click Next. |
| 4. |
In the Choose Install Type window, select Complete. Click Next. Note: You will not be using the WebLogic server that is installed with JDeveloper. Instead, you will deploy to the WebLogic server installed as part of the SOA Suite.  |
| 5. |
In the Confirm Product Installation Directories screen, examine the directory structures. Click Next.  |
| 6. |
In the Choose Shortcut Location screen, select "All Users" Start Menu folder . Click Next.  |
| 7. |
The Installation Summary screen appears. Review the information, then click Next.  |
| 8. |
Installation now begins. When it is complete, deselect Run Quickstart and click Done.  |
Updating JDeveloper
| 1. |
Update JDeveloper with the two extensions that provide BPM and SOA functionality. In essence, this update turns JDeveloper in BPM Studio. Start JDeveloper from the Windows Task Bar: When prompted to select a role, accept the Default Role and click OK.  |
|---|---|
| 2. | Close the Tip of the Day window and select Help > Check for Updates from the JDeveloper main menu. |
| 3. |
The Check for Updates Wizard opens and the Welcome page appears. Click Next.  |
| 4. |
The Source page of the wizard is next. Select Oracle Fusion Middleware Products and Official Oracle Extensions and Updates. Click Next.  |
| 5. |
On the Updates page, select the following checkboxes (build numbers may be slightly different at the time you perform this tutorial):
 Click Next. |
| 6. |
Enter your login credentials for your Oracle Web Account and click OK.  |
| 7. |
The download begins. It takes several minutes to complete.  |
| 8. |
The Summary screen appears after the download has completed, showing the new extensions that have been installed. Click Finish, then click Yes to restart JDeveloper. 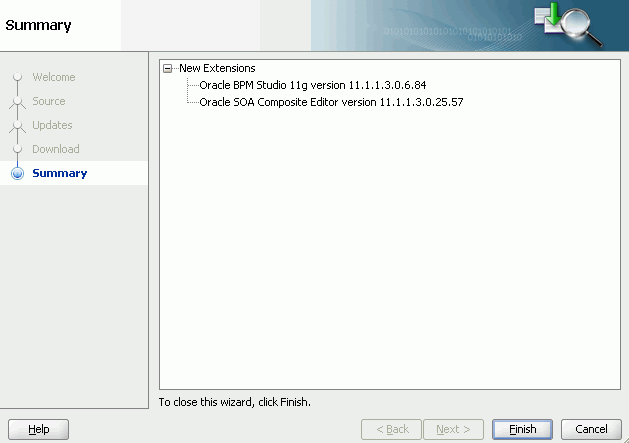 |
| 9. |
Once again, select the Default role when prompted as JDeveloper is opening. You can close JDeveloper now. |
Testing the Install
In this topic, you start the server and log into the BPM Workspace. A successful launch and login to the Workspace proves the success of the BPM installation.| 1. | On the Linux machine, start the WebLogic server. Open a terminal window and navigate to:
<path to your mwhome>/mwhome/user_projects/domains/domain1 |
|---|---|
| 2. |
Type the following command: nohup ./startWebLogic.sh &
 It should take about 5 minutes for the server to complete its startup and be ready to accept requests. Server output will be written to the nohup.out file in the domain1 directory. When this file gets to be about 34K in size, you can check it, using a text editor, to see if the server is accepting requests. Note: The nohup command makes it possible for you to close the terminal window without aborting the process. The & causes process output to be written to the nohup.out file. |
| 3. |
When the server is accepting requests, open a browser and enter the following URL:It will take several seconds to load the web application for the first time. |
| 4. |
Log into the BPM Workspace as the user weblogic using the password welcome1.  Any user interaction with a deployed process would occur in this Workspace. Some administrative tasks are also available in this interface, given the appropriate permissions. |
Seeding the Demo Community
In this section, you will work from the windows machine to deploy the sample web application that you downloaded earlier to the LDAP server within the remote WebLogic. This web application will seed the LDAP server with a collection of users and groups, meeting the requirements of many Oracle SOA sample applications and several tutorials that require a community of users and groups for their business use cases. If you go on to perform the Building Your First Process with Oracle BPM 11g tutorial, you will need to have completed this step.Recall that in the Prerequisite section, you downloaded DemoCommunitySeedApp.zip and unzipped it to C:\Labs\BPM11g.
| 1. |
Open a DOS command window and navigate to C:\Labs\BPM11gOBE\DemoCommunitySeedApp The setAntEnv.bat file in this folder will set environment variables required by the ANT program that deploys the web application. Assuming that you have used the same naming conventions specified in this tutorial, this file is pre-edited to work for your environment. Enter the following command: setAntEnv.bat  |
||||||||||||||||
|---|---|---|---|---|---|---|---|---|---|---|---|---|---|---|---|---|---|
| 2. |
Deploy the DemoCommunitySeedApp and seed the LDAP server by
entering the following command, using the parameter values listed in
the table below as command line parameters. Make any adjustments
necessary to fit your own environment.
ant seedDemoUsers
-Dbea.home=C:\Oracle\Middleware\jdev_bpm11g
-Doracle.home=C:\Oracle\Middleware\jdev_bpm11g\jdeveloper
-Dtarget=AdminServer -Dadmin.url=t3://host01.example.com:7001
-Dserver.url=http://host01.example.com:7001 -Dadmin.name=weblogic
-Dadmin.pwd=welcome1
 When the script completes you should see something like this: 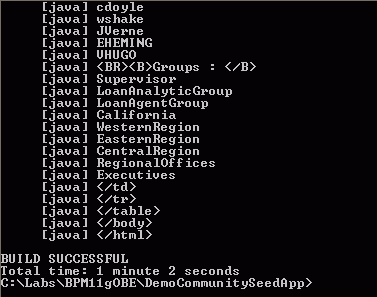 You will be able to see some of the users and groups that were added to the security realm in the WebLogic server as displayed in the command window output.
Troubleshooting Tips:
|


I really appreciate information shared above. It’s of great help. If someone want to learn Online (Virtual) instructor lead live training in Oracle JDeveloper 11g Fusion, kindly contact us http://www.maxmunus.com/contact
ReplyDeleteMaxMunus Offer World Class Virtual Instructor led training on Oracle JDeveloper 11g Fusion. We have industry expert trainer. We provide Training Material and Software Support. MaxMunus has successfully conducted 100000+ trainings in India, USA, UK, Australlia, Switzerland, Qatar, Saudi Arabia, Bangladesh, Bahrain and UAE etc.
For Demo Contact us.
Nitesh Kumar
MaxMunus
E-mail: nitesh@maxmunus.com
Skype id: nitesh_maxmunus
Ph:(+91) 8553912023
http://www.maxmunus.com/
I really appreciate information shared above. It’s of great help. If someone want to learn Online (Virtual) instructor lead live training in Oracle 11g Fusion Java Programming, kindly contact us http://www.maxmunus.com/contact
ReplyDeleteMaxMunus Offer World Class Virtual Instructor led training on Oracle 11g Fusion Java Programming. We have industry expert trainer. We provide Training Material and Software Support. MaxMunus has successfully conducted 100000+ trainings in India, USA, UK, Australlia, Switzerland, Qatar, Saudi Arabia, Bangladesh, Bahrain and UAE etc.
For Demo Contact us.
Nitesh Kumar
MaxMunus
E-mail: nitesh@maxmunus.com
Skype id: nitesh_maxmunus
Ph:(+91) 8553912023
http://www.maxmunus.com/
Thanks for the nice blog here.I was searching this one for a long time.This blog is very helpful for my studies..I got another one site also,which is same as yours Oracle BPM.Check this one also Oracle Fusion HCM Sure it will be helpful for you too..Once more iam thanking you for your creative blog.
ReplyDelete