Oracle Service Bus PS3(11.1.1.4) installation.
This blogpost is pertaining to OSB PS3(11.1.1.4) installation.
The post includes three parts:
1. Weblogic Server Installation
2. Oracle Service Bus 11.1.1.4 installation on top of Weblogic Server
3. Creating and Configuring a Weblogic Domain with Oracle Server Bus 11.1.1.4 aka PS3 product
Weblogic Server Installation:
Go through one of my previous blog post on installing WeblogicServer+Coherence+OEPE
Oracle Service Bus 11.1.1.4 installation on top of Weblogic Server
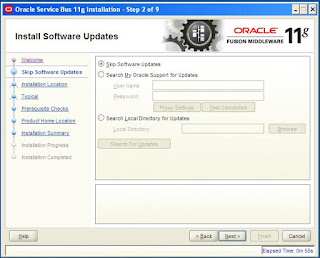
Step#1: Unzip the downloaded zip file and launch the OSB installer
Step#2:Run the installer to start installing the OSB product
Step#3: The installer would require a JDK for it to run. Please specify the JDK location. You can point to the JDK that was created inside the middleware home during the Weblogic Server Installation
Step#4: Click on Next
Step#5: Click on Next.
Step#6: Choose the Middleware home directory(this is the one that gets created with Weblogic Server Install) Also, name the Oracle Home Directory or leave the default one.
Step#7: Choose Custom Installation Type if you are inclined towards installing the Oracle Service Bus Examples aswell. Click on Next
Step#8:Choose the Oracle Service Bus Examples aswell. Click on Next
Step#9: Click on Next
Step#10: Click on Next. Make sure that the right weblogic server location and OEPE location is chosen. OEPE gets installed with the Weblogic Server installation, provided you downloaded the Weblogic(10.3.4)+Coherence+OEPE installer.
Step#11:Click on Install.
Step#12: Click on Next and finish.
We are done installing the OSB PS3 11.1.1.4 product !!!
We will move on in order to create and configure a weblogic domain with OSB product !!!
Hope you are done with the Part#1 of the installation. We will move on to create and configure a weblogic OSB domain.
Step#1: Go to the /common/bin and click-execute the config.cmd(for windows), config.sh for unix environment.
Step#2: Choose 'Create a new Weblogic Domain' as we are inclined towards creating a domain
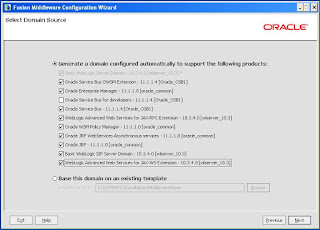
Step#3: Choose the relevant products as shown in the above snap-shot and move on
Step#4: Name you Domain and move on
Step#5: Specify the weblogic password and move on
Step#6: Select the 'Development mode' and click on Next.
Step#7: Configure the MDS/SOAINFRA values and click on Next. If you do not have these Run the RCU (repository creation utility 11.1.1.4) to create the relevant schemas. Also, you can omit this screen if you are not going with the JMS reporting provider.
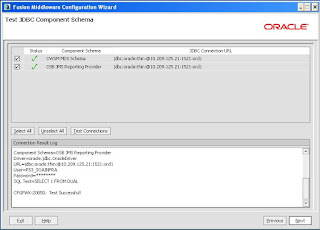
Step#8: Make sure that the configured MDS/SOAINFRA schemas are proper. If the test fails, make sure that the DB hosting the schemas is up and running and also see if the user credentials are properly configured.
Step#9: We are good to go with the domain creation. Click on Create
Step#10: Click on Done.
We are done configuring the OSB domain.
OSB 11g Installation Overview

.
OSB (Oracle Service Bus) = ALSB(BEA’s AquaLogic Service Bus) + ESB (Enterprise Service Bus)
Key points for OSB 11g Installation
1) OSB Installer gives you option to install following sub components
a) Oracle Service Bus Server
b) Oracle Service Bus IDE (Integrated Development Environment)
c) Oracle Service Bus examples (sample examples to see How OSB operates in run-time environment) - “Choose Custom Install to select this option”
2) Prerequisites software to install Oracle Service Bus 11g
a) Oracle Database(OSB schema to store data and metadata)
b) Repository Creation Utility (RCU) more here to create OSB related schema in Database
c) Oracle WebLogic Server (OSB will run on WebLogic server)
d) Optional : Oracle Coherence (optional component, recommended for caching functionality) - This comes with default installation of WebLogic Server
e) Optional : Oracle Enterprise Pack for Eclipse (used mainly to develop, deploy and debug applications for weblogic server) : If you are using OSB IDE component then OEPE (Oracle Enterprise Pack for Eclipse) is mandatory - This component can also be installed with WebLogic Server
3) For development, WebLogic comes with default database (Derby) which can be used in place of Oracle Database (If you plan to use weblogic’s derby database then oracle database and RCU is not required)
4) Installation order for Oracle Service Bus 11g installation
a) Install database 11g
b) Install RCU
c) Run RCU to create/load schemas for OSB
d) Install OSB 11g
e) Create/Extend domain by running config.sh
5) OSB 11g Installation type
a) Interactive - installer (GUI) will prompts details to install software
b) Silent - Installer runs on its own with no intervention from user. Installer uses response file (with parameters used during installation) to install software silently.
6) OSB 11g installation two options
a) Typical Install - OSB Server and Binary of OSB IDE in new Oracle Home
b) Custom Install - gives option to select components (OSB Server, OSB IDE, OSB Examples)
7) Default OSB 11g install will create ORACLE_HOME (directory Oracle_OSB1) under Fusion Middleware Home (MW_HOME). This directory Oracle_OSB1 is also referred as OSB_HOME or OSB ORACLE_HOME. For more information on MW_HOME, ORACLE_HOME and DOMAIN_HOME click here
Database Schema is NOT mandatory with OSB. Database is required only if you wish to use
a) Reporting Feature in OSB or
b) Oracle Web Services Manager (OWSM) policies.
9. To start installation run
a) For Unix- [software]/runInstaller -jreLoc $MW_HOME/jrockit_160_17_R28.0.0-670/jre
b) For Windows- [software]\setup.exe -jreLoc $MW_HOME\jrockit_160_17_R28.0.0-670\jre
10.Fusion Middleware Home (MW_HOME) can contain one and only one Oracle Service BusORACLE_HOME . In one MW_HOME there could be multiple ORACLE_HOME of different type like one ORACLE_HOME for OSB, one for SOA and one for IdM (Identity Management)
11. OSB installation log files are stored in ORACLE_INVENTORY_LOCATION/logs directory
12. If you are installing OSB 11g on 64 bit machine, select Custom Installation type and deselect OSB IDE (Integrated Development Environment) option.
13. After OSB install, create domain ($MW_HOME/oracle_common/common/bin/config.sh|cmd). Default configuration will create domain with 1 Admin Server (listening on port 7001) and 1 Managed Server(osb_server1) . For more information on WebLogic Server Domain, Admin Server and Managed Server click here
14.After OSB installation and configuration, Start Admin Server and Doamin Server using startWebLogic.sh & startManagedWebLogic.sh(osb_server1) For more information on options to start WebLogic Server clickhere
15. Access OSB Administration Console using
http://<hostname>:<osb-port>/osbconsole where osb-port is port configured for managed server osb_server1
Step#1: Go to the /common/bin and click-execute the config.cmd(for windows), config.sh for unix environment.
Step#2: Choose 'Create a new Weblogic Domain' as we are inclined towards creating a domain
Step#3: Choose the relevant products as shown in the above snap-shot and move on
Step#4: Name you Domain and move on
Step#5: Specify the weblogic password and move on
Step#6: Select the 'Development mode' and click on Next.
Step#7: Configure the MDS/SOAINFRA values and click on Next. If you do not have these Run the RCU (repository creation utility 11.1.1.4) to create the relevant schemas. Also, you can omit this screen if you are not going with the JMS reporting provider.
Step#8: Make sure that the configured MDS/SOAINFRA schemas are proper. If the test fails, make sure that the DB hosting the schemas is up and running and also see if the user credentials are properly configured.
Step#9: We are good to go with the domain creation. Click on Create
Step#10: Click on Done.
We are done configuring the OSB domain.
OSB 11g Installation Overview
.
OSB (Oracle Service Bus) = ALSB(BEA’s AquaLogic Service Bus) + ESB (Enterprise Service Bus)
- Download 11g OSB Software from here
- Oracle Service Bus 11g Installation Guide is available here
- For High Availability (Active-Active cluster) in Oracle Service Bus 11g click here
Key points for OSB 11g Installation
1) OSB Installer gives you option to install following sub components
a) Oracle Service Bus Server
b) Oracle Service Bus IDE (Integrated Development Environment)
c) Oracle Service Bus examples (sample examples to see How OSB operates in run-time environment) - “Choose Custom Install to select this option”
2) Prerequisites software to install Oracle Service Bus 11g
a) Oracle Database(OSB schema to store data and metadata)
b) Repository Creation Utility (RCU) more here to create OSB related schema in Database
c) Oracle WebLogic Server (OSB will run on WebLogic server)
d) Optional : Oracle Coherence (optional component, recommended for caching functionality) - This comes with default installation of WebLogic Server
e) Optional : Oracle Enterprise Pack for Eclipse (used mainly to develop, deploy and debug applications for weblogic server) : If you are using OSB IDE component then OEPE (Oracle Enterprise Pack for Eclipse) is mandatory - This component can also be installed with WebLogic Server
3) For development, WebLogic comes with default database (Derby) which can be used in place of Oracle Database (If you plan to use weblogic’s derby database then oracle database and RCU is not required)
4) Installation order for Oracle Service Bus 11g installation
a) Install database 11g
b) Install RCU
c) Run RCU to create/load schemas for OSB
d) Install OSB 11g
e) Create/Extend domain by running config.sh
5) OSB 11g Installation type
a) Interactive - installer (GUI) will prompts details to install software
b) Silent - Installer runs on its own with no intervention from user. Installer uses response file (with parameters used during installation) to install software silently.
6) OSB 11g installation two options
a) Typical Install - OSB Server and Binary of OSB IDE in new Oracle Home
b) Custom Install - gives option to select components (OSB Server, OSB IDE, OSB Examples)
7) Default OSB 11g install will create ORACLE_HOME (directory Oracle_OSB1) under Fusion Middleware Home (MW_HOME). This directory Oracle_OSB1 is also referred as OSB_HOME or OSB ORACLE_HOME. For more information on MW_HOME, ORACLE_HOME and DOMAIN_HOME click here
Database Schema is NOT mandatory with OSB. Database is required only if you wish to use
a) Reporting Feature in OSB or
b) Oracle Web Services Manager (OWSM) policies.
9. To start installation run
a) For Unix- [software]/runInstaller -jreLoc $MW_HOME/jrockit_160_17_R28.0.0-670/jre
b) For Windows- [software]\setup.exe -jreLoc $MW_HOME\jrockit_160_17_R28.0.0-670\jre
10.Fusion Middleware Home (MW_HOME) can contain one and only one Oracle Service BusORACLE_HOME . In one MW_HOME there could be multiple ORACLE_HOME of different type like one ORACLE_HOME for OSB, one for SOA and one for IdM (Identity Management)
11. OSB installation log files are stored in ORACLE_INVENTORY_LOCATION/logs directory
12. If you are installing OSB 11g on 64 bit machine, select Custom Installation type and deselect OSB IDE (Integrated Development Environment) option.
13. After OSB install, create domain ($MW_HOME/oracle_common/common/bin/config.sh|cmd). Default configuration will create domain with 1 Admin Server (listening on port 7001) and 1 Managed Server(osb_server1) . For more information on WebLogic Server Domain, Admin Server and Managed Server click here
14.After OSB installation and configuration, Start Admin Server and Doamin Server using startWebLogic.sh & startManagedWebLogic.sh(osb_server1) For more information on options to start WebLogic Server clickhere
15. Access OSB Administration Console using
http://<hostname>:<osb-port>/osbconsole where osb-port is port configured for managed server osb_server1


Great Article… I love to read your articles because your writing style is too good, its is very very helpful for all of us and I never get bored while reading your article because, they are becomes a more and more interesting from the starting lines until the end. weblogic administrator training
ReplyDelete