Tuesday, 31 January 2012

How to remove unused files/artifacts from MDS?

In development phase of project, we will be adding different artifacts to the MDS so that can be accessed by different processes. In course of development /design changes, applying best practices, there is bound to be lot of unused folders /artifacts lying around in the MDS store. So it is always advised to remove the unwanted artifacts, test the processes before we export them to other environments. I always used a workaround to remove the files, even though it was not the best approach.

Workaround
 There is a table called MDS_PATHS where there would be entries corresponding to each artifact. I used to delete the entries from the table and the artifacts never used to show up, even though there will be entries in other related tables.

BestApproach
The best approach/solution is to use WLST command for cleaning up the MDS store. There is a function called deleteMetadata in WLST which will do the job for you.
This is how Oracle documentation describes the command. It deletes the selected documents from the application repository. When this command is run against repositories that support versioning, that is a database-based repository, delete is logical and marks the tip version (the latest version) of the selected documents as "deleted" in the MDS repository partition.

For more attributes and options available with the command refer this doc

The WLST script is located at:

(UNIX) MIDDLEWARE_HOME/ORACLE_SOA1/common/bin/wlst.sh
(Windows) MIDDLEWARE_HOME\Oracle_SOA1\common\bin\wlst.cmd

Once the scripting tool is initialized, Connect to the server

offline>connect(‘username,’pwd’, ‘hostname:7001’)

For running deleteMetada function you need a minimum of 3 inputs
-          application  - since we are deleting from shared artifacts of soa-infra, the value should be soa-infra
-          server -  value should be ‘soa_server1’ or the server u use for SOA other than admin server.
-          docs – the folder path or artifact which you want to delete.

wls:/GEO_domain/serverConfig> deleteMetadata(application='soa-infra',server='soa
_server1',docs='/apps/dvm/oracle/dvm/*')

Executing operation: deleteMetadata.

Operation "deleteMetadata" completed. Summary of "deleteMetadata" operation is:

List of documents successfully deleted:
/apps/dvm/oracle/dvm/GeoXRef.dvm

1 documents successfully deleted.


This will be really useful in all projects as cleanup in mandatory in the MDS.

Thursday, 26 January 2012

Migrating Oracle BPEL 10.1.3.3.X To Different Environments

  • Initial Setup 
    • Not Required. Out of the box available with SOA Setup. JDeveloper creates a build.xml under each BPEL project which you create. Simply need to alter build.xml to make it suitable for migration across different environments. 
  • Project Setup 
    • Create a copy of build.properties (with the names mentioned below) file for each environment and save it at the same location as build.properties (it’s generally located at the root folder of JDeveloper project) 
      • build_dev.properties 
      • build_tst.properties 
      • build_prd.properties 
      • build_prf.properties 
  • As of now assumption is we have Development (dev), prf (performance), tst (test) and Production (prd) environments. 
  • Make the following changes into build_<env>.properties 
    ############### Add (Mandotory) ############### 
    # Application specific variables to be used during the build 
    bpel_host= <bpel server VIP name> ## (put the host name which will be substituted in WSDL URLs in respective environments) 
    bpel_port=<bpel server VIP port> 
    ############### Update (Mandatory) ############### 
    # Make sure admin.user, admin.password is correct for appserver 
    admin.user = oc4jadmin ## or the user name who has access to BPELAdmin console) 
    # http.hostname and http.port should point to BPEL Server’s host and http port 
    http.hostname = <hostname> ## hostname of the server where we are deploying 
    http.port = <port> ## port where server is running 
    # Change below if deploying in domain other than "default" 
    domain = <bpel domain> 
    # Change below if deploying with process revision other than 1.0 
    rev = <current revision> 
    ############### Update (Mandatory for Clustered Environment) ############### 
    cluster = true 
    j2ee.hostname = <physical node where bpel process will be deployed>
  • Copy build.xml at <app root> to bpel subfolder 
    • copy <app root folder>\build.xml <app root folder>\bpel\build.xml 
  • Make the following changes into <app root folder>\bpel\build.xml 
    • Add <customize> task under bpelc task 
      <target name="compile"> 
      <echo> 
      ————————————————————– 
      | Compiling bpel process ${process.name}, revision ${rev} 
      ————————————————————– 
      </echo>
      <bpelc input="${process.dir}/bpel/bpel.xml" out="${process.dir}/output" 
      rev="${rev}" home="${bpel.home}"/> 
      </target>
      ############### Change it to the following ############### 
      ## You have to put <partnerLinkBinding> tag for each partner link to be modified 
      ## below is illustration for SampleProcess defined in bpel.xml as sample_pl we have to do similar 
      ## task for other processes
      <target name="compile"> 
      <echo> 
      ————————————————————– 
      | Compiling bpel process ${process.name}, revision ${rev} 
      ————————————————————– 
      </echo>
      <bpelc input="${process.dir}/bpel/bpel.xml" out="${process.dir}/output" 
      rev="${rev}" home="${bpel.home}"> 
      <customize> 
      <partnerLinkBinding name="sample_pl"> 
      <property name="wsdlLocation"> 
      http://${bpel_host}:${bpel_port}/orabpel/${domain}/SampleProcess/{rev}/SampleProcess?wsdl 
      </property> 
      </partnerLinkBinding> 
      <configurations> 
      <property name="propName">propValue</property> 
      </configurations> 
      <activationAgents name="actAgentName"> 
      <property name="propName">propValue</property> 
      </activationAgents> 
      <preferences> 
      <property name="propName">propValue</property> 
      </preferences> 
      </customize> 
      </bpelc> 
      </target>
    • If you have to make changes into other files apart from bpel.xml like WSDLs or XSDs or XSLs please use "replace" ant task. Insert this text inside "compile" target before <bpelc> tag. 
      <replace file="<fileName>" token="<searchText>" value="<replaceText>"/> 
      For example: 
      <replace file="sample.wsdl" token="search_text" value="${replace_text}"/>
    • Refer to the environment specific build_<env>.properties file 
      <!– First override from build.properties in process.dir, if available –> 
      <property file="${process.dir}/build.properties"/> 
      ############### Change it to the following ############### 
      <!– First override from build.properties in process.dir, if available –> 
      <property file="${process.dir}/build_${env}.properties"/>
  • Make the following changes into build.xml (at application root folder). 
    • Create a new compile target that redirects execution to the target within the build file within the bpel subdirectory 
      <target name="compileEnv"> 
      <echo> 
      ————————————————————– 
      | Compiling bpel process using ${process.name}/bpel/build.xml 
      ————————————————————– 
      </echo> 
      <ant dir="${process.dir}/bpel"/> 
      </target>
    • Modify the process-deploy target to invoke this new compile target 
      <target name="process-deploy" 
      depends="validateTask, compile, deployProcess, deployTaskForm, deployDecisionServices" /> 
      ############### Change it to the following ############### 
      <target name="process-deploy" 
      depends="validateTask, compileEnv, deployProcess, deployTaskForm, deployDecisionServices" />
    • Refer to the environment specific build_<env>.properties file 
      <!– First override from build.properties in process.dir, if available –> 
      <property file="${process.dir}/build.properties"/> 
      ############### Change it to the following ############### 
      <!– First override from build.properties in process.dir, if available –> 
      <property file="${process.dir}/build_${env}.properties"/>
  • Deployment 
    • Upload your Project to build server under deployment folder for example: /apps/orabpel/deploy/<env>/<domain>/<app>. 
    • Start BPEL Developer Prompt / Shell
      • <ORACLE_HOME>/bpel/bin/devprompt.sh
    • Go to the application folder 
      • cd /apps/orabpel/deploy/<env>/<domain>/<app> folder (as mentioned in step 01) 
    • Execute obant.sh from your <app root folder> and pass appropriate values depending upon the environment you want to deploy
      • obant.sh -Denv=dev -Dadmin.password=<oc4jadmin password> or
      • obant.sh -Denv=qa -Dadmin.password=< oc4jadmin password > or
      • obant.sh -Denv=test-Dadmin.password=< oc4jadmin password > or
      • obant.sh -Denv=prod -Dadmin.password=< oc4jadmin password >
  • Validation Step 
    • Obant script should say "Build Successful" i`n the end. Also test deployment from BPEL Console.

Wednesday, 25 January 2012

Deploying BPEL process to multiple environments

BPEL process can be directly deployed into Development instance from JDeveloper using the ANT script created by it. However this is not good practice to deploy into multiple environments (like TEST, QA, PRE-PROD & PROD) as the configuration properties typically vary from environment to environment. For example, the common error handling web service partner link URL for the production Environment is typically different from the one used in the testing environment.

Beginning with 10.1.3.1 release of SOA suite, customize ANT feature is provided using which we can specify property values for different environments in a single build file location. This task can be used as subtask of bpelc.

Below is sequence of steps to define the ANT ‘customize’ task and deploy BPEL to multiple environments:

Step1: Create environment specific .properties files:
1.Create configuration properties files for each environment with file names following notation of “build_$env.properties”:
Eg:
build_test.properties
build_qa.properties
build_pre-prod.properties
build_prod.properties

2.In each of these properties files, provide all the environment specific variables as follows:

# environment – TEST/QA/PRE-PRD/PRD
host_name=
xyz.us.xyz.com
port_number=9700
domain_name=default
rev=1.0
#Parameters for common Error handling
eh_domain_name=default
eh_rev=1.0
# --------------------------------------------------
# END OF FILE

Step2: Create build.xml with ant customization:
1.Copy build.xml from main folder to BPEL sub-folder

2.Modify this build.xml in BPEL sub-folder to point to the properties file:
Find the below property tag in build.xml:
<!--property file="${process.dir}/build.properties"/>Replace the above XML with the following:
<!--property file="${process.dir}/build_${env}.properties"/>
3.Define ANT ‘customize’ task to change the WSDL URL of a PartnerLink
Find the following target XML tag in the build.xml file under BPEL sub-folder:
<!--target name="compile">
<!--echo>
Compiling bpel process ${process.name
}, revision ${rev} 
<!--bpelc input="${process.dir}/bpel/bpel.xml" out="${process.dir}/output"
rev="${rev}" home="${bpel.home}"/>

Replace the above XML with the following to create customize task for all partner links in BPEL process
<!--target name="compile">
<!--bpelc input="${process.dir}/bpel/bpel.xml" out="${process.dir}/output"
rev="${rev}"home="${bpel.home}">
<!--customize>
<!--partnerLinkBinding name="CommonErrorHandling">
<!--property name="wsdlLocation">
http://${bpel_host}:${bpel_port}/orabpel/${eh_domain_name}/TestProcess/${eh_rev}/TestProcess?wsdl
<!--/property>
<!--/partnerLinkBinding>
<!--partnerLinkBinding name="CustomerUpsertProcess">
<!--property name="wsdlLocation">
http://${bpel_host}:${bpel_port}/orabpel/${domain}/CustomerUpsertProcess/${rev}/CustomerUpsertProcess?wsdl
<!--/property>

<!--/partnerLinkBinding>
<!--/customize> 
<!--/bpelc> 
<!--/target>

Step 3: Create custom target in main build.xml to direct to build.xml created & modified in Step2 above:
1. Add following target to {BPEL Process}/build.xml file
<!--target name="compile1">
<!--echo>
Compiling bpel process with following ${
process.name}/bpel/build.xml file
<!--ant dir="${process.dir}/bpel"/>
<!--/target>

2.Modify process-deploy target to invoke the new compile1target created in above:
Find following target xml tag in {BPEL Process}/build.xml file
<!--target name="process-deploy"
depends="validateTask, compile, deployProcess, deployTaskForm, deployDecisionServices" />
Replace it with the following:
<!--target name="process-deploy"
depends="validateTask, compile1, deployProcess, deployTaskForm, deployDecisionServices" />
3.Change property file value of XML in the build.xml file under {BPEL Application} folder:
Find following property xml tag in {BPEL Process}/build.xml file
<!--property file="${process.dir}/build.properties"/>Replace it with the following:
<!--property file="${process.dir}/build_${env}.properties"/>
Step4 : Use ANT and deploy the BPEL process to respective environment:
Make sure to modify the ant property env= test/qa/pre-prod/prod depending on environment before deploying

Tuesday, 24 January 2012

Oracle SOA Suite 11g – Scheduling the composites using Quartz scheduler

Oracle SOA Suite 11g – Scheduling the composites using Quartz scheduler.

This blog will explain the approach to schedule the composites using the Quartz scheduler.
1. Create the ADF binding to the composite.xml
Open the composite xml
Copy the service section and give a unique name e.g. bpelhelloworld_client_adf and also make sure the ServiceName specified is correct.

Copy the client partnerlink wire and edit the name of the copied wire as adf service name specified in the previous step.

Open the design mode and verify the wires.

2. Create the JOB class that invokes the composite service.
Create the JOB class as shown below to invoke the composite service, change the soa server details and the composite details accordingly.
package javaschedule;
import java.util.Hashtable;
import java.util.UUID;
import java.util.logging.Logger;
import oracle.soa.management.facade.*;
import javax.naming.Context;
import oracle.soa.management.util.*;
import oracle.fabric.common.NormalizedMessage;

import org.quartz.Job;
import org.quartz.JobExecutionContext;
public class BPELHelloWorldJob implements Job {
Logger logger;
public BPELHelloWorldJob() {
logger = Logger.getLogger(this.getClass().getName());
}
public void execute(JobExecutionContext jobExecutionContext) {
try {
System.out.println("initiated");
Hashtable jndiProps = new Hashtable();
jndiProps.put(Context.PROVIDER_URL, "t3://soahost:soaport/soa-infra");
jndiProps.put(Context.INITIAL_CONTEXT_FACTORY,"weblogic.jndi.WLInitialContextFactory");
jndiProps.put(Context.SECURITY_PRINCIPAL, "weblogic");
jndiProps.put(Context.SECURITY_CREDENTIALS, "xxxxxx");
jndiProps.put("dedicated.connection", "true");

Locator locator = null;

String inputPayload ="<ns1:process xmlns:ns1=\"http://xmlns.oracle.com/JavaSchedule/BPELHelloWorld/BPELHelloWorld\"><ns1:input>Albin</ns1:input></ns1:process>";
locator = LocatorFactory.createLocator(jndiProps);
// find composite
Composite composite = locator.lookupComposite("default/BPELHelloWorld!1.0");

System.out.println("Got Composite : "+ composite.toString());

// find exposed service of the composite
Service service = composite.getService("bpelhelloworld_client_adf");
System.out.println("Got serviceName : "+ service.toString());
// make the input request and add this to a operation of the service
NormalizedMessage input = new NormalizedMessageImpl();
// payload is the partname of the process operation
input.getPayload().put("payload",inputPayload);
// process is the operation of the employee service


service.post("process", input);

} catch (Exception e) {
e.printStackTrace();
}
logger.fine("Call HelloWorld BPEL Process Finished");
}
}


3. Create the client that schedule the JOB
Change the cron expression accordingly to change the scheduling period.


package javaschedule;
import org.quartz.CronTrigger;
import org.quartz.JobDetail;
import org.quartz.Scheduler;
import org.quartz.impl.StdSchedulerFactory;
public class ProcessScheduler {
public ProcessScheduler() {

try {

StdSchedulerFactory schedFact = new StdSchedulerFactory();
Scheduler sched = schedFact.getScheduler();
System.out.println(sched);
sched.start();
JobDetail jd =new JobDetail("BPEL Hello World Job", "BPEL Job", BPELHelloWorldJob.class);
CronTrigger cronTrigger =new CronTrigger("BPEL Hello World Job", "BPEL Job");
String cronExpr = null;
//every five min
cronExpr ="0 0/5 * * * ?";
cronTrigger.setCronExpression(cronExpr);
sched.scheduleJob(jd, cronTrigger);

} catch (Exception e) {
e.printStackTrace();

}
}
public static void main(String[] args) {
ProcessScheduler cl=new ProcessScheduler ();
System.out.println("Scheduled JOB");
}

}


4. Execute the client – java javaschedule .ProcessScheduler, this will schedule the JOB every 5 minutes to invoke the composite service.

DOWNLOAD SAMPLE

Sunday, 22 January 2012

Using Shared Object in Soa Suite 11g with MDS

Using Shared Object in Soa Suite 11g with MDS

Inspired by Eric Elzinga , who was wondering how MDS can work in Soa Suite 11g , I made some screenshots how you can use a XSD from a central MDS repository in your composite application. Clemens already blogged about re-using common metadata and he made a great ant utility to import or delete MDS files. For 11G R1 PS1 or higher use this instead of the Clemens utility
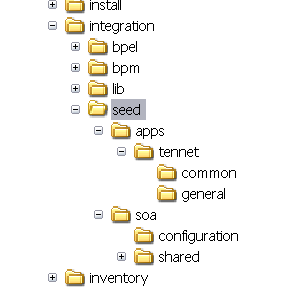
First I make a local MDS repository. If you install the Soa plugin you already have a seed folder in the integration folder. Under this folder create an new folder called apps. ( this have has to be apps else you will get a permission denied error ) . Under this apps folder we can create our own definitions.


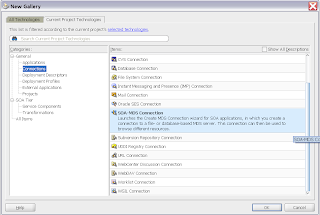
To use my local SOA-MDS repository I create a new MDS File Connection

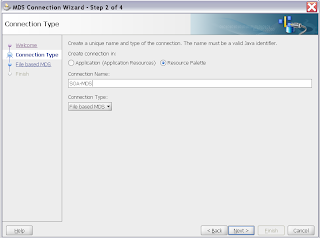
I want to re-use these common objects in every Soa project so I choose for the resource palette option

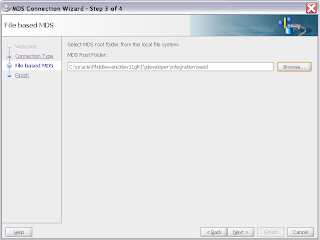
select the seed folder in the integration folder


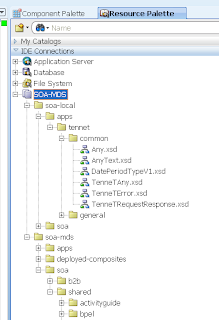
Here we can see our common application objects.
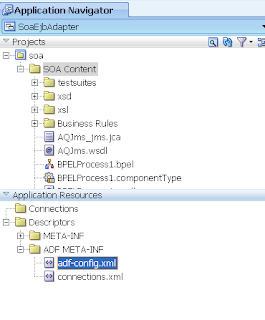
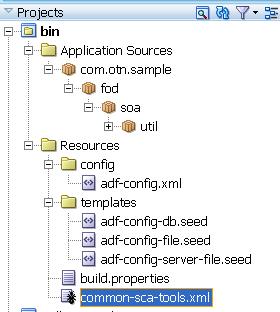
Open the application resources window and open the adf-config.xml

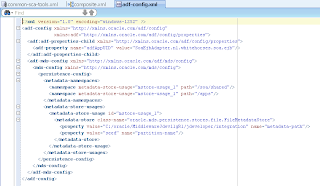
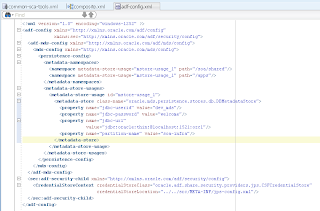
Here we define a new metadata namespace with apps as path. And use the integration folder as metadata-path value.


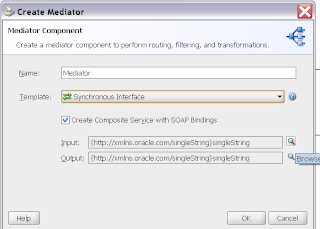
We are ready to use these common objects in a mediator.. Here I will use a schema from the local MDS as input parameter for the mediator.

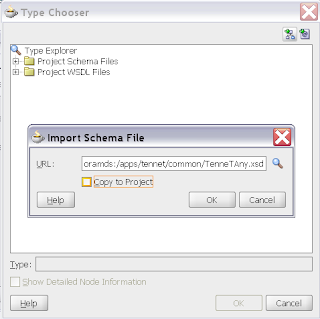
Import a new schema
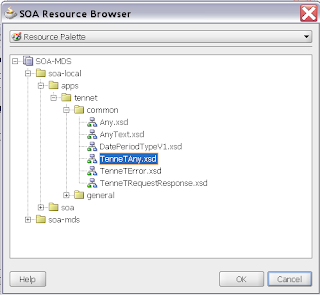
Select the resource browser and here we can select our schema from the local MDS

I uncheck the Copy to project option, because this XSD already exists in the MDS

Our Project is ready but If we want to deploy this Soa project, we will receive a error, it can't find the schema. So we need to export the local MDS files to the SOA Suite database MDS.
To do this we have 2 options , the first option is to create a MAR deployment ( Application properties ) or do this with Ant.
I stripped the Clemens ant project so this ant build file has only two tasks , add and delete. It uses the adf-config.xml ( config folder) for the location of the target MDS and I use the local MDS as source.

Here is the target adf-config.xml which is located in the config folder

Change the build.properties so it matches your environment

This will import your local MDS object to the remote MDS. After this you can deploy your Soa Suite project.
Here you can download my ant project. Thanks to Clemens.

Oracle SOA Suite 11.1.1.5: Log File Configuration

Oracle SOA Suite components generate log files containing messages that record all types of events, including startup and shutdown information, errors, warning messages, access information on HTTP requests, and additional information.
To configure log files:
  1. Access this page through one of the following options:
    From the SOA Infrastructure Menu...From the SOA Folder in the Navigator...
    1. Select Logs > Log Configuration.
    1. Right-click soa-infra.
    2. Select Logs > Log Configuration.
    The Log Configuration page displays the following details:
    • View list for selecting the type of loggers for which to view information:
      • Persistent: Loggers that become active when a component is started. Their configuration details are saved in a file and their log levels are persisted across component restarts.
      • Active run time: Loggers that are automatically created during run time and become active when a particular feature area is exercised (for example,oracle.soa.b2b or oracle.soa.bpel). Their log levels are not persisted across component restarts.
    • A table that displays the logger name, Oracle Diagnostic Logging (ODL) level for setting the amount and type of information to write to a log file, the log file, and the log level state.
    Description of sca_logconfig.gif follows

  2. Perform the following log file tasks on this page:
    1. In the Logger Name column, expand a logger name. This action enables you to specify more specific logging levels within a component.
    2. In the Oracle Diagnostic Logging Level columns, select the level and type of information to write to a log file.
    3. In the Log File column, click a specific log file to create and edit log file configurations.
  3. Click the Log Files tab.
    This page enables you to create and edit log file configurations, including the log file in which the log messages are logged, the format of the log messages, the rotation policies used, and other parameters based on the log file configuration class.
    Description of sca_logfiles.gif follows

Build Oracle AIA ABCS With Multiple Service Targets

Build Oracle AIA 3.2 On SOA 11.1.1.4 ABCS With Multiple Service Targets
For an overview of all Oracle AIA specific terms and basic building blocks, please refer to my earlier post Steps to build the AIA artifacts.

To building a ABCS, we will take advantage of Service Constructor. This blog-thread assumes that readers have already downloaded the AIA Service Constructor extension for JDeveloper 11.1.1.5.

Right Click on the Application Workspace and choose to select AIA Service Component Project,


Add caption


 Choose the Service Description from the AIA connection. This service description must have been created using Project Lifecycle Workbench. http://host:soaport/AIA


Click on the Import Service Request button as shown above.


Click on the Database Connection Lookup.


Choose a Service Request EBS from the list


 Press OK and you will see the result


Press Nest and Populate the Application Name, System Code, Application Short Name same as Product code and "Core" For Industry. Service Operation: Create; Service Version: 1.0; Service Type: Provider ABCS; Press Next.


Choose the EBS That will consume this EBS


Choose the Target Service This ABCS will call


Click Next and select default values. To call the additional services, click on "Additional Targets" and follow the steps to "Add Target Service"


For questions, comments and feedback  please contact:

xslt padding with characters call template for left pad and right pad

  Could a call-template be written that took two parameters ?   a string, and a   number) return the string with empty spaces appended t...