Thursday, 6 December 2012

Oracle SOA 11g 11.1.1.6 Performance Tuning of BPEL Processes:Audit

AuditLevel

The auditLevel property sets the audit trail logging level. This configuration property is applicable to both durable and transient processes. This property controls the amount of audit events that are logged by a process. Audit events result in more database inserts into the audit_trail table which may impact performance. Audit information is used only for viewing the state of the process from Oracle Enterprise Manager Console.
ValueDescription
InheritInherits the audit level from infrastructure level.
OffNo audit events (activity execution information) are persisted and no logging is performed; this can result in a slight performance boost for processing instances.
MinimalAll events are logged; however, no audit details (variable content) are logged.
ErrorLogs only serious problems that require immediate attention from the administrator and are not caused by a bug in the product. Using this level can help performance.
ProductionAll events are logged. The audit details for assign activities are not logged; the details for all other activities are logged.
DevelopmentAll events are logged; all audit details for all activities are logged.

AuditDetailThreshold

The auditdetailthreshold property sets the maximum size (in kilobytes) of an audit trail details string before it is stored separately from the audit trail. If an audit trail details string is larger than the threshold setting, it is not immediately loaded when the audit trail is initially retrieved; a link is displayed with the size of the details string. Strings larger than the threshold setting are stored in theaudit_details table, instead of the audit_trail table.
The details string typically contains the contents of a BPEL variable. In cases where the variable is very large, performance can be severely impacted by logging it to the audit trail.
The default value is 50000 (50 kilobytes).

AuditStorePolicy

This property specifies the strategy to persist the BPEL audit data.
ValueDescription
syncSingleWrite (default)AuditTrail and dehydration are persisted to DB in one transaction.
syncMultipleWriteAuditTrail and dehydration are persisted in the same thread but separate transactions.
asyncAuditTrail and dehydration are persisted by separate threads and separate transactions.
By default, audit messages are stored as part of the main BPEL transaction. A BPEL instance holds on to the audit messages until the flow reaches dehydration. In some use cases, for example when you have a large loop, and there is no dehydration point in the loop, a large number of audit logs are accumulated. This could lead to an out-of-memory issue and BPEL main transaction can experience timeout errors. You may consider using syncMultipleWrite or async to store the audit message separately from the main transaction.
When you use syncMultipleWrite and async auditStorePolicy, there are a few other properties that need to be considered. Please see the sections below.


AuditFlushByteThreshold

This property controls how often the engine should flush the audit events, basically after adding an event to the current batch, the engine checks to see if the current batch byte size is greater than this value or not.
Consider tuning this property when async or syncMultipleWrite audit strageties are used. This size needs to be tuned based on the application.


AuditFlushEventThreshold

This property controls how often the engine should flush the audit events, basically when it reaches this limit of the number of events, the engine would trigger the store call.
Consider tuning this property when async or syncMultipleWrite audit strageties are used. This size needs to be tuned based on the application.

Oracle SOA 11g 11.1.1.6 Performance Tuning of BPEL: Significant Tips

OneWayDeliveryPolicy

The oneWayDeliveryPolicy is from the Oracle 10g configuration property deliveryPersistencePolicy.
The new configuration property name is bpel.config.oneWayDeliveryPolicy.
The oneWayDeliveryPolicy property controls database persistence of messages entering Oracle BPEL Server. By default, incoming requests are saved in the delivery service database tabledlv_message. These requests are later acquired by Oracle BPEL Server worker threads and delivered to the targeted BPEL process. This property persists delivery messages and is applicable to durable processes.
When setting the oneWayDeliveryPolicy property to async.cache, if the rate at which one-way messages arrive is much higher than the rate at which Oracle BPEL Server delivers them, or if the server fails, messages may be lost. In addition, the system can become overloaded (messages become backlogged in the scheduled queue) and you may receive out-of-memory errors. Consult your own use case scenarios to determine if this setting is appropriate.
One-way invocation messages are stored in the delivery cache until delivered. If the rate at which one-way messages arrive is much higher than the rate at which Oracle BPEL Server delivers them, or if the server fails, messages may be lost.
ValueDescription
async.persist (Default)Delivery messages are persisted in the database. With this setting, reliability is obtained with some performance impact on the database. In some cases, overall system performance can be impacted.
async.cacheIncoming delivery messages are kept only in the in-memory cache. If performance is preferred over reliability, this setting should be considered.
syncDirects Oracle BPEL Server to bypass the scheduling of messages in the invoke queue, and invokes the BPEL instance synchronously. In some cases this setting can improve database performance.


MaximumNumberOfInvokeMessagesInCache

This property specifies the number of invoke messages that can be kept in the in-memory cache. Once the engine hits this limit, it would push the message to dispacther in-memory cache, instead it would save the message in the db and these saved messages can be recovered using recovery job. You can use value -1 to disable.
The default value is 100000 messages.


StatsLastN

The StatsLastN property sets the size of the most-recently processed request list. After each request is finished, statistics for the request are kept in a request list. A value less than or equal to 0 disables statistics gathering. To optimize performance, consider disabling statistics collection if you do not need them.
This property is applicable to both durable and transient processes.
The default value is -1.


LargeDocumentThreshold

The largedocumentthreshold property sets the large XML document persistence threshold. This is the maximum size (in kilobytes) of a BPEL variable before it is stored in a separate table from the rest of the instance scope data.
This property is applicable to both durable and transient processes.
Large XML documents impact the performance of the entire Oracle BPEL Server if they are constantly read in and written out whenever processing on an instance must be performed.
The default value is 10000 (100 kilobytes).


Validate XML

The validateXML property validates incoming and outgoing XML documents. If set to True, the Oracle BPEL Process Manager applies schema validation for incoming and outgoing XML documents. Nonschema-compliant payload data is intercepted and displayed as a fault.
This setting is independent of the SOA composite application and SOA Infrastructure payload validation level settings. If payload validation is enabled at both the service engine and SOA Infrastructure levels, data is checked twice: once when it enters the SOA Infrastructure, and again when it enters the service engine
CAUTION: Enabling XML payload validation can impact performance.
This property is applicable to both durable and transient processes.
The default value is False.


SyncMaxWaitTime

The SyncMaxWaitTime property sets the maximum time the process result receiver waits for a result before returning. Results from asynchronous BPEL processes are retrieved synchronously by a receiver that waits for a result from Oracle BPEL Server.
The default value is 45 seconds.


InstanceKeyBlockSize

The InstanceKeyBlockSize property controls the instance ID range size. Oracle BPEL Server creates instance keys (a range of process instance IDs) in batches using the value specified. After creating this range of in-memory IDs, the next range is updated and saved in the ci_id_range table.
For example, if instanceKeyBlockSize is set to 100, Oracle BPEL Server creates a range of instance keys in-memory (100 keys, which are later inserted into the cube_instance table as cikey). To maintain optimal performance, ensure that the block size is larger than the number of updates to the ci_id_range table.
The default value is 10000.


MaxRecoverAttempt

You can configure the number of automatic recovery attempts to submit in the same recoverable instance. The value you provide specifies the maximum number of times invoke and callback messages are recovered. Once the number of recovery attempts on a message exceeds the specified value, a message is marked as nonrecoverable.
When a BPEL instance makes a call to another server using invokeMessage, and that call fails due to a server down, validation error, or security exception, the invokeMessage is placed in a recovery queue and BPEL attempts to retry those messages. When there are many messages, and a majority of them are being sent to the same target, the target can become overloaded. Setting the appropriate value of MaxRecoveryAttempt will prevent excessive load on servers that are targeted from BPEL web service calls.


Oracle SOA Suite 11.1.1.6: Monitoring SOA Composite Behavior with SQL Queries

Oracle SOA Suite 11.1.1.6: Monitoring SOA Composite Behavior with SQL Queries


The standard information obtained from Oracle Enterprise Manager Fusion Middleware Control might not be sufficient and adequate for fine grained monitoring. By querying some core product tables in the [PREFIX]_SOAINFRA schema such as the COMPOSITE_INSTANCE, CUBE_INSTANCE, and MEDIATOR_INSTANCE tables, you can get detailed metrics that include success/failure counts, composite instance performance, and durations of invokes as well. Here, we provide two main
queries to obtain performance metrics on BPEL processes and Mediator services, specifically the duration of time that each component took. Though Oracle typically does not recommend querying the product tables directly (since the structure of the tables may change after a patch or upgrade), note that these queries below run fine on Oracle SOA Suite 11g PS3 (11.1.1.4), PS4 (11.1.1.5), and PS5 (11.1.1.6).


The following query outputs a list of all BPEL component instances, their state,
average, minimum, and maximum durations, as well as counts:

SELECT DOMAIN_NAME PARTITION,COMPONENT_NAME,
DECODE(STATE,'1','RUNNING','5','COMPLETED','6',
'FAULTED','9','STALE') STATE,
TO_CHAR(AVG((TO_NUMBER(SUBSTR(TO_CHAR(MODIFY_DATECREATION_
DATE),12,2))*60*60) +
(TO_NUMBER(SUBSTR(TO_CHAR(MODIFY_DATE-CREATION_DATE),15,2))*60) +
TO_NUMBER(SUBSTR(TO_CHAR(MODIFY_DATECREATION_
DATE),18,4))),'999990.000') AVG,
TO_CHAR(MIN((TO_NUMBER(SUBSTR(TO_CHAR(MODIFY_DATECREATION_
DATE),12,2))*60*60) +
(TO_NUMBER(SUBSTR(TO_CHAR(MODIFY_DATE-CREATION_DATE),15,2))*60) +
TO_NUMBER(SUBSTR(TO_CHAR(MODIFY_DATECREATION_
DATE),18,4))),'999990.000') MIN,
TO_CHAR(MAX((TO_NUMBER(SUBSTR(TO_CHAR(MODIFY_DATECREATION_
DATE),12,2))*60*60) +
(TO_NUMBER(SUBSTR(TO_CHAR(MODIFY_DATE-CREATION_DATE),15,2))*60) +
TO_NUMBER(SUBSTR(TO_CHAR(MODIFY_DATECREATION_
DATE),18,4))),'999990.000') MAX,
COUNT(1) COUNT
FROM CUBE_INSTANCE
GROUP BY DOMAIN_NAME, COMPONENT_NAME, STATE
ORDER BY COMPONENT_NAME, STATE


The following query displays a list of all Mediator component instances, their state,
average, minimum, and maximum durations, as well as counts:

SELECT SUBSTR(COMPONENT_NAME, 1, INSTR(COMPONENT_NAME,'/')-1)
PARTITION,
SUBSTR(COMPONENT_NAME, INSTR(COMPONENT_NAME,'/')+1,
INSTR(COMPONENT_NAME,'!')-INSTR(COMPONENT_NAME,'/')-1) COMPONENT,
SOURCE_ACTION_NAME ACTION,
DECODE(COMPONENT_STATE,'0','COMPLETED','2',
'FAULTED','3','ABORTED','4','RECOVERY
NEEDED','8','RUNNING','16','STALE') STATE,
TO_CHAR(AVG((TO_NUMBER(SUBSTR(TO_CHAR(UPDATED_TIMECREATED_
TIME),12,2))*60*60) +
(TO_NUMBER(SUBSTR(TO_CHAR(UPDATED_TIME-CREATED_TIME),15,2))*60) +
TO_NUMBER(SUBSTR(TO_CHAR(UPDATED_TIMECREATED_
TIME),18,4))),'999990.000') AVG,
TO_CHAR(MIN((TO_NUMBER(SUBSTR(TO_CHAR(UPDATED_TIMECREATED_
TIME),12,2))*60*60) +
(TO_NUMBER(SUBSTR(TO_CHAR(UPDATED_TIME-CREATED_TIME),15,2))*60) +
TO_NUMBER(SUBSTR(TO_CHAR(UPDATED_TIMECREATED_
TIME),18,4))),'999990.000') MIN,
TO_CHAR(MAX((TO_NUMBER(SUBSTR(TO_CHAR(UPDATED_TIMECREATED_
TIME),12,2))*60*60) +
(TO_NUMBER(SUBSTR(TO_CHAR(UPDATED_TIME-CREATED_TIME),15,2))*60) +
TO_NUMBER(SUBSTR(TO_CHAR(UPDATED_TIMECREATED_
TIME),18,4))),'999990.000') MAX,
COUNT(1) COUNT
FROM MEDIATOR_INSTANCE
GROUP BY COMPONENT_NAME, SOURCE_ACTION_NAME, COMPONENT_STATE
ORDER BY COMPONENT_NAME, SOURCE_ACTION_NAME, COMPONENT_STATE

Friday, 30 November 2012

Migrating the Metadata from SOA 10g to 11g and sharing the common artifacts to MDS Repository.

Migrating the Metadata from SOA 10g to 11g and sharing the common artifacts to Repository:
If we use the Domain Value Maps (DVMs) or Cross References in Oracle BPEL Process Manager 10g or Oracle Enterprise Service Bus 10g project, the Xpath functions used to access the domain value maps or cross references will be upgraded automatically when the projects are upgraded in Oracle JDeveloper 11g.
However, a manual upgrade task has to be performed to upgrade the domain value maps and cross references that are saved in the Oracle Enterprise Service Bus repository. Also, if we use the common schemas or WSDLs in 10g project the same should be migrated to MDS repository; in 11g all the common artifacts will be stored in MDS repository.
There is a lot of information for the same topic but thought of sharing my experience.
Below are the steps for migrating the DVMs and XREFs to 11g and also to create the project that will have all the common artifacts like DVM, XREF, WSDL and SCHEMAs that can be stored to MDS repository.
Export the DVM and XREF metadata from 10g server: (Steps should be executed on 10 g server)
  1. Log on to your Oracle SOA Suite 10g server.
  2. cd $ORACLE_HOME/integration/esb/bin
  3. Set the environment - ./ esbsetenv.sh
  4. Run the export.sh script to export the entire ESB metadata - ./export.sh metadata10g.zip.
  5. Copy the metadata10g.zip file from $ORACLE_HOME\integration\esb\bin to the Oracle SOA 11g server.
Convert the ZIP file to an Oracle SOA Suite 11g archive file (Steps should be executed on 11g server) :
  1. Log on to your Oracle SOA 11g server
  2. Set your environment:
export DomainHome=<<Weblogic DomainHome>>
export OracleHome=<<OracleHome>>
cd $DomainHome/bin
. setDomainEnv.sh
  1. Execute the below comments to convert the 10g metadata to 11g format.
cd $OracleHome/bin
ant -f ant-sca-upgrade.xml upgrade-xrefdvm -Dsource=<<Path to metadata10g.zip>> -Dtarget= <<Target path>>
  1. Copy the archive sca_XrefDvmFiles10g_rev1.0.jar generated in target path to local machine.
Create the Metadata project:
  • Create a new Generic Application (e.g. MetaDataApp) in JDeveloper 11g.
  • Click “Next” and Give a Project Name e.g. Metadata.
  • From the Oracle JDeveloper 11g “File” menu, select “Import”, then “SOA Archive into SOA Project”. In the Import Composite Archive Dialog Box, click Browse and locate the sca_XrefDvmFiles10g_rev1.0.jar file that you created previously.
  • Make sure that the Project Name and Composite Name in the Create SOA Project from SOA Archive dialog box and Import Composite Archive Dialog Box have the same name.
  • Click Finish to create the new SOA project. The new project consists of an empty composite, along with the upgraded Xref and DVM files.
  • Crete new folders with the name Xref, dvm, faultpolicy, schemas and WSDL under SOAContent of the project folder based on the different type of artifacts needs to be stored in MDS.


  • Group the dvm’s to dvm folder and the xref’s to Xref folder. By default all content is grouped in the project folder in the file system.


  • Copy the common schemas from 10g to the schemas folder of Metadata project.


  • Copy the common WSDL’s from 10g to the WSDL folder of Metadata project.


  • Copy the fault Policy and fault binding files to faultpolices folder of MeatDataProject.

  • Remove the folders those are not required like xsl, xsd, classes and testsuites from the Metadata project.


Now the metadata application is ready with all the common artifacts, create a metadata archive file and deploy the project to the server, the metadata can be referred in the Composite with the help of oramds protocol.

Oracle SOA Suite 11g – Creating Resource Adapter Connection factories through WLST for Database Adapter,MQ Adapter and FTP Adapter

Creating Resource Adapter Connection factories through WLST for Database Adapter,MQ Adapter and FTP Adapter
WLST script can be use to create the Resource Adapter connection factories (DB, FTP and MQ) and set the different configuration parameters in weblogic server.
Here we will use the property file to configure the connection factories details, the WLST script will create the connection factories in the server based on the property file.
Just edit the ResourceAdapter.properties file with the connection factories details.
Set the global.resource.deployment.plan.path property with the where the generated deploymentPlan files needs to be stored.
ResourceAdapter.properties
domain.AdminIP=xxxxxxxx
domain.AdminPort=xxxx
domain.AdminPasswd=xxxxxxxxxx
global.resource.deployment.plan.path= /config/deployplan
domain.resource.ftpHost = 10.10.10.10
domain.resource.ftpUserName=
domain.resource.ftpPassword=
domain.resource.mqQueueManager=TCRMGEN1
domain.resource.mqHost=LOCALHOST
domain.resource.mqport=2022
domain.resource.mqChannel=L_CRM_FUSION_CLNT_N2
The below WLST code snippet will create the required connection factories in the server.
Set the DB data source Connection Factory JNDI Name and the data source name as per the requirement. In this sample we are creating two connection factories. Change the method createDBConnectionFactory to create more Database Adapter connection factories.
Change the method createFTPConnectionFactory to create more FTP Adapter connection factories.
Change the method createMQConnectionFactory to create more FTP Adapter Connection factories.
ResourceAdapterCreation.py
from java.io import FileInputStream
TargetServerName='AdminServer'
#Connect
#The directory of the SOA binaries
soaHome=os.environ["SOAHOME"]
print "SOAHOME="+soaHome
appPathDB=soaHome+'/soa/connectors/DbAdapter.rar'
appNameDB='DbAdapter'
moduleOverrideNameDB=appNameDB+'.rar'
appPathFTP=soaHome+'/soa/connectors/FtpAdapter.rar'
appNameFTP='FtpAdapter'
moduleOverrideNameFTP=appNameFTP+'.rar'
appPathMQ=soaHome+'/soa/connectors/MQSeriesAdapter.rar'
appNameMQ='MQSeriesAdapter'
moduleOverrideNameMQ=appNameMQ+'.rar'
moduleDescriptorName='META-INF/weblogic-ra.xml'
ConnFactory1JNDIName = 'eis/DB/OM'
ConnFactory1DataSourceName = 'eai/ds/EAIReference'
ConnFactory2JNDIName = 'eis/DB/XRef'
ConnFactory2DataSourceName = 'eai/ds/EAIXRef'
transactionSupport='LocalTransaction'
ftpJNDIName='eis/Ftp/ProductRefXML'
mqJNDIName='eis/MQ/MQSeriesAdapterRemoteCRMtoEAI'
domainName='SOADomain'
def createDBConnectionFactory():
propInputStream = FileInputStream("ResourceAdapter.properties")
configProps1 = Properties()
configProps1.load(propInputStream) planPathDB=configProps1.get('global.resource.deployment.plan.path')+'/'+domainName+'_PlanDB.xml'
edit()
startEdit()
myPlanDB=loadApplication(appPathDB, planPathDB)
makeDeploymentPlanVariable(myPlanDB, 'ConnectionInstance_eis/DB/OM_JNDIName_13102979357209', ConnFactory1JNDIName , '/weblogic-connector/outbound-resource-adapter/connection-definition-group/[connection-factory-interface="javax.resource.cci.ConnectionFactory"]/connection-instance/[jndi-name="'+ConnFactory1JNDIName+'"]/jndi-name',moduleOverrideNameDB)
makeDeploymentPlanVariable(myPlanDB, 'ConfigProperty_dataSourceName_Value_13102979357210', ConnFactory1DataSourceName,'/weblogic-connector/outbound-resource-adapter/connection-definition-group/[connection-factory-interface="javax.resource.cci.ConnectionFactory"]/connection-instance/[jndi-name="'+ConnFactory1JNDIName+'"]/connection-properties/properties/property/[name="xADataSourceName"]/value',moduleOverrideNameDB)
makeDeploymentPlanVariable(myPlanDB, 'ConnectionInstance_eis/DB/XRef_JNDIName_13102979357211', ConnFactory2JNDIName , '/weblogic-connector/outbound-resource-adapter/connection-definition-group/[connection-factory-interface="javax.resource.cci.ConnectionFactory"]/connection-instance/[jndi-name="'+ConnFactory2JNDIName+'"]/jndi-name',moduleOverrideNameDB)
makeDeploymentPlanVariable(myPlanDB, 'ConfigProperty_dataSourceName_Value_13102979357213', ConnFactory2DataSourceName,'/weblogic-connector/outbound-resource-adapter/connection-definition-group/[connection-factory-interface="javax.resource.cci.ConnectionFactory"]/connection-instance/[jndi-name="'+ConnFactory2JNDIName+'"]/connection-properties/properties/property/[name="xADataSourceName"]/value',moduleOverrideNameDB)
makeDeploymentPlanVariable(myPlanDB, 'ConnectionDefinitionProperties_TransactionSupport_13123107532320', transactionSupport,'/weblogic-connector/outbound-resource-adapter/connection-definition-group/[connection-factory-interface="javax.resource.cci.ConnectionFactory"]/connection-instance/[jndi-name="'+ConnFactory1JNDIName+'"]/connection-properties/transaction-support',moduleOverrideNameDB)
makeDeploymentPlanVariable(myPlanDB, 'ConnectionDefinitionProperties_TransactionSupport_13123107532320', transactionSupport,'/weblogic-connector/outbound-resource-adapter/connection-definition-group/[connection-factory-interface="javax.resource.cci.ConnectionFactory"]/connection-instance/[jndi-name="'+ConnFactory2JNDIName+'"]/connection-properties/transaction-support',moduleOverrideNameDB)
myPlanDB.save();
save();
cd('/AppDeployments/DbAdapter/Targets');
updateApplication(appNameDB, planPathDB);
startApplication(appNameDB)
#redeploy(appNameDB, planPathDB,targets=cmo.getTargets());
activate(block='true');
def createFTPConnectionFactory():
propInputStream = FileInputStream("ResourceAdapter.properties")
configProps1 = Properties()
configProps1.load(propInputStream)
planPathFTP=configProps1.get('global.resource.deployment.plan.path')+'/'+domainName+'_PlanFTP.xml'
ftpHost=configProps1.get('domain.resource.ftpHost')
ftpUserName=configProps1.get('domain.resource.ftpUserName')
ftpPassword=configProps1.get('domain.resource.ftpPassword')
edit()
startEdit()
myPlanFTP=loadApplication(appPathFTP, planPathFTP)
makeDeploymentPlanVariable(myPlanFTP, 'ConnectionInstance_eis/Ftp/FtpPRD_JNDIName', ftpJNDIName, '/weblogic-connector/outbound-resource-adapter/connection-definition-group/[connection-factory-interface="javax.resource.cci.ConnectionFactory"]/connection-instance/[jndi-name="'+ftpJNDIName+'"]/jndi-name',moduleOverrideNameFTP)
makeDeploymentPlanVariable(myPlanFTP, 'ConfigProperty_useSftp_Value_FtpPRD', 'true', '/weblogic-connector/outbound-resource-adapter/connection-definition-group/[connection-factory-interface="javax.resource.cci.ConnectionFactory"]/connection-instance/[jndi-name="'+ftpJNDIName+'"]/connection-properties/properties/property/[name="useSftp"]/value',moduleOverrideNameFTP)
makeDeploymentPlanVariable(myPlanFTP, 'ConfigProperty_host_Value_FtpPRD', ftpHost, '/weblogic-connector/outbound-resource-adapter/connection-definition-group/[connection-factory-interface="javax.resource.cci.ConnectionFactory"]/connection-instance/[jndi-name="'+ftpJNDIName+'"]/connection-properties/properties/property/[name="host"]/value',moduleOverrideNameFTP)
makeDeploymentPlanVariable(myPlanFTP, 'ConfigProperty_password_Value_FtpPRD', ftpUserName, '/weblogic-connector/outbound-resource-adapter/connection-definition-group/[connection-factory-interface="javax.resource.cci.ConnectionFactory"]/connection-instance/[jndi-name="'+ftpJNDIName+'"]/connection-properties/properties/property/[name="username"]/value',moduleOverrideNameFTP)
makeDeploymentPlanVariable(myPlanFTP, 'ConfigProperty_password_Value_FtpPRD', ftpPassword, '/weblogic-connector/outbound-resource-adapter/connection-definition-group/[connection-factory-interface="javax.resource.cci.ConnectionFactory"]/connection-instance/[jndi-name="'+ftpJNDIName+'"]/connection-properties/properties/property/[name="password"]/value',moduleOverrideNameFTP)
myPlanFTP.save();
save();
cd('/AppDeployments/FtpAdapter/Targets');
updateApplication(appNameFTP, planPathFTP);
startApplication(appNameFTP)
#redeploy(appNameFTP, planPathFTP,targets=cmo.getTargets());
activate(block='true');
def createMQConnectionFactory():
propInputStream = FileInputStream("ResourceAdapter.properties")
configProps1 = Properties()
configProps1.load(propInputStream)
planPathMQ=configProps1.get('global.resource.deployment.plan.path')+'/'+domainName+'_PlanMQ.xml'
mqQueueManager=configProps1.get('domain.resource.mqQueueManager')
mqHostName=configProps1.get('domain.resource.mqHost')
MqPort=configProps1.get('domain.resource.mqport')
mqChannelName=configProps1.get('domain.resource.mqChannel')
edit()
startEdit()
myPlanMQ=loadApplication(appPathMQ, planPathMQ)
makeDeploymentPlanVariable(myPlanMQ, 'ConnectionInstance_eis_MQ_MQSeriesAdapterRemoteCRMtoEAI_JNDIName', mqJNDIName, '/weblogic-connector/outbound-resource-adapter/connection-definition-group/[connection-factory-interface="javax.resource.cci.ConnectionFactory"]/connection-instance/[jndi-name="'+mqJNDIName+'"]/jndi-name',moduleOverrideNameMQ)
makeDeploymentPlanVariable(myPlanMQ, 'ConfigProperty_host_Value_mqQueueManagerPRD', mqQueueManager, '/weblogic-connector/outbound-resource-adapter/connection-definition-group/[connection-factory-interface="javax.resource.cci.ConnectionFactory"]/connection-instance/[jndi-name="'+mqJNDIName+'"]/connection-properties/properties/property/[name="queueManagerName"]/value',moduleOverrideNameMQ)
makeDeploymentPlanVariable(myPlanMQ, 'ConfigProperty_password_Value_mqHostNamePRD', mqHostName, '/weblogic-connector/outbound-resource-adapter/connection-definition-group/[connection-factory-interface="javax.resource.cci.ConnectionFactory"]/connection-instance/[jndi-name="'+mqJNDIName+'"]/connection-properties/properties/property/[name="hostName"]/value',moduleOverrideNameMQ)
makeDeploymentPlanVariable(myPlanMQ, 'ConfigProperty_password_Value_MqPortPRD', MqPort, '/weblogic-connector/outbound-resource-adapter/connection-definition-group/[connection-factory-interface="javax.resource.cci.ConnectionFactory"]/connection-instance/[jndi-name="'+mqJNDIName+'"]/connection-properties/properties/property/[name="portNumber"]/value',moduleOverrideNameMQ)
makeDeploymentPlanVariable(myPlanMQ, 'ConfigProperty_password_Value_mqChannelNamePRD', mqChannelName, '/weblogic-connector/outbound-resource-adapter/connection-definition-group/[connection-factory-interface="javax.resource.cci.ConnectionFactory"]/connection-instance/[jndi-name="'+mqJNDIName+'"]/connection-properties/properties/property/[name="channelName"]/value',moduleOverrideNameMQ)
myPlanMQ.save();
save();
cd('/AppDeployments/MQSeriesAdapter/Targets');
updateApplication(appNameMQ, planPathMQ);
startApplication(appNameMQ)
#redeploy(appNameFTP, planPathMQ,targets=cmo.getTargets());
activate(block='true');
def makeDeploymentPlanVariable(wlstPlan, name, value, xpath,overrideName, origin='planbased'):
wlstPlan.destroyVariable(name)
wlstPlan.destroyVariableAssignment(name, overrideName, moduleDescriptorName)
variableAssignment = wlstPlan.createVariableAssignment(name, overrideName, moduleDescriptorName)
variableAssignment.setXpath(xpath)
variableAssignment.setOrigin(origin)
wlstPlan.createVariable(name, value)
print 'moduleDescriptorName=',moduleDescriptorName
def main():
propInputStream1 = FileInputStream("ResourceAdapter.properties")
domainProps = util.Properties()
domainProps.load(propInputStream1)
adminURL='t3://'+domainProps.get('domain.AdminIP')+':'+domainProps.get('domain.AdminPort')
adminUserName='weblogic'
adminPassword=domainProps.get("domain.AdminPasswd")
connect(adminUserName, adminPassword, adminURL)
createDBConnectionFactory()
createFTPConnectionFactory()
createMQConnectionFactory()
disconnect()
main()
Set the environment variable “SOAHOME” in the server and execute the WLST script that will create the required Resource Adapter connection factories. Also this will create the deploymentPlan files to the location specified. The generated plan file can be used to modify the configuration of connection factories also to move the connection factories from one server to another server.
>$ORACLE_HOME/common/bin/wlst.sh ResourceAdapterCreation.py

SOA 11g AQ Adapters

SOA 11g AQ Adapters


Oracle Streams Advanced Queuing (AQ) provides a flexible mechanism for bidirectional, asynchronous communication between participating applications. Advanced queues are an Oracle database feature, and are therefore scalable and reliable. Other features of Oracle database, such as backup and recovery (including any-point-in-time recovery), logging, transactional services, and system management, are also inherited by advanced queues. Multiple queues can also service a single application, partitioning messages in a variety of ways and providing another level of scalability through load balancing.


Login to database as sys create user aq_user, then login as aq_user and create the necessary table Queues
CONNECT sys/change_on_install as sysdba

DROP USER aq_user CASCADE;

CREATE USER aq_user IDENTIFIED BY aq_user
  DEFAULT TABLESPACE users
  TEMPORARY TABLESPACE temp;

ALTER USER aq_user QUOTA UNLIMITED ON users;

GRANT aq_administrator_role TO aq_user;
GRANT connect               TO aq_user;
GRANT create type           TO aq_user;
GRANT create sequence       TO aq_user;

EXECUTE dbms_aqadm.grant_type_access('aq_user');

-- Login as AQ_User
CONNECT aq_user/aq_user

CREATE TYPE message_type AS OBJECT (
    message_id     NUMBER(15)
  , subject        VARCHAR2(100)
  , text           VARCHAR2(100)
  , dollar_value   NUMBER(4,2)
)
/
BEGIN

   -- ----------------------------------------------------

    DBMS_AQADM.CREATE_QUEUE_TABLE (
        queue_table         => 'aq_user.msg_qt'
      , queue_payload_type  => 'aq_user.message_type'
    );

    -- ----------------------------------------------------

    DBMS_AQADM.CREATE_QUEUE (
        queue_name          => 'msg_queue'
      , queue_table         => 'aq_user.msg_qt'
      , queue_type          => DBMS_AQADM.NORMAL_QUEUE
      , max_retries         => 0
      , retry_delay         => 0
      , retention_time      => 1209600
      , dependency_tracking => FALSE
      , comment             => 'Test Object Type Queue'
      , auto_commit         => FALSE
    );

    -- ----------------------------------------------------

    DBMS_AQADM.START_QUEUE('msg_queue');

    -- ----------------------------------------------------

END;
/
--To Stop and Drop the Queue
CONNECT aq_user/aq_user

EXECUTE dbms_aqadm.stop_queue(queue_name => 'aq_user.msg_queue');
EXECUTE dbms_aqadm.drop_queue(queue_name => 'aq_user.msg_queue');
EXECUTE
dbms_aqadm.drop_queue_table(queue_table => 'aq_user.msg_qt');

DROP TYPE aq_user.message_type;

Weblogic configuring aq adapter

Login to weblogic server console .

Create JDBC Datasource localhost-aq whose JNDI name is jndi/localhost-aq

Under Deployments select AQAdapter , Configurations Tab and Outbound Connection , Create a new Outbound Connection eis/aq/localhost-aq whose XADataSourceName is jndi/localhost-aq

Below are Datasource details to aq_user user in database

This will be deployed on Admin Server , as my SOA installation is running on Admin server

Save

Update the AQAdapter Deployment , Update the plan , no restart needed.

SOA 11g BPEL process using enqueue  

Lets create a simple BPEL process my-aq-app , Under External Reference Insert AQ Adapter

Edit the BPEL Process use Invoke activity to connect to AQ Adapter

This is how the BPEL would look like

Add assign before invoke to wire input variables to AQ input variables.

These are Details of AQ Adapter

Create a DB Connection by name localhost-aq

Note JNDI name should match to the one that we configured in the Weblogic Console

Select Enqueue operation

Select the DB Schema as AQ_USER , click on Browse button and select MSG_QUEUE as Queue Name

Leave Correlation Id as blank

Select Object Payload as Whole MESSAGE_TYPE

Save, Deploy and Test , You can see the Data being Written to Queue Table under AQ_USER.

SOA 11g bpel process using dequeue

Lets create one more simple BPEL process that reads from the Message Queue using Dequeue Operation of AQ Adapter. the moment message is written to DB this Process picks the message and writes into file system using File Adapter at /tmp folder

The BPEL process is Mediator Driven one that has Dequeue inserted into Exposed Services side of composite.

Details of Dequeue configuration , Connect to DB

Select Dequeue operation

Select AQ_USER as schema and MSG_QUEUE as Queue name using Browse Operation

Select MESSAGE_TYPE

Edit the Mediator that connects the Dequeue and File Adapter, create new tranformation

Assign variables in the XML transformation

Save, Deploy the Process and Test , the new message should be written into File system under /tmp folder with the filename given during Adapter configuration

TESTING PROCESS END TO END

Use BPEL process 1 to write data in DB

Once the process is executed data is written into MSQ_QUEUE table under USER_DATA column

The 2nd BPEL Process Dequeues this message and through Mediator and File adapter writes into a File under /tmp folder

Tuesday, 27 November 2012

Oracle SOA 11g Tips And Tricks

Thought of documenting few useful advance tips to help others to save time and also for my own reference.
Question : I have deployed the composite to the EM console and upon invocation my changes are not getting reflected. How do I know the files I modified are deployed to em console are correct.
Answer : Here is how you access composite.xml /.bpel and .xsl files from your browser to ensure that the deployment is having correct files.
http://hostname:managedserverportnumber/soa-infra/services/partitionname/compositename/composite.xml
http://hostname:managedserverportnumber/soa-infra/services/partitionname/compositename/bpelfilename.bpel
http://hostname:managedserverportnumber/soa-infra/services/partitionname/compositename/xsl/xslfilename.xsl
This also comes in handy when you have configuration plan attached to the composite at the time of the deployment which over-rides composite.xml
Question : How to update the DVM values from browser?
Answer : Access http://hostname:managedserverportnumber/soa/composer
Login using the authentication details and then Click open –> open dvm from the tab and it will list all DVMs part of the MDS. You can click on individual DVM and add or update the values.
Question : How to use Database Based MDS in SOA 11g based application?
Answer : Please refer to the article http://www.orafmwschool.com/ant-scripts-for-database-based-mds/ this article describes how to use ant scripts for deploying the MDS Artifacts to the DB Based MDS.
Question : How to clear MDS Cache?
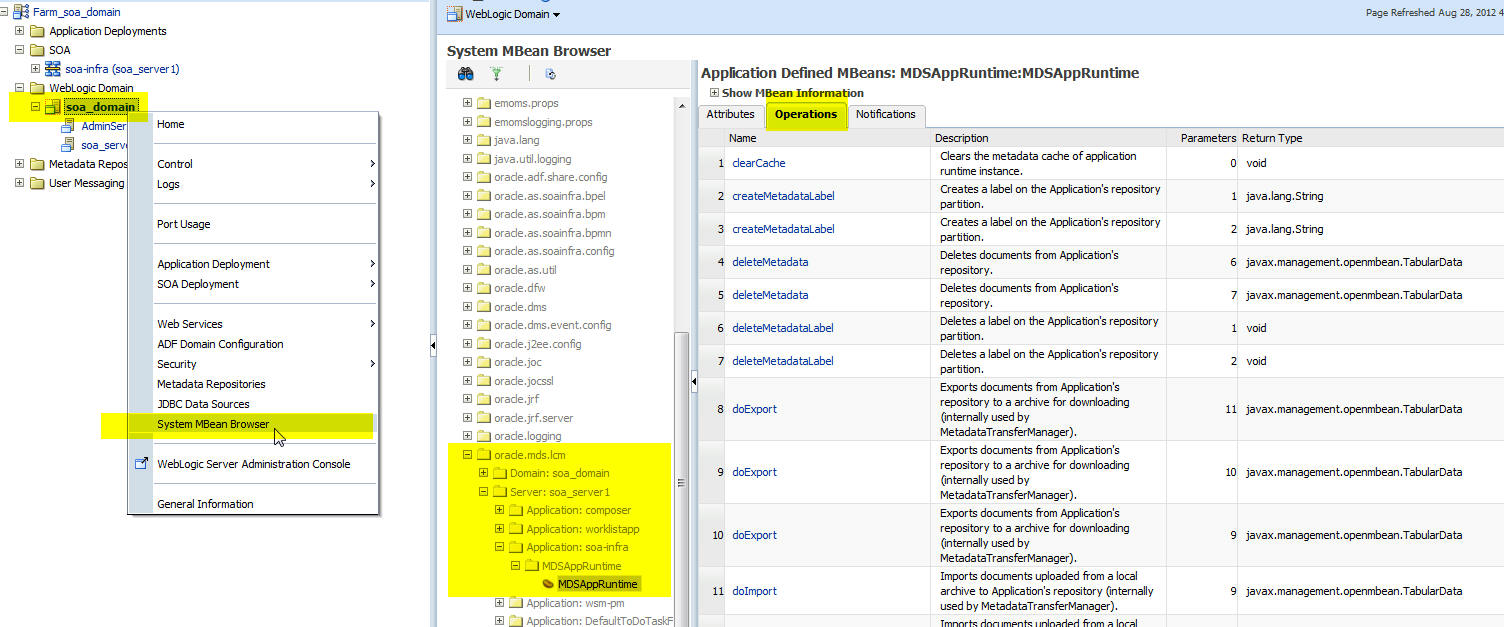
Answer : Please login to the em console and then follow the screen shot below to reach clearCache link. Click on clear cache and then click invoke it will clear the MDS Cache.
Please click on the image below to view the full screen.
Clear MDS Cache

Clear MDS Cache
Question : How take export of the MDS Artifcats from EM Console?
Answer : Please login to the EM console and follow the steps in the screen shot.
Please click on the image below to view the full screen.
Export MDS
Export MDS
Question : How do I deploy / undeploy composite using ant scripts?
Answer : You will find all the ant scripts responsible for carrying out various task for deployment / undeployment and unit testing of composites under $SOA_HOME/bin directory.
example /Middleware/Oracle_SOA1/bin. Please go thru these files and write your own wrapper to invoke tasks part of these ant scripts to have your own deployment scripts.
Question : I am unable to Install Oracle XE 11g and getting following error OracleServiceXE found on system. How do I overcome this?
Answer : Go to command prompt and type following
sc delete OracleServiceXE
Even if you are logged in as an administrator or user with administrative privileges  it is recommended to go to Accessories –> command prompt –>right click–>Run As Administrator.
This will remove the service and you can proceed with installation.
For more details please refer to the blog here
Question : Where can I find information on SOA 11g Performance Tuning?

Here is a link of very nice blog that I found very informative.
http://blog.ipnweb.com/2011/04/performance-tuning-oracle-soa-suite-11g.html

Oracle SOA 11g Installation Pitfalls

In my earlier post I have recommended using install instructions which are part of the Quick Install Guide available at http://www.oracle.com/technetwork/middleware/soasuite/overview/quickstartguidesoasuite11gr1ps4-459545.pdf
However after trying installation myself on a new PC I realized that there are few issues that we encounter and we need to take few corrective actions which are not mentioned in this guide and these are applicable only when you are using Oracle XE as a database. I am writing this post to help newbees avoid the issues and have a smooth installation.
Page no 12 of the Quick Install Guide has an important note and asks us to set an environment variable as follows.
set RCU_JDBC_TRIM_BLOCKS=TRUE
echo %RCU_JDBC_TRIM_BLOCKS%
Initially when I tried installation the SOA server failed at startup ( Please refer to the link https://forums.oracle.com/forums/thread.jspa?threadID=2292686 ) after following various instrcutions I concluded that we need to perform following steps.
Before using RCU Utility
Go to the command prompt
c:\>sqlplus [XE Username/ Password] @ XE as sysdba
for example in my case it was
c:>sqlplus sys/welcome1@XE as sysdba
SQL> show parameter session
SQL> show parameter processes
SQL> alter system reset sessions scope=spfile sid=’*';
SQL> alter system set processes=500 scope=spfile;
SQL>grant execute on dbms_lob to public;
SQL> shutdown immediate
SQL> startup
SQL> show parameter session
SQL> show parameter processes
(In my case after shutting the DB down it did not come up by giving the command mentioned above so I have to explicity re-start the database).
GO to command prompt and then to the  directory where RCU is extracted.
set RCU_JDBC_TRIM_BLOCKS environment variable.
set RCU_JDBC_TRIM_BLOCKS=TRUE
echo %RCU_JDBC_TRIM_BLOCKS% this should return TRUE.
Now login to the XE databse ( http://127.0.0.1:8080/apex ) use SYS or SYSDBA or any user with administrative previleges.
Execute following query.
grant execute on dbms_lob to public
This sql statement is what I think made the difference as just setting the environment variables mentioned above (set RCU_JDBC_TRIM_BLOCKS=TRUE) did not help.
I would suggest re-starting the XE database again and continue with using RCU for creating MDS and soa-infra schema etc.
I found following links useful.
http://www.javamonamour.org/2011/01/package-body-devmdsmdsinternalshredded.html
http://www.yonaweb.be/start_webcenter_domain
I have written this post to provide all that it takes to fix this issue and hope this helps in preventing the conflict which we are predicting will prevent the soa server to get started after installation.

How To Learn Oracle SOA Suite 11g

After spending around 30 months and almost as many attempts to get hold of Oracle Fusion Middleware 11g I think now I know how not to learn this technology stack and hence writing this post to help beginners and stragglers like myself to learn more in less time.There is documentation overdose when it comes to SOA 11g that causes a humble and earnest beginner to get drowned in the vast sea of information freely available.
Prerequisites :
  • Through understanding of XML / XML Schema ( XSD ) / XSL / XML namespaces.
  • Web Services ( wsdl structure ) / SOAP messages.
  •  Java Database Connectivity ( JDBC ) / Java Messaging Service ( JMS ) / Java Connection Architecture ( nice to have ).
  • Familiarity with JavaEE Application Server ( preferably Weblogic)
  • Familiarity with Apache Ant scripting ( Python is nice to have as Weblogic Scripting Technology WLST is based on Python).
  • A Laptop or PC with around 3 GB RAM preferred configuration is 64 it OS with 4GB + RAM.
Please don’t attempt learning SOA 11g if you don’t know enough of XML and related technologies mentioned in the very first point above. Once you have acquired prerequisite skills then follow the steps mentioned below.
Steps : 
  1. Install latest version of JDeveloper and other relevant software. Please refer to the link for downloading software and documentation.http://www.oracle.com/technetwork/middleware/fusion-middleware/overview/index.html.
  2. If you are doing this for the first time then you will need installation instructions. Oracle has published updated installation instructions which are available at following url http://www.oracle.com/technetwork/middleware/soasuite/overview/quickstartguidesoasuite11gr1ps4-459545.pdf (11.1.1.5.0 )
  3. Each installation of JDeveloper comes with bunch of very useful documentation which are often ignored and a lot of time is wasted in searching for the information on the web when it is already available just a click away in your own JDeveloper.
  4. To access this documentation Open JDeveloper –> Help –> Table Of Contents –> Developing SOA Applications. You will find Developer’s Guide to Oracle SOA Suite; this guide belongs to the version of JDeveloper that you have installed.
  5. There is a book tailor made for beginners Getting Started with Oracle SOA Suite 11g R1 – A Hands-On Tutorial by  Heidi Buelow,Manas Deb,Jayaram Kasi,Demed L’Her,Prasen Palvankar printed by PACKT publishing ( ISBN 978-1-847199-78-2). You should be able to download the free source code from the book website www.packtpub.com. This book is having screen shots for earlier version of SOA suite so don’t get confused but the content is still relevant.
  6. There are plethora of blogs / tutorials dedicated to teach SOA Suite 11g but the trick is to only concentrate on relevant topics to pick up the jargon and technology fast and not to get distracted with information overdose. If you want to still explore then go to the link http://www.orafmwschool.com/  which has lot of short tutorials and whole lot of other information to get you going.
  7. Here is the index page for Getting Started for Oracle Fusion Middleware Technology stack which will help in getting started with the stack of your choice http://download.oracle.com/docs/cd/E21764_01/getstarted.htm
  8. Good blog by Oracle recommending the approach to learn SOA 11g available here https://blogs.oracle.com/SOA/entry/how_to_get_trained_on
  9. If you are one of those who prefer to learn by samples rather than going thru the books or documentation then http://java.net/projects/oraclesoasuite11g/pages/Home
  10. Once you are comfortable with the basics then have a deep dive and explore Oracle Fusion Order Demo provided by Oracle.Here is a very good blog by Antony Reynolds to download / install and run Fusion Order Demo for PS5. Here is the link for detailed documentation http://docs.oracle.com/cd/E12839_01/integration.1111/e10223/index.htm
  11. Here is collection of very good articles by Oracle on SOA in general http://www.oracle.com/technetwork/topics/soa/whatsnew/index.html
As this is a post to help beginners save on time and effort hence providing lot of document links in this blog will defeat the whole purpose of writing this. It will take at least 120 hours to finish reading the Developer’s guide and around 100 hours to finish the book that I have recommended with all the examples and I am sure by that time you would get familiar with the tools and jargon. And by that time I want to come up with another post that will try to explain a bit of theory and rationale behind all this. I sincerely hope this helps you.

xslt padding with characters call template for left pad and right pad

  Could a call-template be written that took two parameters ?   a string, and a   number) return the string with empty spaces appended t...